Saturday, January 30, 2010

Tomato Sauce with Onion and Butter

When I first took a bite of this, we'll call it "spaghetti", I wasn't entirely convinced that I would like it. It was certainly different, to say the least. But, after eating (and totally enjoying) my serving, watching my kids eat theirs, and hearing them beg for seconds, I knew this one was going to be one of our new favorites. After dinner was over, I found myself craving more and I literally could not wait until lunchtime the next day to devour the left-overs. I don't know if it was the San Marzano tomatoes or the simplicity of the ingredients that made this so delicious, but I do know that I will definitely be making it again and again.

Pictures courtesy of Smitten Kitchen
Tomato Sauce with Onion and Butter
From Smitten Kitchen

Serves 4 as a main course; makes enough sauce to lightly coat most of a pound of spaghetti

28 ounces whole peeled tomatoes from a can (San Marzano, if you can find them)*
5 tablespoons butter
1 medium-sized yellow onion, peeled and halved
Salt to taste

Put the tomatoes, onion and butter in a heavy saucepan (it fit just right in a 3-quart) over medium heat. Bring the sauce to a simmer then lower the heat to keep the sauce at a slow, steady simmer for about 45 minutes, or until droplets of fat float free of the tomatoes. Stir occasionally, crushing the tomatoes against the side of the pot with a wooden spoon. Remove from heat, discard the onion, add salt to taste and keep warm while you prepare your pasta. I actually mashed the tomatoes, in the saucepan, with a potato masher.

Serve with spaghetti, with or without grated parmesan cheese to pass.

*I found these at Market Street grocery store. You can also purchase at Whole Foods, or any store that caters to a specialty market. If you can't find them, use whatever brand you prefer, and I'm sure it will still turn out delicious!

Friday, January 29, 2010

Wordless Friday?


All right already, so it's not Wednesday and it's not quite wordless, but I just couldn't let another day go by without sharing this photo with you. Some time ago, I posted a recipe for cinnamon rolls. Well, I recently made another batch and they came out so dang pretty, I just had to take some more photos. This one stimulates such a Pavlovian response in me, it's all I can do not to run down the stairs this instant to bake up a batch. I'm sorry if you now feel compelled to make these rolls... it was all just a part of my master plan (insert evil cackle).

I hope you have a wonderful, tasty weekend!

Edna Mae's Sour Cream Pancakes

Would you like a bite of the most delicious pancakes you've ever eaten? That was the question I asked my husband this morning after making and trying these. While this blog has no shortage of pancake recipes...this one certainly hits the spot- easy to make, ingredients that you will have on hand, and so perfectly delicious that you'll be wanting to double the recipe for next time. Originally a recipe from Pioneer Woman, this also got the stamp of approval from the ever-popular Smitten Kitchen and if thats not enough for you, then I don't know what is. Just found it here too! One piece of advice: don't skimp on the butter...you better lay some down on your griddle before you try to cook these, its worth it.
picture courtesy of Smitten Kitchen

Edna Mae's Sour Cream Pancakes

Pioneer Woman Cooks

7 tablespoons all purpose flour
1 tablespoon sugar
1 teaspoon baking soda
1/ 2 teaspoon salt
1 cup sour cream
2 large eggs
1/2 teaspoon vanilla extract
Butter
Maple syrup (see here for a great homemade recipe)
Blueberries (optional- see below)

Heat a cast iron skillet or griddle over medium-low heat; you want it to slowly get nice and hot.

Stir the flour, sugar, baking soda and salt together in the bottom of a medium bowl. Dump the sour cream in on top and stir it together very gently; it’s okay to leave the texture a bit uneven. Whisk the eggs and vanilla in a separate bowl and stir them into the sour cream mixture, once again, being careful not to overmix.

Melt about a tablespoon of butter in your skillet or griddle and pour the batter in, a scant 1/4 cup at a time. Cook for about 2 minutes on the first side, or until bubbles appear all over the surface , flipping them carefully and cooking for about a minute on the other side. Repeat with remaining batter. I put frozen blueberries on some of the pancakes before I flipped them and it was nothing short of a-mazing. If you try that, let the pancakes cook for a while longer to make sure they are entirely cooked through.

Serve in a stack, topped with a pat of butter and a cascade of maple syrup.

Thursday, January 28, 2010

Poppy Seed Vinaigrette

I have been bad; very, very bad. On Tuesday, I started a unit on plate tectonics with my earth science students. To introduce this unit, I always like to model the interior structure of the earth... with peanut M&Ms. Now, remember, I'd been out of the classroom for three years before getting back to it this fall. I couldn't remember how many bags I would need for three classes, so - to be on the safe side - I got extra. There's nothing worse than running out of materials in middle of the day, right? Well, maybe one thing worse: having so many peanut M&Ms left over that in two days, you gain three pounds. I really wish I was kidding.

So, what have I been eating for dinner in a lame attempt to stem the flow of calories? Salad. Lots and lots of salad. This is another new dressing to me. I got the original recipe after being served a wonderful salad at Christmas eve dinner. It was (try and follow this!) my husband's brother's wife's mom's recipe. (Yeah, so I could've said it came from my sister-in-law's mother... but where's the fun in that?).

This is a wonderful dressing; I was enamoured with it from my very first bite. Of course, when I got the recipe, I quickly realized why. There was half a cup of sugar for 1 cup of liquid! Phew! No wonder I liked it so well. Fortunately, when I made it at home the first time, I cut the sugar in half and still thought the dressing was divine. The other thing I like so much about this dressing is the color! I'm not normally a big fan of pink, but it's a great shade on a dressing. Gorgeous! For the best flavor, be sure you use a good quality, fresh bottle of red wine vinegar. A bottle that's been around for a while can have an unappealing sour taste and that's no fun.

Poppy Seed Vinaigrette
Yield: approx. 1 cup of dressing

1/4 cup sugar
1/3 cup red wine vinegar
2 TBS fresh lemon juice
1/4 tsp salt
2 TBS chopped onion
2/3 cup vegetable oil
2 tsp poppy seeds

In a blender or mini-prep processor, process the sugar, vinegar, lemon juice, salt, and onion together until well blended. Add the oil and process for 5-10 seconds. Stir in the poppy seeds. Keeps refrigerated in an air-tight for one week.

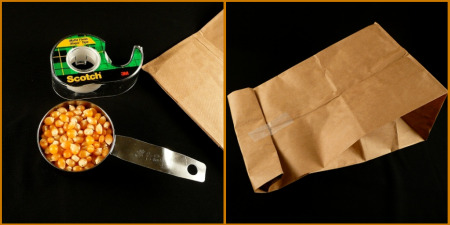
Easy Homemade Microwave Popcorn

I love it! I love it! I love it!

Easy Homemade Microwave Popcorn

From Makes and Takes Blog


Homemade Microwave Popcorn
It’s as easy as 1, 2, 3:
  1. Put 1/4 cup popcorn in a brown paper bag. Fold top over a few times and tape it.
  2. Place in microwave folded side upfor 2 to 3 minutes or until there is 5 seconds between pops.
  3. Eat plain or add flavors (such as salt, butter, sugar, etc.)
Easy Homemade Microwave Popcorn
With this system of microwave popping, you can:
  • control the amount of salt and butter
  • reuse the paper bag again and again
  • save money from buying the corn kernels, which yields a lot more popcorn
  • pop popcorn fast, without getting out the heavy machinery

Wednesday, January 27, 2010

Chicken Parmesan Pizza


While this was not the most elegant recipe ever made, it was good and it was mess-free, and it was quick.  A.K.A. a perfect last-minute meal.

Chicken Parmesan Pizza
From Southern Living magazine


Yield: Makes 4 servings

Ingredients

  • 1  (10-oz.) package frozen garlic bread loaf
  • 1/2  cup  canned pizza sauce
  • 6  deli fried chicken strips
  • 1  cup  (4 oz.) shredded Italian three-cheese blend
  • 2  tablespoons  chopped fresh basil

Preparation

1. Preheat oven to 400°. Arrange garlic bread, buttered sides up, on a baking sheet.
2. Bake at 400° for 8 to 9 minutes or until bread is lightly browned. Spread pizza sauce over garlic bread.
3. Cut chicken strips into 1/2-inch pieces, and arrange over pizza sauce. Sprinkle with cheese and basil.
4. Bake at 400° for 8 to 10 minutes or until cheese melts. Serve immediately.

Sweet and Sour Chicken


Pic courtesy of My Kitchen Cafe

I have tried many, many sweet and sour chicken
recipes over the years and they've all been so-so. Until I tried this one on My Kitchen Cafe. Not only is it relatively easy (for a dredging recipe), but it tastes almost as good as the deep-fried stuff at P.F. Chang's (trust me, I used to work there). I make this ALL the time now and Christian even requested it last week as his "break-the-fast" meal. Next time you're feeling like some Chinese, try this and, I promise, when you're done eating, you WON'T feel like you just drove through Panda Express.

I have something REALLY, REALLY exciting coming up in the next few days...so stay tuned!!!

Sweet and Sour Chicken
adapted from My Kitchen Cafe

Chicken:
3-4 boneless, skinless chicken breasts
Salt and pepper
1 cup cornstarch
2 eggs, beaten
2 Tbl canola oil (the real recipe calls for 1/4 cup, but 2 Tbl will do just fine)

Cut boneless chicken breasts into chunks. Season with salt and pepper. Dip chicken in cornstarch and then in egg. Fry in a little oil until brown but not cooked through. Place in a single layer in a baking dish. Mix sauce ingredients (below) together and pour over chicken.

Sauce:
¾ cup sugar
4 tablespoons ketchup
½ cup vinegar
1 tablespoon soy sauce
1 teaspoon garlic salt

Bake for one hour at 325 degrees. Turn chicken every 15 minutes. If you like extra sauce, make another batch of sauce and bring it to a boil on the stovetop. Stir constantly and let cook over medium heat until thickened and reduced - about 6-8 minutes.

Tuesday, January 26, 2010

Jello Salad

Sorry I don't have a picture, but I just got this recipe from a lady in my ward. She made this jello salad for our ward Christmas party, and it was so delicious that mom has been begging me to get the recipe for her. I've never made it, but I can vouch for it's great taste. So here it is...

Mix the following and chill until set:
1 large package raspberry jello
1 can blueberry or strawberry or cherry pie filling
Dice 1 or 2 apples or peaches
2 cups boiling water
1 large can crushed pineapple with juice

Beat the following until smooth, and put on top of the firm set jello:
1 pkg cream cheese
4 Tbs. sugar
16 oz. sour cream

Top with nuts, pineapple chunks, or anything you'd like!

Peanut Butter Bars

Brian's birthday was last week and these delectable treats were his request for a birthday cake. I halved the recipe and it worked perfectly in a 9X13 pan instead of a cookie sheet. They have oatmeal in them, which not only gives the bar a great texture, but makes you feel like it might be slightly healthy for you (don't worry, they're not). Addicting and delicious, these peanut butter bars really deliver.
Peanut Butter Bars

1 cup butter
1 cup granulated sugar
1 cup brown sugar
2/3 c. peanut butter
2 eggs
1 tsp. vanilla
1/2 tsp. salt
2 cups flour
1 tsp. baking soda
2 cups oats

Chocolate Frosting:
3 c. powdered sugar
4 Tbs. butter
4 Tbs. cocoa powder
4 Tbs. milk
1/3 c. peanut butter (or to taste)

Mix butter, sugars, peanut butter, eggs and vanilla. Add salt, flour, baking soda, and oats. Mix well and spread out on a cookie sheet. Bake at 350F for 16-18 minutes. Cool completely and then frost. Enjoy!

Sunday, January 24, 2010

Hot Fudge Pudding Cake


Can I say Mmmm?  So rich and delicious!  Reminds me of the chocolate molten cake at Chili's.  Mmm.


Hot Fudge Pudding Cake

From My Kitchen Cafe Blog


*Makes an 8X8-inch pan


1 cup sugar

½ cup cocoa powder

1 cup all-purpose flour

2 teaspoons baking powder

¼ teaspoon salt

½ cup milk

4 tablespoons butter, melted

1 large egg yolk

2 teaspoons vanilla extract

½ cup semisweet chocolate chips

1 cup boiling water


Preheat oven to 350 degrees. Spray an 8-inch square baking pan with cooking spray. Whisk ½ cup sugar with ¼ cup cocoa powder and set aside.


Whisk the flour, remaining ½ cup sugar, remaining ¼ cup cocoa, baking powder, and salt in a large bowl. Whisk milk, butter, egg yolk, and vanilla in medium bowl until smooth. Stir milk mixture into flour mixture until just combined. Fold in chocolate chips (the batter will be stiff).


Using a rubber spatula, scrape batter into prepared pan and spread into corners. Sprinkle reserved cocoa and sugar mixture evenly over the top. Gently pour boiling water over cocoa. Do not stir.


Bake until the top of the cake is cracked, sauce is bubbling and a toothpick inserted into cakey area comes out with moist crumbs attached, about 22-24 minutes. Cool on rack for at least 10 minutes. Serve warm with vanilla ice cream.


Black and White Cheesecake Squares

Pic courtesy of My Kitchen Cafe

Wow. These were soooo devilishly good. They might set you back a couple pounds on your New Year's diet, but if you are going to indulge, I would definitely reach for these babies. I made them last night for a game night and they went over hugely. They are really, really rich (think 2 1/2 cubes of butter and 2 cups of sugar) so thankfully, you really can't eat that many at a time.

Black and White Cheesecake Squares
from My Kitchen Cafe

Nonstick cooking spray
2 cups plus 2 tablespoons all-purpose flour
3/4 cup unsweetened cocoa powder
1 teaspoon baking soda
1/2 teaspoon salt
2 1/2 sticks butter, softened
2 cups granulated sugar
3 large eggs
2 1/2 teaspoons vanilla extract
8 ounces cream cheese, softened
1/2 cup confectioners' sugar

Preheat oven to 325 degrees. Coat a 9-by-13-inch baking dish with cooking spray.

Sift flour, cocoa powder, baking soda, and salt into a large bowl. In another bowl, cream butter and granulated sugar with a mixer until smooth. Add 2 eggs and 2 teaspoons vanilla, and beat until smooth, scraping down sides of bowl. Reduce speed to low; add flour mixture. Increase speed to medium; beat until incorporated.

Reserve 1 cup of dough; cover, and refrigerate. Press remaining dough into bottom of prepared dish. Refrigerate for 30 minutes. Bake until base is set and edges are puffed, 22-25 minutes (don't overbake or this brownie layer will be too hard and crumbly). Let cool in dish on a wire rack.

Mix cream cheese, confectioners' sugar, and remaining egg and 1/2 teaspoon vanilla in a medium bowl. Spread over cooled base; crumble reserved dough on top. Bake until filling is set, 25 to 30 minutes. Let cool in dish on wire rack. Cut into 24 squares. Squares will keep, covered and refrigerated, for up to 3 days.

Saturday, January 23, 2010

Bruschetta Style Pasta with Chicken

I admit it- I got this recipe from the back of Ronzoni Healthy harvest box but have made some really great additions/subtractions to it...so I will call it my own!:) Adults die for it and even kids love it. My nephew who infamously NEVER eats dinner had 2nds and 3rds. And I use the whole wheat blend of pasta or you can even use the protein Barilla plus pasta and skip out on the chicken.


Bruschetta Style Pasta with Chicken
1 box Ronzoni Healthy Harvest pasta (I like to use Penne Rigati pasta or bow ties)
3 TBSP Olive Oil
3 TBSP minced garlic
3 c. fresh tomatoes, diced (you can use canned but I have always used fresh)
3 TBSP balsamic vinegar
1 TBSP Pesto
Diced, cooked, and seasoned chicken breasts
Parmesan cheese

Cook and season chicken breast in frying pan. I like to used Italian seasoning with s&p of course. You want this to be hot so I cook this while I am boiling the pasta. Meanwhile cook olive oil, vinegar and garlic in a large saucepan until garlic browns. Add tomatoes and pesto. Then add pasta and diced chicken. Garnish with Parmesan or any type of Italian cheese.

Cranberry and Sage Roasted Chicken

This is one of my favorite meals. Of course, perhaps by now you've noticed that I have a thing for gravy. Anything with gravy on it constitutes a favorite meal in my book. But this one is extra favorite. I first came up with this recipe in 2001 and have been making it regularly ever since.

I love it for many reasons. It's a cinch to make. Even the gravy is extra easy. It has a wonderful, unique flavor that is both rustic and gourmet at the same time. It's sweet; it's savory. It's the classic Thanksgiving combination of cranberry and sage, but you can have it at any time of the year! Let me show you just how easy this is to make. I kid you not, the hardest part is waiting for it to cook!

The first step is to get out a heavy cast iron Dutch oven. As far as I'm concerned, these vessels are the only way to oven roast almost everything. Prime rib and turkey may just be the only exceptions I can think of. Because they are such wonderful conductors of heat, cast iron Dutch ovens regulate heat very well so that your bird gets a gentle, even trip in the oven. The heavy lid sits firmly enough to keep the juices in, and I am convinced that when it's really going, there might even be a slight pressure increase from the steam that helps things along, too.

Preheat the oven to 325 degrees F. Place the Dutch oven on the stove top on a medium-high burner. Add a splash of oil and let it heat up. When the pan is hot (a drop of water flicked in the pan will dance around immediately), place the chicken in breast side down and let it develop a nice, brown crust. Move chicken around to get all sides evenly golden. Remove from heat and set chicken breast-side up in the pan.

Cut one whole onion into slices and place in and around the chicken. Do the same with the garlic. Now mix the wine and cranberry sauce together in a jar or bowl. Pour over the top of the chicken. I usually use whole cranberry sauce, but this time, I used homemade cranberry sauce that had been put through a food mill. I like both versions for different reasons. Use either one you like. Sprinkle the top of the chicken with the ground sage, parsley, salt, and pepper. Cover and place in the oven for 1 to 1 1/2 hours or until the juices run clear. Doesn't look like much here, does it? I promise happy changings in the oven!

At the end, remove the lid and broil for 10 minutes, or until the bird is nicely browned and beautiful. Didn't I promise happy changings!?!

Pull the bird out of the pan and set aside to rest while you prepare the gravy. Set the Dutch oven back on the stove top over medium heat. Stir to loosen up the bits and pieces in the pan. While you can strain the gravy to make it smooth, I like it with the large pieces of onion and - when I use the whole cranberry sauce - there are beautiful berries floating in there too. Grab a whisk and a mini mesh strainer with a couple of spoonfuls of cornstarch inside. Once the pan juices are bubbling gently (adjust heat as needed), gently tap the cornstarch into the gravy and whisk it in with the other hand. Be sure not to tap too much cornstarch in at once or you'll end up with lumps. Go slowly so that you don't over thicken your gravy. Remember that cornstarch has to cook to reach its full thickening power. The general rule of thumb for cornstarch is one tablespoon for each cup of liquid (it has about twice the thickening power of flour).

Remove from the heat. It's time to slice the chicken! I like to cut the breast meat all off of the bone in one piece and then cut vertical slices so that everyone gets a nice combination of the meat and flavorful skin. No need for fighting at the table!

Cranberry and Sage Roasted Chicken
Yield: 2-4 servings, depending on the size of your bird

1 TBS vegetable oil
1 whole chicken
1 cup cranberry sauce, whole berry or smooth
3/4 cup white wine
1 medium onion, preferably sweet, sliced
2 large garlic cloves, minced
1 tsp ground sage
salt, pepper, parsley

Preheat the oven to 325 degrees F. Heat a cast iron Dutch oven on the stove top over medium-high heat. Brown the chicken in the oil until it is a nice golden color all over. Remove from heat and arrange the chicken so that it is breast side up in the pan.

Place the onions and garlic in and around the chicken. Mix the cranberry sauce and wine together and pour over the bird. Sprinkle with the sage, parsley, salt, and pepper. Cover and bake at 325 degrees F for about 1 to 1 1/2 hours, or until the juice runs clear (actual cooking times will depend of the size of your bird). The nice thing about cast iron and low heat, is that if you overcook it, it will still taste fabulous!

At the end, remove the lid and roast under the broiler (be careful not to have the bird too close to the broiler) for about 10 minutes or until nice and golden.

Remove the bird to a separate plate to rest while making the gravy. Place the Dutch oven over medium heat on the stove top. If there is too much fat in the pan, you can spoon some off before making the gravy. When the mixture is gently bubbling, add cornstarch slowly by sprinkling it from a mesh strainer. Stirring while sprinkling in the cornstarch is the key to lump-free gravy. You will need about 1 tablespoon of cornstarch for every cup of pan juices. I usually end up with at least of cup of juices, but if there is not quite enough, you could add a little chicken broth to extend it. Serve with your favorite side dish!

Thursday, January 21, 2010

Honey Glazed Chicken

This is a new staple meal for our family. I absolutely loved it. I served it with brown rice, and I cooked the chicken for less time than the recipe states. Chicken and rice is always a safe way to go, and this is a new flavor for me. I rarely use curry powder, but the flavors all blended so nicely together.

photo courtesy of My Sister's Cucina

Honey Glazed Chicken
recipe from My Sister's Cucina
1/2 cup flour
1 tsp salt
1/2 tsp cayenne pepper
1/4 cup butter
4 chicken breasts (you could use chicken tenders too! I used about 3 of the frozen chicken breasts from Costco cut up)
Preheat oven to 350. Mix flour, salt and cayenne pepper together in a large ziploc bag. Drop chicken in bag and shake to coat. Melt butter and place in a 9 x 13 baking dish. Place flour coated chicken in baking dish and turn to coat both sides with butter. Bake uncovered for 30 minutes.
Honey Glaze Sauce
1/4 cup brown sugar
1/4 cup honey
1/4 cup lemon juice
1 Tbsp soy sauce
1 tsp curry powder
1/4 cup butter, melted
Combine all ingredients. Pour over chicken until well coated. Bake for an additional 45 minutes. Serve over rice. (Keep your eye on it, mine started to burn a little bit).

Grandma's Rolls

Pic courtesy of Sister's Cafe

Ok, so I really believe I am cursed when it comes to baking bread. It NEVER turns out for me. I decided to give it another shot this week, though and found this recipe on one of my faves, the Sister's Cafe, and guess what??? They turned out beautifully! Let me tell you, Christian has been saying ALL week that these are the best rolls he's ever tasted. They are creamy, soft, and fluffy. You really must try them.

Grandma’s Dinner Rolls
adapted from The Sister's Cafe

2 rounded Tb yeast
1 ½ cups warm water
1 cup warm milk
½ cup sugar (2/3 c for sweet rolls)
6 Tb shortening (I know, I don't like using shortening, and I sure you could sub butter, but it worked)
2 tsp salt
4 eggs (I only had 3 eggs, so I substituted 1 egg for 1 Tbl ground flaxseed with 3 Tbl water)
7-8 cups flour (I used half white whole wheat and half all-purpose white)

Beat first 7 ingredients until smooth (it's not going to be completely smooth b/c of the shortening). In an electric mixer with a dough hook, add flour one cup at a time until dough forms a ball, cleaning off edge of bowl. Knead 5 minutes (or 10 minutes by hand). Let rise until double. Punch down dough and let rise until double again. (To make this easier, I leave the dough in the mixing bowl with dough hook, covered with a damp towel. When it has risen double, I turn on the machine briefly to gently punch down the dough. Then I cover again with the towel and allow to rise again.) Punch down again and divide into 3 parts. Roll out each part and form into rolls. *I prefer butterhorn rolls: roll each segment of dough into a circle. With a pizza cutter, cut into fourths then each fourth into thirds - making 12 pie shapes. Roll each one up starting at the wide end. Place on cookie sheet and let rise briefly. Watch carefully as rolls will rise very quickly now after 2 risings. Optional: dust lightly with shortening or non-stick spray before baking, it makes the rolls glossy. Bake at 350 degrees for 14-16 minutes, until lightly browned.

Tuesday, January 19, 2010

Brown Sugar Spiced Pork Loin


Strangely and wonderfully unique. The cinnamon gives it such a different taste. Gotta make!


Brown Sugar Spiced Pork Loin

My Kitchen Cafe Blog


Rub Ingredients:

2 teaspoons salt

1/2 teaspoon black pepper

1 teaspoon ground cumin

1 teaspoon chili powder

1 teaspoon cinnamon

2 pork tenderloins (2 1/2 lb. total), each tenderloin cut into two chunks

2 tablespoons olive oil


Glaze ingredients:

1 cup packed dark brown sugar

2 tablespoons finely chopped garlic

1 tablespoon tabasco sauce


Preheat oven to 350 degrees. In a small bowl, stir together salt, pepper, cumin, chili powder, and cinnamon, then coat the pork with the spice rub. Heat the oil in an ovenproof 12-inch heavy skillet that is ovenproof (I used my cast iron skillet) over medium high heat until the oil is hot and rippling. Brown the pork, turning, about 4 minutes total. Leave pork in the skillet.


Stir together the brown sugar, garlic, and Tabasco and pat on top of each tenderloin. Roast in the middle of the oven until a thermometer inserted diagonally in center of each tenderloin registers 140, about 25 minutes. Let pork stand in the skillet at room temperature for 10 minutes. The temperature will rise to about 155 while standing.

Baked Potato Soup

I got this recipe from a friend here where we live. I love it! Its very hearty, and goes great paired with a salad. A perfect, warm, comfy dinner. You need to make this.


Baked Potato Soup

2 large baking potatoes
3 Tbsp. thinly sliced green onions (or regular onion if you don't have this)
1/3 c. butter
1/3 c. flour
1/4 tsp. dried dillweed
1/4. tsp. dried, crushed thyme
4 c. milk
3/4 c. shredded cheese

Prick potatoes with a fork 3-4 times. Rub olive oil all over them and then roll them in salt. Bake at 450 F for one hour, or until tender. Cut potatoes in 1-in. cubes. Or, you could scoop out the pulp and discard the skins, if you prefer (I like the skins). In large saucepan, cook green onion in butter until tender. Stir in flour, dill, thyme, salt and pepper (to desired taste). Add milk all at once. Cook and stir one minute more. Add potatoes (or pulp, if you took that route) and 1/2 cup cheese; stir until cheese melts. Garnish each serving with remaining cheese, onion or bacon. I don't use these garnishes because I think the soup is great without it...its up to you. Enjoy!

Monday, January 18, 2010

Pecan Crusted Acorn Squash

I have never been a huge fan of winter squash. Pumpkin pie or bread, sure... roasting an acorn squash for dinner? Not so much. But, it had been a while and so I figured it was time to revisit a flavor I had neglected for a while. Tastes change, after all.

I bought this little acorn squash weeks and weeks ago. That's one of the joys of winter squash. They're such good keepers! I finally decided the other night to give this one a go. It was the same night I made my candied pecans and I had some broken pecan pieces lying around. A natural progression of butter, brown sugar, and cinnamon ensued. A little lemon zest perked it up.

You know what? I've decided I'm still not a big fan of winter squash, but I ate this one anyway; it was that good with those little crunchy pecan bits and sweet/tart/spice. If you actually like winter squash, then I think you'll really love this preparation!

Pecan Crusted Acorn Squash
Yield: 2-4 servings

1 acorn squash, halved and cleaned
1 TBS room temperature butter
3 TBS brown sugar
2 TBS pecan pieces, chopped
1/4 tsp lemon zest
dash cinnamon
fresh ground pepper

Preheat the oven to 400 degrees F. Prepare a rimmed baking pan with foil. Cut the squash in half along its equator and scoop out the seeds and goop. Place cut side up on the foil.

In a small bowl, mix the remaining ingredients together and stir together to make a crumbly mixture. Sprinkle over and in the squash halves. Cover loosely with foil and bake for 20 minutes. Remove the foil and continue baking another 10-20 minutes, until the squash is tender and the topping is caramelized and the nuts are browned and crunchy. Cool slightly before serving.

Sunday, January 17, 2010

Creamy Chicken Enchiladas

A good variation on an ordinary dinner. I enjoyed the chili powder base to the cream sauce.


Creamy Chicken Enchiladas
www.RecipeGirl.com

One 10¾ oz. can Healthy Request Cream of Chicken soup
8 oz light sour cream
1 cup Pace picante sauce
2 tsp. chili powder
2 cups chopped cooked chicken
2 cups shredded Monterey Jack cheese
Ten 6-inch flour tortillas
1 large tomato, chopped
3 green onions, sliced
1 avocado, mashed and mixed w/ a little sour cream and picante sauce (quick guacamole)
1. Preheat oven to 350 degrees F. Spray 9×13 pan with cooking spray.
2. Stir soup, sour cream, picante sauce and chili powder in a medium bowl.
3. In a large bowl, stir 1 cup of the sauce mixture with the chicken & 1 cup of the cheese.
4. Spread about 1/4 cup of the chicken mixture down the center of each tortilla. Roll up and place seam-side-down in prepared dish. Scoop remaining sauce over the filled tortillas. Sprinkle with remaining cheese. Spray a piece of foil with cooking spray. Place sprayed-side-down on enchiladas and cover tightly.
5. Bake for 40 minutes or until enchiladas are hot and bubbling. Top individual servings with tomato and onion. Add a dollop of guacamole, if desired.
Servings: 6

Chocolate Chip Vanilla Pudding Cookies


What?  Vanilla pudding cookies?  That's right.  Fun new variation on the ordinary chocolate chip cookie.  Definitely a good recipe.

Chocolate Chip Vanilla Pudding Cookies

From Our Family Treat Blog


1 cup butter (the unsalted kind), softened

3/4 cup brown sugar

1/4 cup sugar

1 (3.5 ounce) box of instant vanilla pudding mix

2 eggs

1 teaspoon vanilla

1 teaspoon baking soda

2 1/4 cups flour

Semi-sweet chocolate chips (as much as you prefer)


Cream together the butter and the sugars. Then add pudding mix, eggs and vanilla. Once all combined, add the baking soda and flour. Mix well. Then add chocolate chips. Make sure to grease your baking sheets and bake at 375 for 11-12 minutes.


Here's what Cooper looked like after devouring 2 (one was allowed, one was stolen)...


Saturday, January 16, 2010

Zupas Wisconsin Cauliflower Soup


Are you tired of soup recipes yet? I just LOVE soup when it's cold outside! I made this last night even though I knew it would be risky with a family that doesn't eat cooked vegetables. And success- they loved it! I don't know how many of you have eaten at Zupas in Provo, but it is sooooo good and this is one of their recipes. Bon appetit!

Wisconsin Cauliflower Soup
from Just Cook Already

2 tablespoons margarine or butter (1/4 stick)
1 medium onion, chopped
1/4 cup all-purpose flour
1/2 teaspoon salt
2 cups milk
1 can (13 3/4 to 14 1/2 ounces) chicken broth
1 head (2 1/2 pounds) cauliflower, cut into 1-inch pieces
1 teaspoon Dijon mustard (I just used regular mustard and it was fine)
1 cup shredded cheddar cheese
1 cup pepper jack cheese

In 4-quart saucepan, melt margarine or butter over medium heat. Add onion and cook until golden, about 10 minutes, stirring occasionally. Stir in flour and salt; cook 2minutes, stirring frequently. Gradually stir in milk, chicken broth, and 1 1/2 cups water; add cauliflower and heat to boiling over high heat. Reduce heat to low; cover and simmer until cauliflower is tender, about 10 minutes. In blender (with center part of blender cover removed to allow steam to escape), blend cauliflower mixture at low speed in small batches until very smooth. Return cauliflower mixture to saucepan; heat over medium heat until hot, stirring occasionally. Remove saucepan from heat; stir in mustard and 1 1/2 cups cheese until melted and smooth. Garnish soup with remaining cheese to serve.

Raspberrry Balsamic Vinaigrette

I really like salad, but I hate always having the same dressing on it all the time. I guess I just like a little variety in my life. Hey, who doesn't? I used to go back and forth between store-bought Italian and a homemade balsamic and oil mix. But then I started getting bored with that and came up with my creamy garlic dressing. I like that pretty well and have moved it into the rotation. I also really like Caesar dressing, but finding a decent bottled version is like trying to find jars of gold for sale at the grocery store. So, I finally had to figure out how to make my own.

I like the creamy dressings, but I recently decided that it was time to broaden my vinaigrette making skills. I was inspire by a great dressing I had over the holiday (which I'll post here soon as well). The basis for today's dressing was in a magazine somewhere, but I didn't like the proportion of ingredients at all, so I made some changes.

Raspberry Balsamic Vinaigrette
Yield: about 1/2 cup of dressing

3 TBS seedless (or nearly) raspberry jam*
2 TBS balsamic vinegar
3 TBS extra virgin olive oil
1 tsp lemon juice
1/4 tsp salt
dash pepper

Whisk all ingredients together and store, covered, in the refrigerator up to one week. Dressing needs to come to room temperature before using. If in a hurry, place the dressing in the microwave in 5 second intervals until it loosens up.

*NOTE: I used my homemade raspberry freezer jam for this recipe. I think it is much better than making it with cooked jam, which has a very different flavor and color, but cooked jam is probably better than no jam! Another option is to get a bag of frozen raspberries, let them thaw, crush them, run them through a sieve to remove most of the seeds, and mix with a bunch of sugar (maybe a one to one ratio of raspberry puree to sugar). You can then store this syrup in the refrigerator or freezer to use in making this dressing whenever the urge hits you.

Wednesday, January 13, 2010

Salmon Chowder in a Flash

I can't tell you how long I've had this little can of salmon sitting in my pantry. Every time I opened the door, it would stare out at me forlornly. "Choose me. Cook me," it always seemed to say. But, alas, I would grab something else and tell that poor little can that maybe next time would be its chance.

It's not as if I've never used a can of salmon before; I have. But not often and not with great success. To be honest, I think it was a result of the age old quandary: I have it but what do I do with it? I had never received that canned salmon epiphany... until five days ago. Can't tell you where it came from, how, or why. After all these times opening and closing that pantry door, this time... this time, it came. Chowder. I would prepare a super fast and easy salmon chowder. It was fast (less than 30 minutes) and it was absolutely delicious. I might have to go buy another can now!

It starts with a 7 1/2 ounce can of salmon. To round out the flavor, I used celery and shallots, but you could substitute onions for the shallots if you wish. I cut the vegetables into pretty small pieces. I wanted them to cook quickly and I didn't want big pieces to overwhelm the salmon flavor.

I turned a pan on medium-high heat and melted a tablespoon of butter. Once things were warmed up, I added the vegetables and let them sweat it out for a few minutes. I'm guessing it was about five minutes, about the time it took me to prepare the salmon and the remaining ingredients. Oh, yeah, and I added a bit of fresh ground black pepper. Normally I would add some salt at this stage, but between the butter, the salmon, and the broth it can get pretty salty. It's best to wait until the end and add salt to taste, if necessary.

Most canned salmon consists of a salmon steak (cross-wise cuts through the fish). This means that there is part of the spine running through the can. They also can it with the skin on. I pull the meat out of the can and remove the backbone and skin. You can ignore the bones, though. Through the canning process they have become softened enough to eat... in fact, this is why canned salmon is a pretty decent source of calcium. Once the vegetables are softened, add the salmon and any juice in the can into the pot. Stir around for a minute and then add the water and half of a bouillon cube. Bring to a simmer and cook with a bay leaf for 5-10 minutes.


The last step is to add the milk slurry. You do not have to thicken this soup at all, or you could thicken it a lot more. As presented here, it will not be super thick, but it will have some body. Adjust as you see fit. Mix the corn starch and milk together before the milk is heated. Pour into the pan and heat until it comes to a simmer. Cook for about a minute and remove from the heat. If desired, you can add a splash of heavy (or light) cream to give a little bit of that rich mouth feel. Lastly, add a small pinch (I used about a teaspoon) of fresh minced parsley. If you only have dried, it's not a big deal.

Salmon Chowder in a Flash
Yield: 2-3 servings, about 1 quart

1 TBS butter
1/4 cup celery, diced small
1/4 cup shallot, diced small (onion's OK, too)
dash fresh ground pepper
7 1/2 oz can salmon with juice
2 cups water
1 bay leaf
1/2 cube Knorr vegetable bouillon (or similar)
1 cup milk (preferably whole)
2 TBS corn starch
splash heavy or light cream (optional)
1 tsp fresh or dried parsley

Melt butter in a 2 quart sauce pan over medium-high heat. Add the celery and shallot and cook, stirring occasionally until softened and lightly browned. Somewhere along the way, add a dash of fresh pepper. Meanwhile, open the salmon, save the juice, and pull it into small pieces, removing the skin and backbone. You can leave all the other, smaller bones alone.

When the vegetables are ready, add the salmon and juice to the pan along with the water, bouillon, and bay leaf. Bring to a simmer and cook for 5-10 minutes. Remove the bay leaf. Mix the milk and cornstarch together to form a slurry. Add to the soup, stirring constantly. Bring back up to a simmer and cook about 1 minute, until the mixture has thickened slightly. Test for salt and adjust as necessary. Add a splash of cream, if desired. Lastly, stir in the parsley and serve.

Monday, January 11, 2010

Chicken Cream Cheese Soup


I made this for dinner last night for the second time and was reminded how good it is. My husband, who claims to "hate" cream cheese even loved it. Perfect for a cold night (which we've been having quite a few here in Albuquerque). I have made the whole recipe below and it makes a LOT of soup. Last night, I made only half of the recipe and it will feed Christian and me for 2 nights.

Chicken Cream Cheese Soup

1 lb chicken (breasts or combination)
1 onion, diced
1-2 Tb butter
2 handfuls baby carrots (about 2 cups sliced small)
4-5 potatoes, peeled, diced small
1 c milk
1/4 c flour
8 oz package cream cheese

1. Put chicken in pot and cover with water; boil until cooked. Take chicken out of water but keep the broth. When chicken is cool, shred.
2. Saute onion in butter. Put onion in pot and add carrots and potatoes. Add 3-4 cups of broth or enough to cover vegetables. Add bouillon cubes or soup base for flavor (I add 4 bouillon cubes). Bring to a boil and simmer until veggies are tender.
3. Mix flour with milk and add to soup. Soften cream cheese in microwave then add to soup in little pieces and stir until melted. Season with salt and pepper.

Sunday, January 10, 2010

Candied Nuts

This is one of those recipes that's been on my back burner for a number of years now. Ever since I had a salad with candied walnuts in it that made my heart swoon. Somehow, I never got around to giving it a try. I did know that all of the recipes I came across for candied nuts just didn't seem like it would turn out a product like I was looking for. I knew I would have to just trial and error it. Yesterday was my second try, and I got what I was looking for!

Two weeks ago, while out doing some last minute Christmas shopping, I came across a guy selling farm fresh pecans. This might be my favorite thing about the south! So, despite the fact that the salad I still dream about had walnuts on it, I figured it might be a sin to use the grocery store walnuts in my freezer when I had beautiful, farm fresh pecans ready to be eaten... 'course, they were still in the shell.

If you ever find the need to shell pecans, please remember this simple axiom: pecans shell much more easily when they are frozen. Trust me on this one.

Once you have chosen your nut, be sure they are roasted. Candied nuts need to be crunchy and raw nuts simply won't do. You can dry roast them over medium heat in the pan before you get started or you can roast them in the oven at about 250 degrees for a few minutes until they just start to show some color. Set the nuts aside and start working on the candy part.

The proportions of this recipe will vary depending on how many nuts you want to candy. I did about twenty pecan halves in this trial run. I used 3 tablespoons of sugar. You can make as much of the candy coating as you want! This is the most simple coating ever; just be careful, because sugar can get very, very hot and can cause serious burns.

Simply place the sugar in the bottom of a skillet over medium heat. Let it melt and then let it start to caramelize and turn a glorious burnt sienna color. There is not need to stir. Just let it do its thing. Meanwhile, in a small bowl, mix together 2 TBS granulated sugar with 1/8 tsp table salt and a dash of cinnamon. Stir to mix. Here is a picture of my sugar about halfway there.

When the sugar on the stove is dark but not too dark (dark caramel can have a bitter flavor), turn the heat down and grab a pair of tongs that you have liberally sprayed with oil. Set up a little assembly line like shown below. I covered a cutting board with parchment as a cooling station.

Using the tongs, coat all sides of each nut with the molten sugar mixture. The nuts will really stick together if you let them; I find it's best to keep them apart as much as possible. Working one nut at a time, coat it with the hot sugar and then transfer it to the small bowl of coating sugar. Toss it around to coat all sides and then place it on the cooling board. While they are tasty almost immediately (please wait long enough to not burn the heck out of your tongue!!), they are best after they have time to completely cool and harden. Then they are crunchy and sweet with just a hint of salty. Great as a snack or as a garnish to salads or desserts!

Candied Nuts
Yield: 20 candied nut halves, can easily be adjusted for any yield

20 whole nut halves, such as pecans or walnuts
3 TBS sugar

2 TBS sugar
1/8 tsp table salt
dash cinnamon

Toast the nut halves in a dry skillet over medium heat or in a 250 degree oven until they just start to show some color. Set aside to let cool.

Place 3 TBS of sugar in a small skillet over medium heat. You do not need to stir the sugar, an occasional shake of the pan if it appears to be melting unevenly is all that is necessary. Let the sugar melt and darken to a light brown color. Do not let it go too far or it will have a bitter flavor.

While the sugar on the stove melts, mix the remaining sugar, salt, and cinnamon in a small bowl. Spray a pair of tongs with oil and set up a cooling rack by placing parchment paper over a bowl or cutting board.

When the melted sugar is ready, reduce the heat to low and, one by one, coat the nuts on all sides with the hot sugar and then dip them in the granulated sugar to coat all sides. Shake off the excess and place on the cooling rack. They should be completely cool, crunchy, and ready to use in about half an hour. Keeps for two weeks in an air-tight container.

Saturday, January 9, 2010

Beautiful Potatoes


I recently received a mandolin as a gift. It may be the only thing kitchen related that I did not already own. I had thought that because I have a food processor now, I was not in need of a mandolin. Boy, was I wrong! I love my food processor, but I have since realized that a mandolin can do things a food processor only dreams of doing.

So, anyhow, the other day I was slicing potatoes while running the gizmo through its paces. How many times in my life have I sliced potatoes? Hundreds? Thousands? How can it be that I have never noticed how beautiful they are on this inside?

Friday, January 8, 2010

Caramelized Onions and Brussel Sprouts

So, I've been on a brussel sprouts kick lately. I don't know if you have this problem, but I find that I get on kicks with certain foods where I will eat the heck out of them for a short period of time and then move on. I guess I should be grateful that this time, I'm stuck on a food that is at least healthy. I tell you, it's rough when I get on my cake kicks... or cookie kicks... or pasta kicks. Well, you get the idea.

This time, though, I've gotten stuck on a food I never really ate much before. I did try growing them once, but that was an unmitigated disaster. I guess if you want to let your brussel sprouts "sweeten" through a couple of frosts, you shouldn't plant them so early. They were ready in mid-August. Yuck! Boy were they bitter.

Fortunately, the ones you get at the store are typically pretty good. I've tried them a variety of ways recently, but tonight's variation is hands down my favorite. Of course, you can't really go wrong when caramelized onions are involved, now, can you?

I was only cooking for myself tonight, so I used one medium onion and sliced it fairly thin. I like to start my onions with a bit of heat to get them going and then turn them way down to finish. I put a pan over medium-high heat and melted a tablespoon of butter in it. I added the onions and cooked, stirring frequently until they were soft and starting to brown a bit.

At this point, I added a pinch of salt and turned the heat down to medium-low. After a few minutes, I added cleaned and quartered brussel sprouts. To clean the sprouts, I washed them, trimmed the stem, and then peeled back any leaves that were not clean and fresh looking. I threw the cut sprouts into the pan and let them hang out with the onions over medium-low heat until they started to brown, too. At some point along the way, I added some fresh ground pepper.

Then, to help the sprouts get tender through, I put a lid over the pan, but left it cocked just slightly to let some of the steam escape.

When the sprouts were tender through and nicely browned, I turned off the heat and added a teaspoon of butter. I served myself a nice little pile and shredded some Parmigiano Reggiano on top. The flavor profile was spectacular. The cheese added a wonderful nuttiness to the sweet onions and earthy goodness of these cute little vegetables. Be sure you get a bit of everything in every bite!

Thursday, January 7, 2010

Baked Ziti with Tomatoes and Mozzarella

After watching this and then reading this, I decided that I would try and make some changes in our family dinners seeing that my take on food has forever changed. So, I made this last week and ate it for no less than 6 meals in a row- it was that satisfying and delicious. You have got to try it.


Baked Ziti with Tomatoes and Mozzarella
Modified from The America's Test Kitchen Family Cookbook

1 Tbs. Olive Oil
2 garlic cloves, minced
1 (28 oz.) can crushed tomatoes
1 (14.5 oz.) can diced tomatoes
2 Tbs. minced fresh basil (fresh is a must!)
Salt
1 lb. ziti or penne (I used Barilla Plus penne)
8 oz. mozzarella, shredded (2 c.)
1/4 c. grated Parmesan cheese

Heat oven to 400 F. Bring 4 quarts of water to a boil in a large pot for the pasta. Meanwhile, cook the oil and garlic in a skillet over medium heat, stirring often until the garlic is fragrant but not browned, about 2 minutes. Stir in the tomatoes, with their juice. Bring to a simmer and cook until thickened slightly, about 15 minutes. Stir in the basil and salt. (You can add 1/4 tsp. sugar to balance the acidity of the tomatoes here, but I didn't use it and it still tasted great). When the pasta water is boiling, stir in 1 Tbs. salt and pasta. Cook until almost tender, but still with a bite. Reserve 1/2 cup of the pasta water, drain the ziti, and return to pot. Add tomato sauce and pasta water, as needed, to loosen the sauce. Spread half the pasta in an oiled 9X13 baking dish. Sprinkle with half the mozzarella and half of the parmesan cheese. Repeat. Sprinkle fresh basil on top, if desired.

Bake until cheeses turn golden brown, about 20 minutes. Enjoy!


Monday, January 4, 2010

Caramel Popcorn


I know that we all love the caramel popcorn recipe in the family cookbook....however, this one is almost as good and a whole lot easier. I totally recommend it when you need a quick, delicious treat.

Caramel Popcorn

From Or So She Says Blog
1 cup butter
1 cup brown sugar
2 cups marshmallows
2 bags microwave popcorn

Pop 2 bags of microwave popcorn. Melt 2 sticks of butter and 1 cup of brown sugar in the microwave. Stir until caramelized. Add 2 cups of marshmallows and microwave for 2 more minutes. Stir and add to popped popcorn. Enjoy!

Bacon Wrapped Cocktail Sausages

A really delicious and easy appetizer! First thing gone at the table!


Bacon-Wrapped Cocktail Sausages

Recipe from Our Best Bites

1 14-oz. package Lit'l Smokies

1 12-oz. package lean bacon

3/4 c. brown sugar

Preheat your oven to 325 and line a baking sheet with aluminum foil. Using a pair of kitchen shears, cut the slab of bacon into thirds.

Wrap 1/3 of each slice of bacon around each sausage and secure with a toothpick and place on the baking sheet. I took a picture of this, but my husband informed me in no uncertain terms that that picture was completely inappropriate for a family-friendly food blog. Let's just say Freud may have had something to say about it...

Anyway, repeat with remaining sausages and bacon. When I was making these, the stars somehow aligned and this package of Lit'l Smokies and Hormel Black Label bacon matched up completely--no leftover bacon, no leftover sausage. Sprinkle brown sugar over sausages and bake at 325 for 40-45 minutes or until bacon has cooked and is starting to brown.