Friday, September 30, 2011

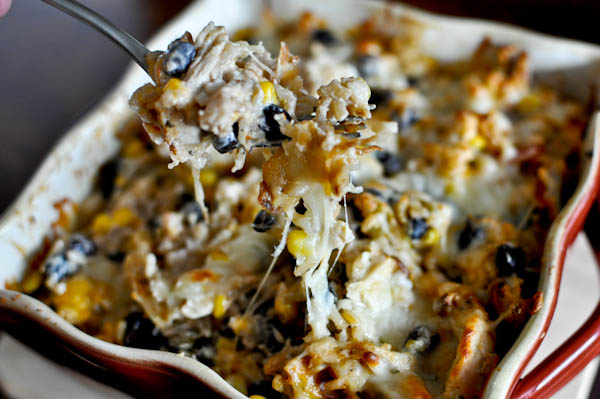
Cheesy Chicken and Rice Bake

Photo from howsweeteats.com

This is the perfect meal to use up a bunch of leftovers, such as rice and chicken.  Wasn't my favorite meal ever but the practicality of it has it's worth!


Cheesy Chicken and Rice Bake
Recipe from howsweeteats.com


serves 4-6
2 boneless, skinless chicken breasts, grilled and shredded
4 cups cooked brown rice
3/4 cup frozen corn
1 15 ounce can black beans, drained and rinsed
1 cup plain greek yogurt (you can use sour cream)
1 4 ounce can green chilis
1/2 cup chunky salsa
1 cup grated cheddar & monterey jack cheese (low-fat cheese works too!) + more for topping if desired
cilantro for garnish

Preheat oven to 350. In a large bowl, combine all ingredients except for cilantro and mix thoroughly to combine. Make sure the yogurt and cheese is stirred in throughout the entire bowl. Season with salt and pepper if desired. Transfer to an oven-safe dish and top with extra cheese if you would like. Bake for 20-25 minutes, or until heated through. Garnish with chopped cilantro.

To make this process easier, I always have cooked chicken on hand, and use Uncle Ben’s Ready Rice. If you have those two things, this mean can be throw together in a matter of minutes! It can also easily be made ahead of time and reheated.

Thursday, September 29, 2011

Apple Crisp Pie


Hi everyone!

Today's recipe is a Delicious and super easy Apple Crisp Pie. I'm making everything from scratch, but feel free to buy the pie Crust if you don't want to make one!

I hope you like this one. This is my family's favorite recipe!

Ingredients for the Pie Crust (Feel free to buy yours at the grocery store if you want)
2 cups all purpose flour
1 tablespoon granulated sugar
3 tablespoons cold vegetable shortening
1 stick cold unsalted butter
1/2 teaspoon cinnamon
1/2 teaspoon salt
5 to 6 tablespoons of cold water

Ingredients for the filling:
4-5 green apple
1/2 cup sugar
2 tablespoons flour
2 tablespoons unsalted butter
1 tablespoon of Cinnamon
pinch salt
1 pinch ground all spice
1 pinch ground nutmeg
zest of 1 lemon
1-2 tablespoon lemon juice
1/4 cup apple juice
1/2 teaspoon vanilla extract

Ingredients for the Crisp:

1 1/2 cups old fashion oats
3 tablespoons  flour
1 1/2 tablespoon cinnamon
1 pinch nutmeg
1 pinch salt
1/3 cup brown sugar
1/3 cup unsalted butter


Crust Preparation:

In a large bowl mix the flour, salt, sugar and cinnamon. Mix until the all the ingredients are well combined and then add in the butter cut in pieces, also add the vegetable shortening, mix with a fork or with your hands until the flour gets the texture of coarse bread crumbs. (mix in an electric mixer if you prefer). Slowly add the cold water and knead until all the ingredients come together to form a soft dough. Refrigerate for 30 minutes to 1 hour.(use a electric mixer if you want.)


Filling Preparation:

Wash, core and slice the apples in 1/4 inch slices. In a large bowl, combine the apple slices with the lemon zest and the lemon juice. Season with the sugar, flour, cinnamon: and a pinch of each: salt, nutmeg and all spice. Also add in the Vanilla extract and the apple juice. Mix all the ingredients together and set aside until you are ready to fill the pie.

Crisp Preparation:

Melt the butter.

Combine the old fashion oats with the flour, brown sugar, salt, nutmeg and cinnamon. Mix together, and add in the melted butter. Stir all the ingredient until well combine and set aside until you are ready to use.

Time to make a pie:

Preheat the oven to 400°F

Spray pie pan with cooking spray.

Divide the dough into two equal size sections. Roll out one of the sections on a lightly floured surface. Roll it out enough to line your pie pan. (Half the dough should be enough to cover a 9-in pie pan.) Freeze the rest of the dough or use it to top the pie instead of the crisp. Dough can be frozen for up to 10 days.

Line your pan with the dough and fill with the apple mixture and dot with 2 tablespoons of butter.

Reduce the oven temperature to 375°F and bake the pie for 35 minutes.

Reduce the oven temperature to 350°F. Top the apple pie with the crisp and dot with 1 tablespoon of butter. Continue to bake at 350°F for 15 minutes or until the Crisp is golden brown.

It can be serve warm or cold and if you want you can serve with some ice cream or whipped cream.

Enjoy!

To watch this video recipe please click HERE

Tuesday, September 27, 2011

Mini Cheese Meatloaves

Photo from Tasteandtell blog


I know, I know it's weird but I actually loved these!  Plus, I love how they are perfect portions.  I think I am slowly becoming a meatloaf fan.  


Mini Cheese Meatloaves
Recipe from tasteandtellblog
Serves 4


Meatloaves
1 egg
3/4 cup milk
1 cup shredded cheese
1/2 cup quick cooking oats
1/4 – 1/2 cup breadcrumbs
1/2 cup chopped onion
1 teaspoon salt
1 pound lean ground beef


Sauce
2/3 cup ketchup
1/2 cup packed brown sugar
1 1/2 teaspoon prepared yellow mustard


Preheat oven to 350F. Grease a 9×13 baking dish.


In a bowl, beat the egg and milk. Stir in the cheese, oats, 1/4 cup breadcrumbs, onion and salt. Add beef and mix well. Add more breadcrumbs if needed to be able to form loaves. Shape into 8 small loaves, and place in a greased 9×13 baking dish.


In a small bowl, mix ketchup, brown sugar and mustard. Spoon over loaves. Bake, uncovered, for 45 minutes or until meat is no longer pink.

Monday, September 26, 2011

Turkey Cutlets and Garlic Roasted Potatoes


To celebrate 400 subs! One of my favorite dishes, super easy and super delicious! Turkey Cutlets and Garlic Roasted Potatoes! I hope you like it!


Ingredients for the garlic roasted potatoes:
1 1/2 pounds red potatoes
4-5 garlic cloves (3-4 per pound)
1 tablespoon fresh thyme
2 tablespoon of olive oil
2 slices of bacon
1/4 cup green onions
1/3 cup fresh parsley

for the turkey cutlets:
1 package of turkey cutlets, about 1 half pounds.
1/2 tablespoon heavy cream
1 package Stove Top stuffing mix
1/2 cup flour
1 egg

Start with the potatoes because they will take a little longer to cook.

Cut the potatoes in half, then each half in quarters. Finely chop the garlic, remove the thyme leaves from the sprig. Combine the potatoes with the garlic and thyme, cover with about 2 tablespoons of olive oil, mix everything together, make sure every piece of potato is covered with the oil, garlic and thyme. Season with salt and ground black pepper, about 1/2 tablespoon of each. Add some crushed red pepper to add heat if desired. Toss everything together and bake at 400°F for about 15-20 minutes

Cook the bacon until brown and crispy.(cook it with the potatoes if you want, but only for 6-10 minutes)

Once the potatoes are done. Garnish with fresh parsley, green onions, large bacon pieces and about 1/2 tablespoon of extra virgin olive oil, add more salt and pepper if needed, give everything a quick toss and that's it. Ready to serve.

Turkey Cutlets:

Blend the stuffing mix in a blender or food processor, just blend until it becomes a fine powder and set aside.

Beat the egg with 1 tablespoon of heavy cream to make an egg wash. Set aside.
The Stuffing mix has tons of flavor, so there is no need to season the egg wash or the flour at all.

Dust the cutlets with flour on both sides, then dip them into the egg wash, and finally coat them with the stuffing mix powder.

Continue to repeat these steps until you are done with the cutlets. (cover in flour, dip in the egg wash and coat with the stuffing mix.) Spray with cooking spray on both sides and bake at 400ยบ for about 12-16 minutes or until the cutlets are completely cooked.

Serve with the Garlic Roasted Potatoes and enjoy!

To watch this video recipe click HERE!

A Strange, Strange Dream

So, I had a very strange dream last night... it wasn't really a nightmare, but it was a little stressful. It actually woke me up!

This last month has been a whirlwind of travel. First I went home to Washington to visit family and friends for a week. Then my husband and I went on our first real vacation in the last five years. We went on a lovely cruise up the New England coast. For the most part, it was a great time. It was a nine day trip. Unfortunately, on day six, we both woke up and went, "Ugh." Apparently, hanging out in a confined space with 2,400 other individuals from all over the globe was more than our immune systems could handle. Fortunately, we still managed to have some fun.

Anyway, we got home Saturday afternoon. Sunday, I slept a lot, trying to kick this stupid cold's you-know-what. I didn't even go out to get any groceries, even though it was some serious Mother Hubbard's cupboard around here. Then last night, I had this strange dream.

Like most dreams, some of the details are fuzzy. As you might imagine, the "why" is a little mysterious, but in this dream, I was tasked with preparing a three dish "meal" in a limited amount of time. While I had two other dishes in the bag, for some reason, I felt compelled to make eclairs.

Perhaps it was because I partook of a substandard eclair on our trip. In Boston, we ate in the North End Italian district and stopped in a pastry shop afterwards where I purchased an eclair that was so unsatisfying, I threw most of it away. Now, anyone that knows me, knows that this is a rare event indeed. Actually, come to think of it, I also had a very substandard profiterole on the cruise ship. I think these two disturbing events may have prompted my dream... that and the fact that there was no heavy whipping cream in my refrigerator last night.

So, here I am in my dream, attempting to make eclairs when I realize that I do not have enough time to make pastry cream, let it cool, and pipe it into said pastries. Being the resourceful gal I am, I decide to go for making whipped cream filled profiteroles, but - I didn't have any whipping cream! I became so distraught in my dream that I actually woke up!

I lay awake for some time, trying to calm myself enough to fall back asleep, which I finally did. However, when I woke up this morning, the first thing I felt compelled to do was go grocery shopping! Apparently, I cannot rest (literally) until there is at least a pint of whipping cream in my fridge awaiting the call of duty.

Friday, September 23, 2011

Texas Roadhouse Rolls


Photo from eatcakefordinner.com

These are as good as they look though I admit that mine didn't look like this picture.  All tastes the same in the mouth!

Texas Roadhouse Rolls - Copycat Recipe
Recipe from Eatcakefordinner.blogspot.com

4 tsp. active dry yeast
1/2 c. warm water
2 c. milk, scalded and cooled to lukewarm
3 Tbl. of melted butter, slightly cooled
1/2 c. sugar 
2 quarts all purpose flour (7-8 cups)
2 whole eggs
2 tsp. salt

Dissolve yeast in warm water with a teaspoon of sugar.  Add yeast, milk, sugar and enough flour to make a medium batter.  Beat thoroughly.  Let stand until light and foamy.  Add melted butter, eggs and salt.  Beat well.  

Add enough flour to form a soft dough.  Sprinkle a small amount of flour onto counter and let dough rest.  Meanwhile, grease a large bowl.  Knead dough until smooth and satiny and put in greased bowl; turn over to grease top. (I used the dough hook on my Kitchen-Aid to knead this for about 4-5 minutes).  Cover and let rise in a warm place until double in bulk.  Punch down.  Turn out onto a floured board.  Divide into portions for shaping; let rest 10 minutes.  Shape dough into desired forms.  Place on greased baking sheets.  Let rise until doubled.  

Bake at 350 degrees for 10-15 minutes or until golden brown.  Baste immediately with butter.  Yield: 5 to 6 dozen.  

*Jenn's Notes: I shaped my rolls by rolling out the dough into a rectangle, about 1/2-inch thick, then I folded the rectangle in half, making it about 1-inch thick. I used  my rolling pin and rolled over the dough, ever so gently, just to seal the two halves together.  I then used a dough scraper and cut the rolls into squares and placed those on my greased baking sheet.  I cut the recipe in half and I got exactly 12 big rolls and baked them for 16-17 minutes.  In order to get the 5-6 dozen rolls like the recipe states, you would have to make really small rolls.  

Wednesday, September 21, 2011

Coffee Granita

Hey everyone: Today I'm bringing you another granita! Summer is almost over, but before it's gone, you have to try this Raspado! Nothing better than frozen coffee to cool down the heat during the last few days of summer! It is super easy and super delicious!

Ingredients:

(if you have any leftover coffee from the morning you can use that.) or
1 small package (1.75 oz) Gourmet flavored coffee  (any flavor you like.)
4 cups boiling water
1/4 cup of granulated sugar


if you are using espresso, or unflavored coffee and you want to spice it up a little bit you can season it with:

1 teaspoon cinnamon (more to taste)
1 teaspoon of vanilla extract (more to taste)
1/2 tablespoon of cocoa powder. (more to taste)

Stir the sugar and coffee into the boiling water, stir until the sugar has dissolved. The coffee, wont dissolve completely, that's the kind of texture I want. If you prefer, you can brew the coffee in a coffee machine.  (I'm using about 2-3 tablespoons of coffee for every cup of water, but be free to add as much or as little coffee as you like. The same goes to the sugar, add as much as you like.

Let it cool a bit, pour into a plastic container, cover and feeze for about 2 hours.

After 2 hours in the freezer the coffee should be frozen but not all the way through, break the ice with a fork to make the granita and place back into the freezer for about an hour.

Once again, break the ice with a fork,and you are ready to serve.


Garnish with whipped cream, sprinkle with a little more coffee or cocoa powder.
Enjoy!

To watch this video recipe please click HERE

Breakfast Taco

 
I made this the other day and my family loved them! I hope you like them too.

Makes 4-6 fat large tacos (serves 3-4 people)
Ingredients:
2 cups diced potatoes
1 1/2 cups chopped sausage (bacon, ham or leftover chicken or any other meat)
4 large eggs
2 tablespoons heavy cream
1/4 cup finely chopped onions
2 teaspoon of minced garlic
1 tablespoon unsalted butter
1 tablespoon Worcestershire sauce
Flour tortillas
Salt and ground black pepper to taste
1 tablespoon of olive oil.

In a large skillet at medium low heat, combine the olive oil and butter, let the butter melt and add the onion and garlic, cook for about 2 minutes or until the onions become transparent. Add in the potatoes, season with salt and pepper to taste
stir together, put on the lid and let it cook for about 10 minutes or until the potatoes become a little bit tender.

After the potatoes have been cooking for about 10 minutes, season the Worcestershire
sauce, stir well, and also add the chopped sausage,continue to cook until the sausage has brown a little bit and the potatoes are completely cooked. (for about 6-8 more minutes)

While the potatoes and sausage continue to cook. Make a simple omelet.
Beat the eggs with the cream, season with salt and pepper, add some Tabasco sauce to add a little heat. Cook the omelet at medium low heat, on a non-stick skillet for about 2 minutes on each side. (cook longer if you want the eggs to be really well done). Divide the omelet in four sections, 1 for each taco.

Warm up the tortillas in the microwave.

The first layer of the Taco is the flour tortilla, followed by the omelet, top it with the potatoes and sausage mixture and sprinkle with shredded cheddar cheese, roll it up and that's it!
Enjoy! Serve with your favorite salsa and if you want, you can add a small salad to go with it!

To watch this video recipe please click HERE

Tuesday, September 20, 2011

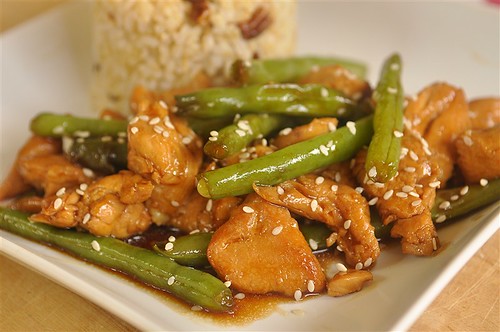
Chicken and Green Bean Stir Fry

Photo from Yourhomebasedmom.com

Once again, loved this one and even my kids ate it all!


Chicken & Green Bean Stir Fry
Recipe from Yourhomebasedmom.com


2 skinless, boneless chicken breasts, cut into bite size pieces
1/2 lb. green beans
2-3 Tbsp. sesame oil
1 Tbsp. minced ginger
3 tsp garlic, minced
5 Tbsp soy sauce
3 Tbsp vinegar

Steam green beans by placing them in a ziploc baggie and microwaving on high for about 2 minutes.  Until crisp-tender and bright green.

Heat 2 Tbsp. sesame oil in pan over medium heat.  Add chicken, sprinkle with salt and pepper and cook until cooked through.  Remove chicken from pan.  Add remaining oil to pan and add green beans, garlic and ginger and stir fry for 1-2 minutes.  Add chicken back in.  Add in soy sauce and vinegar and cook until sauce begins to thicken – about 2-3 minutes.

Serve over rice.

Sunday, September 18, 2011

Lemon-Blueberry Yogurt Loaf

I made this loaf/cake over the weekend and thought it was really delicious- tart, flavorful and different from your run-of-the-mill breakfast cake. Really though, you could eat this anytime of the day as a delicious and satisfying snack.
Lemon-Blueberry Yogurt Loaf

For the loaf:
1 1/2 cups all-purpose flour + 1 Tbs. flour, divided
2 tsp. baking powder
1/2 tsp. salt
1 cup plain (not low-fat) yogurt
1 cup sugar
3 large eggs
2 tsp. grated lemon zest (approx. 2 lemons)
1/2 tsp. vanilla extract
1/2 cup vegetable oil
1 1/2 cups blueberries (can use frozen, but thaw first), rinsed

For the Lemon Syrup:
1/3 cup freshly squeezed lemon juice
1/3 cup sugar

For the Lemon Glaze:
1 cup confectioner's sugar
2-3 Tbs. fresh lemon juice

Preheat oven to 350 degrees and butter and flour a 9X5 loaf pan. In a medium bowl, whisk together 1 1/2 c. flour, baking soda, and salt; set aside. In a large bowl, whisk together yogurt, sugar, eggs, lemon zest, vanilla and oil. Slowly whisk the dry ingredients into the wet ingredients. In a small, separate bowl, gently toss the remaining 1 Tbs. flour with the blueberries until coated. Gently fold blueberries into batter. Pour batter into loaf pan and bake for 50-65 minutes until toothpick inserted in center comes out clean. Let loaf cool in the pan for 10 minutes before removing it to a wire rack placed over a cookie sheet (important!). While the loaf is cooling, make the lemon syrup. In a small saucepan, stir together the lemon juice and sugar until the sugar is completely dissolved. Continue to cook for 3 more minutes and then remove from heat. Poke holes with a toothpick all over top and sides of loaf and pour lemon syrup slowly over the top. Allow loaf to cool completely before making the lemon glaze. To make the lemon glaze, whisk together the sugar and lemon juice. Mixture should be thick, but pourable. Add more lemon juice, if needed. Pour the lemon glaze over the top of the loaf and allow to harden before serving.

Croissant Dough Gems

These little gems were devised out of necessity while I was making all those croissants. What was I to do with those dough scraps I cut off the ends? I certainly couldn't throw them away! I mean really, duh! So, I thought that I might toss them in some cinnamon and sugar and see what happened.

Wow! I mean, double, triple, holy fantastic, wow. Wow, like, I may just make batches of this croissant dough to make these, wow. I made these twice. The first time I had the proportions more right than the second. The first time, I had more sugar than butter and the end result was an almost crunchy, caramelized crust on the outside of each dough ball. The second time, I must have used less sugar and, while they were still good, they ended up a bit too rich and did not have quite the tasty crunch from the sugar. Moral of the story? Use more sugar and less butter.

Snip your left over dough into one inch pieces using a pair of kitchen shears. Mix together a small amount of soft butter with a lot of sugar and cinnamon. Obviously, how much you need would depend on how many scraps you have. I think a ratio of butter to sugar of 1:3 is probably good. Add cinnamon based on your taste preferences. I would err on the side of too little... cinnamon is pretty strong and a little goes a long way. Add the butter mixture to the dough bits and stir to coat.

Spray a shallow baking dish with cooking oil. You want the dough bits to only be one layer thick, so plan accordingly. Let the dish sit in a warm place for 30 minutes to let the dough rise slightly. Place in a preheated 425° F oven. Bake until very golden, maybe 20-30 minutes. Let cool slightly before eating. That sugar will be hot!

Saturday, September 17, 2011

Pretzel Dog Dippers

Photo from laurenslatest.com

BYU vs. Texas: the best thing about the game were these pretzel dog dippers!  These were super easy and really quick  to make--after you let the dough rise.  I think it took me about 5 minutes of prep, no joke!

Pretzel Dog Dippers 
Recipe from laurenslatest.com

8 frozen white bread rolls (I used Rhodes)
1 package of hot dogs, or 8 polish sausages (little smokies work too)
1 cup hot water
2 tablespoons baking soda
salt

Defrost and proof dough according to packaged directions (it took me 3 hours to get my dough to defrost and rise a little)

Preheat oven to 350. In a small bowl, dissolve baking soda in hot water. Set aside. Cut hot dogs in half or into thirds if you want bite sized snacks. Form dough into 1 large ball. Divide dough into enough equal pieces to cover all pieces of hot dogs. Smooth dough over hot dog pieces and dip into baking soda water. Arrange on greased baking sheet. Sprinkle salt over top. Bake 12-15 minutes or until dough is darker golden brown. Serve with cheesy chili dip (below), or usual hot dog condiments.

Cheesy Chili Dip

1/2 cup velveeta
1 can chili, or 2 cups homemade leftover chili

Microwave velveeta and chili for 1-2 minutes until velveeta is completely melted. Serve with pretzel dog dippers or tortilla chips. 

Friday, September 16, 2011

Lehi Orange Rolls

Photo from Sister's Cafe

Just look at these.  They were so good!  I froze half the batch and ate them later and they were still so delicious!

Lehi Orange Rolls   

Recipe from The Sister’s Cafe

1/3 cup warm water
2 Tb yeast
3 eggs
1 tsp orange extract
1 cup warm water
1 tsp salt
1/3 cup sugar
1/2 cup oil
5 1/2 – 7 cups flour, divided
1  cup butter, softened, divided
1 1/3 cup sugar, divided
zest of 2 oranges
Dissolve yeast in 1/3 cup very warm water.  Add eggs and beat.  Add orange extract, 1 cup warm water, salt, 1/3 cup sugar, oil, and 4 1/2  cups flour. Beat.  Add 1/2 to 1 cup flour and knead for several minutes.  Place dough in greased bowl and cover with greased plastic wrap. Put in a warm place and let rise for 1 hour, or until doubled.
Knead dough 5 or 6 times.  Divide in half.  Cover and let rest for 10 minutes.  Roll each half out into a narrow and long rectangle, about 1/2 inch thick.  Spread with softened butter, remaining sugar, and orange zest.  Roll up lengthwise  and pinch to seal edge of dough.  Cut rolls about 1 1/2 inches thick.  Place in a greased pan fairly close together and cover with greased plastic wrap.  Let rise for 1 hour in warm place.  Bake at 350 degree for 12 to 17 minutes. Don’t overbake.  Let cool slightly, then ice with orange cream cheese icing.


Orange Cream Cheese Icing

1/2 package of cream cheese (4 oz.), at room temperature
1 Tb butter, softened
1/2 package of powdered sugar (about 3 cups)
2 Tb orange juice
1/2 tsp vanilla extract
1/2 – 1 tsp orange extract, to taste
Beat all ingredients together.  Add more orange juice, if necessary, for drizzle consistency.  Use over orange rolls.

Oiling Utensils

Like most people these days, I use a lot of wooden utensils in the kitchen. I love them for a variety of reasons, not the least of which is they are relatively cheap, don't mess up my non-stick pans, and are fairly durable. I even put them in the dishwasher with great success. I do this mainly because wood does tend to absorb stuff and I like to think that my utensils are free of any bacteria and food odors.

A key step in improving the life and utility of your wooden utensils (and cutting boards) is to periodically oil them with mineral oil. As you can see in the picture above, there is a big difference between that gnarly, feathery fork like thing and the freshly oiled spoon behind it. And after oiling my cutting boards, it never ceases to amaze me how much easier they are to clean (I hand wash them). I love to see the water bead up on the surface! Just don't forget to be sure you use a food safe mineral oil. I got mine at a kitchen supply store for less than five bucks. It's lasted me years and there is still plenty left.

I simply use a pastry brush to apply the oil and then use a clean rag to wipe off the excess. Suddenly, my wooden utensils look brand, spanking new!

Thursday, September 15, 2011

Rasberry Cheesecake Trifle

Photo from ourfamilytreat.com
Oh my gosh!  This has got to be the most amazing piece of heaven I've tasted recently.  Plus, you just buy the cake part, you don't even have to make it.  Plus, it was good for the next couple of days, too.  Not that I needed to confess that.  

Raspberry Cheesecake Trifle
Recipe from ourfamilytreat.com
Ingredients:

2 8 ounce packages cream cheese, softened
2 cups powdered sugar
1 cup sour cream
2 teaspoons vanilla

Mix together cream cheese, powdered sugar, sour cream and vanilla. 

1 cup heavy cream
1 tablespoon sugar
1 teaspoon vanilla

Whip heavy cream, sugar and vanilla. Then fold into the cream cheese mixture.

2 prepackaged Angel Food Cake, cubed

2 package raspberry Danish Dessert (I can never find this so I used raspberry jello and unflavored gelatin and then added a little cornstarch mixed with water)
3 cups water
2 package frozen raspberries

Bring water and Danish Dessert to a boil. Stir constantly. Remove from heat and add frozen raspberries. In trifle bowl, begin to layer. Start with raspberry layer, then add cream cheese mixture, then angel food cake, and repeat. Be sure to end with raspberry layer. Chill for at least 2 hours before serving.

Tuesday, September 13, 2011

Tuna Salad


Hey everyone! I hope you are all doing great! Today I'm bring you a delicious and super easy Tuna Salad! My eating healthy-diet kind of thing is still going on... I lost a couple pounds and hopefully by the end of this month I will be in my ideal weight! So I'm really excited, anyway,let's go to the recipe!

Serves 2
Ingredients:

2-4 leaves of lettuce (Optional. Any kind you like, I used Iceberg Lettuce)
1 can tuna in water
2/3 cup corn kernels
2/3 cup diced cooked potatoes (can potatoes, or leftover cooked potatoes)
1/3 cup red bell peppers chopped in small pieces
1/4 cup diced cooked carrots (can carrots, or leftover cooked carrots)
1 avocado
2 Campari tomatoes cut in quarters
Cilantro for garnish
1 lime for garnish

Dressing:
2 tablespoons lemon juice
1 tablespoon mayonnaise
1/2 tablespoon Dijon mustard
Ground black pepper and crushed red pepper to taste.

Dressing: Combine all the ingredients together, mix well, taste the flavor add more ground black pepper and crushed red pepper if needed. Set aside.

Salad: In a bowl combine the tuna, corn kernels, red pepper, carrots and potatoes, stir together. Pour the dressing over the tuna mixture, stir, taste and add salt, ground black pepper and more crush red pepper if needed.

Serve on a lettuce leaf, or a bed of chopped lettuce. Garnish with avocado slices, tomato wedges and chopped cilantro, squeeze a lime over the lettuce, avocado and tomato, season with salt and ground black pepper.

That's it. Enjoy!
To watch this video recipe click HERE

Cafe Rio Style Salad

Photo from favefamilyrecipes.com

We don't really need a picture do we?   I finally found it and I am so, so, so excited!  By far the best replica of Cafe Rio salad.  I love it!

Cafe Rio Style Salad 

Recipe from ventanarecipes.blogspot.com

Cafe Rio Pork

2 lbs pork roast
1 can Coke decaf
1/4 cup water
1 tsp garlic salt
1 can green chiles
1 cup red enchilada sauce (suggested La Palmas mild)
3/4 cup brown sugar

Put pork into a crock pot with 1/2 can Coke, water, and garlic salt.  Cook on high for 1 hour and then on low for 3 hours.  Shred pork in pot and add rest of Coke, green chiles, enchilada sauce, and brown sugar.  Cook on low for 2 more hours.  Serves 6

Creamy Tomatillo Dressing

2 jalapenos diced
3 cloves garlic diced
2 tomatillos chopped
1 small handful cilantro
2 TBS lime juice
2 cups milk
2 cups mayonnaise
2 envelopes Hidden Valley Ranch dressing mix

Blend all ingredients except mayo in blender until smooth.  Add mayo and blend until just incorporated.  Chill (overnight is best.)

Lime Cilantro Rice

1 cup uncooked rice
1 tsp butter
2 cloves garlic minced
1 tsp lime juice
1 cup chicken broth
1 cup water
1 TBS lime juice
2 tsp sugar
3 TBS cilantro chopped

In saucepan, combine rice, butter, garlic, 1 tsp lime juice, broth, and water.  Bring to a boil and cook for 22 minutes on low.  Combine rest of ingredients and stir into rice as you fluff it.

Toppings:

cheese, cheddar and monterey jack
romaine lettuce chopped into 1/4" strips
tomatoes, chopped
sour cream
avocados or guacamole
black beans
pinto beans
crunchy corn tortilla strips or chips

Layer the Cafe Rio Pork Salad as follows:

cooked tortilla, cheese, black/pinto beans, lime cilantro rice, lettuce, Cafe Rio Pork, then your choice of favorite toppings.  drizzle with creamy tomatillo dressing.  crush corn tortilla chips for final topping.

Monday, September 12, 2011

Chicken Tortilla Soup


picture courtesy of bloggingitswhatsfordinner.blogspot.com

I know there are probably several tortilla soup recipes on here already, but I saw this one (from bloggingitswhatsfordinner.blogspot.com) and it caught my eye because of the fresh cilantro and fresh limes. It was really really easy too unlike some other recipes I have tried. Kids weren't crazy about it with the chunks of tomatoes from the rotel and  the cilantro and lime- it was just too much for them! But my husband and I really enjoyed it.

Chicken Tortilla Soup
2 cans of black beans, rinsed
4 cans of chicken broth
1 pkg of frozen corn
2 cans of mild rotel
1/2 small can of tomato paste
Shredded chicken (I just threw 3 breasts in a crock pot with a cup of water...super moist to shred)
Combine the above in a pot and heat until boiling. Add salt and garlic powder to taste (about 1tsp of ea).


Garnish with:
-1 bunch of cilantro chopped, for garnish
-shredded cheese, garnish (we had pepper jack for adults and cheddar for kids...PJ was AWESOME in this)
-two avocados chopped into bits, garnish
-two limes cut into wedges, for squeezing on top-Tortilla Chips for crunching on top

P.S.- this makes A TON. I would half it next time for sure. It makes about 10 adult servings.


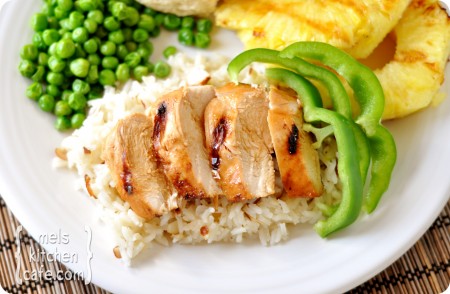
Grilled Teriyaki Chicken

Photo from melskitchencafe.com


I love grilling and I love the flavor of teriyaki.  Thus, I love this recipe.  I just used the canned pineapple and still loved it all!


Grilled Teriyaki Chicken

Recipe from melskitchencafe.com

*Note: if you don’t have fresh pineapple or choose not to use it, you can use a large can of pineapple chunks, draining and reserving the liquid for the marinade, and serving the pineapple chunks alongside the grilled chicken. I like to serve this teriyaki chicken with baked brown rice (cooked with chicken broth – and after baking, I stir in toasted almonds and sliced green onions).
*Serves 6
6 boneless, skinless chicken breasts
6 ounces (3/4 cup) pineapple juice
1/2 cup reduced-sodium soy sauce
1 tablespoon molasses
2 tablespoons brown sugar
1/4 cup canola or olive oil
3 tablespoons cider vinegar
1 teaspoon garlic powder
Fresh pineapple, for grilling
Hot rice, for serving

In a small bowl, combine the pineapple juice, soy sauce, molasses, brown sugar, oil, vinegar and garlic powder. Whisk to combine. Add the chicken breasts to a large ziploc bag and pour the marinade over the chicken. Seal the bag and let the chicken marinate in the refrigerator for 6 to 8 hours.

Drain the liquid. Grill the chicken over medium-high heat for 6-7 minutes on each side, until the chicken is cooked through. When the chicken has about 4-5 minutes left to cook, add the rings of fresh pineapple and grill for 2 minutes per side. Transfer the chicken to a plate or cutting board, cover with foil and let rest for 5 minutes. Slice the chicken into strips. Serve over hot, cooked rice with grilled pineapple.

Friday, September 9, 2011

Crispy Oven-Baked Chicken

Pic courtesy of Mel's Kitchen Cafe

I had looked over this recipe on Mel's Kitchen Cafe months ago and passed it up because it just looked ordinary. But, last night I was desperate for something new for dinner and came across this again. And, I'm so glad I didn't pass it up again, because we LOVED it. Christian could not stop raving. I loved it for it's simplicity (I had all the ingredients on hand!). But, it's texture of flavor from the butter to the garlic to the bread crumbs and Parmesan, made it a definite winner in my book. This is definitely going to be making many more appearances at our dinner table.

Crispy Oven-Baked Chicken

adapted from Mel's Kitchen Cafe

*Note: If you don’t have a food processor to make fresh bread crumbs, you can try using a blender and pulsing the crumbs or try using panko bread crumbs (usually found in the Asian foods aisle). If you are using a food processor, you can also add the Parmesan cheese, salt and pepper to the bread crumbs and pulse to combine to create an even finer crumb.

4 tablespoons butter
3 garlic cloves, finely minced
1-2 thick slices whole wheat bread (for about 1 1/2 cups fresh bread crumbs)
1/4 cup finely grated Parmesan cheese
1 1/2 teaspoons kosher salt
1/2 teaspoon ground black pepper
2 large boneless, skinless chicken breasts, cut in half length-wise

Preheat oven to 350 degrees F. Line a rimmed baking sheet with aluminum foil and coat lightly with nonstick cooking spray. Set aside. Combine butter and garlic in an 8- or 10-inch skillet. Heat over medium heat until the butter has melted. Pour the butter/garlic mixture into a shallow pie plate or similar dish and cool to room temperature. Pound the 4 chicken pieces with a meat tenderizer until they are about 1/4-inch thick.

In the bowl of a food processor, tear the bread into large chunks, and pulse until the bread is ground into crumbs. Pour the bread crumbs into a shallow pie plate or shallow bowl and toss with the Parmesan cheese, salt and pepper.

Dip each chicken breast in the melted, cooled garlic butter. Transfer to the bread crumb mixture and turn until coated on all sides. Arrange the chicken in one flat layer on the prepared baking sheet. Drizzle any of the remaining melted butter over the chicken. Bake the chicken until it is lightly browned and just cooked through, 40-50 minutes. The baking time will depend on the thickness and size of the chicken you are using. Don’t overcook or the chicken will be dry.

Thursday, September 8, 2011

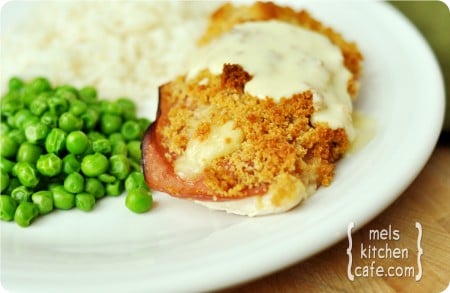
Easy Chicken Cordon Bleu

Photo from melskitchencafe.com
This was easy and it was really good.  I don't love dijon mustard so I substitued honey mustard.  But I don't love honey mustard so I would probably make the sauce with sour cream or cheese next time or maybe just leave out the mustard.  Jake loved the sauce.  To each their own.
  
Easy Chicken Cordon Bleu
Recipe from melskitchencafe.com
*Serves 6
For the Cordon Bleu:
3 large chicken boneless, skinless chicken breasts, cut in half length-wise (to form two thinner chicken breast cutlets)
12 slices deli ham
1 cup bread crumbs
2 tablespoons butter, melted
1/3 to 1/2 pound thinly sliced swiss cheese
For the Parmesan-Dijon Cream Sauce:
2 tablespoons butter
2 tablespoons all-purpose flour
1 cup milk
1 teaspoon chicken bouillon granules (or 1 bouillon cube, crushed)
1/2 teaspoon salt
1 tablespoon Dijon mustard
1/2 teaspoon Worcestershire sauce
1/2 cup finely grated Parmesan cheese
Lightly grease a 9X13-inch baking dish with cooking spray and preheat the oven to 350 degrees. In a bowl, combine the bread crumbs and melted butter. Set aside.
Lay the cut chicken breasts in a single layer in the 9X13-inch dish. Layer each chicken breast with two slices of ham and top with 2 slices of swiss cheese, shingling across the chicken breast to make sure the entire chicken breast is covered with ham and cheese. Sprinkle the bread crumbs over the top of the chicken.
Bake the chicken for 30-35 minutes, until the chicken is cooked through completely, the cheese is bubbling and the bread crumbs are golden.
While the chicken bakes, in a medium saucepan, melt the 2 tablespoons butter. Stir in the flour, whisking constantly, while cooking the flour/butter mixture for 1-2 minutes. Slowly pour in the milk while whisking quickly. Stir in the chicken bouillon granules and salt. Whisk constantly over medium heat until the mixture begins to simmer and thicken, about 3-5 minutes. Once the sauce has bubbled and thickened, remove from heat and stir in the mustard, Worcestershire sauce and Parmesan cheese. Stir until the cheese is melted. Keep the sauce warm until the chicken is finished baking.
Serve each chicken cordon bleu portion with warm sauce.

Wednesday, September 7, 2011

Citrus and Fresh Herbs Oven Roasted Chicken


Today I'm bringing you a special dinner to celebrate anything you want! This one is perfect for any kind of occasion, if you change the chicken for turkey, it will definitely make a terrific Thanksgiving Dinner or Christmas Dinner!

It might not be as easy as the rest of my recipes, but it is worth the extra time and effort! Your family, friends and/or guests would be very surprised with this dinner! This one is under $15 dollars, and will feed up to 6 persons! I hope you like it!
Chicken was $4.99 potatoes were .99c a pound and the corn were 3 ears $1. Herbs were 1.99 for the 3 of them.

Serves 4-6
Ingredients:

1 whole chicken
1 1/2 tablespoons of fresh rosemary
1 1/2 tablespoons of thyme
1 tablespoon of sage
2 tablespoons of minced garlic
3 whole cloves (optional)

1/3 of cup of unsalted butter, soften
2 tablespoons of extra virgin olive oil
Zest and juice of one orange
Zest and juice of one lemon
tablespoon of smoked paprika

salt and ground black pepper to taste

Optional
3 ears of yellow corn cut in quarters
1 pound of red and white potatoes cut in quarters (half a pound of each)
1 large red onion chopped in big chunks

Chop the fresh herbs, rosemary, thyme and sage.

In a bowl combine the butter with the olive oil, the fresh herbs and minced garlic. Add in the orange zest, lemon zest and 1/2 cup of orange juice plus 1 tablespoon of lemon juice. Season with 1/2 tablespoon of each, salt, ground black pepper and smoked paprika. Stir everything together. Taste for flavor, add more salt and pepper if needed. Set aside.

Rinse the chicken with cold water, rinse it inside and out. Pat it dry with some paper towels.

In order to get all the flavor into the meat and not only the skin, loosen the skin from the body a little bit. Place your index finger in between the skin and the meat
and start working your way up to the neck and sides of the chicken. Push between the skin but be careful not to remove the skin or tear it apart. Continue doing this until you have loosen the skin from the whole chicken.

Using a knife, poke the chicken several times, this is just to make sure, all the flavors will be absorbed into the rest of the meat.

Rub the butter mixture under and on the skin. Make sure to massage it really well under the skin first. We want all those delicious oils from the fresh herbs and the rest of the flavors to fully impregnate the meat making it just as delicious as the skin itself. So rub the mixture under the skin really well.

Pour whatever is left on the chicken, and rub it very well on the skin
don't forget to do the back as well and also rub some of the mixture inside the chicken cavity.

Season with salt, ground black pepper and paprika, about 1/2 tablespoon of each on each side, give it one last rub. Refrigerate for 4 hours before cooking. (Overnight will be better)

Optional
This extra step takes less than 5 minutes and it will make the chicken 10 times more
delicious and juicy.

Fill the chicken cavity with one half of the orange that we used earlier, also add the remaining half of the lemon and 3 garlic cloves and if you have any left over herbs also insert them in the chicken cavity. Refrigerate for 4 hours before cooking. The flavors would be even better if you refrigerate overnight.

Bake at 400° for 30 minutes. Turn around and continue to bake for 25-30 more minutes, or until the chicken is completely cooked.

If roasting potatoes and corn with the chicken
Bake the Chicken at 400° for 30 minutes. Turn around, add the potatoes, corn and onions, season with extra virgin olive oil, salt and ground black pepper. Continue to cook for 25-30 minutes or until the chicken is cooked.


Transfer the chicken to a serving plate, remove everything you put inside the chicken cavity: orange skin, lemon wedges, herbs, garlic, etc.

Stir (bathe) the potatoes, corn and onions in the chicken juices, then transfer to the same serving plate with the chicken and that's it, enjoy!


To watch this video recipe click HERE!
Tuesday, September 6, 2011

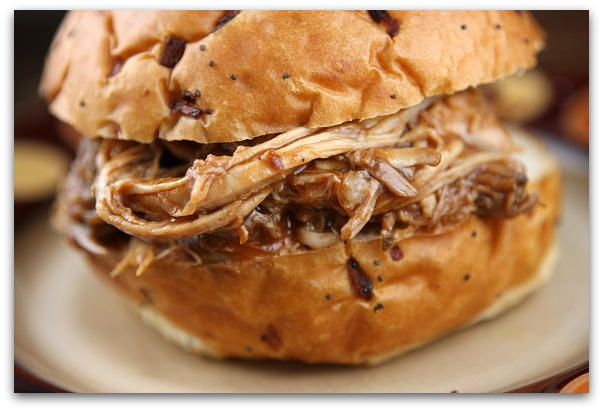
Root Beer Pulled Pork

Raving reviews from all the gentlemen in the house--and there were 4 of them (grown men that is).  I liked it but I think I personally prefer pulled chicken in my sandwiches.

Root Beer Pulled Pork   

Recipe from recipegirl.com

Ingredients:

1 (5 to 6 pound) bone-in pork shoulder/butt roast
1 envelope dried onion soup mix (or dehydrated onions)
salt and pepper
1 can root beer
2 cups barbecue sauce, divided
buns

Directions:

1. Trim roast of excess fat. It's okay to leave some on there-- just get rid of the large, visible slabs.
2. Place roast on a work surface and sprinkle with onion soup mix. Use clean hands to rub the mix into the meat, reaching underneath to reach all sides. Sprinkle generously with salt and pepper. Place seasoned roast in your slow cooker.
3. In a medium bowl, whisk together root beer and 1/2 cup barbecue sauce. Pour over the roast in the slow cooker.
4. Place lid on the slow cooker and cook on LOW heat for 10 to 11 hours, or until internal temperature is above 190 degrees F. and meat is tender enough to pull away from the bone.
5. Remove roast to a cutting board and let sit to cool for just a few minutes. Pour out all but about 3/4 cup of the juices from the slow cooker. Use two forks to shred the pork, cutting around and discarding any fatty pieces. Place all of your pulled pork back into your slow cooker. Add about 1 1/2 cups of barbecue sauce. Stir to combine and place the lid back on. Heat on HIGH for about 15 to 20 minutes, just until pork and juices are hot and bubbly. Use this time to heat up buns and get the rest of your meal ready.
6. Scoop pulled pork onto buns and serve immediately.

Tips:

*If you don't wish to make such a large roast, you can use the same ingredients for a smaller roast too. You can likely cut down a bit on the cooking time, and use less barbecue sauce when adding it in at the end.
*For the most tender pulled pork, I do not recommend trying to short-cut the recipe by cooking it on HIGH heat. Low and slow is best!

Thursday, September 1, 2011

Chocolate Brownies


These brownies work for a crowd (obviously, since served at Girl's Camp and at our massive family reunion).  I doubled them and put them on a large cookie sheet.  I used mint chips on top of the chocolate chips.  Yummy!  I also love how you make it in the microwave.  Simple, that's how I roll.

Chocolate Brownies
Recipe from Andrea Bake, served at Girls Camp


3/4 cup cocoa
1 cups butter or margarine
2 cups of sugar
3 eggs
1 tsp vanilla
1 cups flour
1 cup chocolate chips
Toffee and mint pieces

Melt butter in microwave, add cocoa and sugar; mix well.  Incorporate eggs and vanilla.  Stir in flour.  Spread on foil lined baking sheets.  Bake at 350 for 20-25 min.  Immediately after the brownies are removed from the oven, sprinkle with chocolate chips.  Allow to sit for 5 min.  Spread melted bits evenly over brownies, and top with toffee or mint pieces.  Allow to cool before cutting into bars.