Granola
Recipe from my MIL, Debbie Hutchings
8 c. oats (old-fashioned)
1 c. wheat germ
1 c. brown sugar
1 c. of any or all of the following:
slivered or sliced almonds
cashews
sunflower seeds
flaked coconut
pumpkin seeds
any other raw nut you desire
Mix well in large bowl.
In a saucepan heat:
1/2 c. water
1/2 c. oil
1 c peanut butter
1/2 c. maple syrup
3/4 c. honey
Heat until bubbly then turn off heat and add 2 tsp.vanilla. Pour over granola mixture.
Spread onto 2 extra large baking sheets. Bake at 200 degrees for 2 hours. Do not overcook. It may seem moist, that's how it's supposed to be! Let cool. Put back into bowl and stir in:
2 c. craisins and/or your choice of any other dried fruit.
Store in airtight containers.
Tuesday, November 29, 2011
Monday, November 28, 2011
Breakfast Panini

Hi Everyone!
Today's recipe is a breakfast Panini! Super easy and a great alternative to start your mornings!
Makes 1 panini (could be enough to feed 2 persons)
Ingredients:
2 slices white old fashion bread ( or any bread you like)
1 egg
1 bacon slice (I'm using turkey bacon)
2 slices of cheese ( I'm using colby jack cheese)
1/2 teaspoon butter
2 tablespoon shredded parmesan cheese
1 slice 1/4 inch thick of Smoke Turkey Ham
1/4 cup of baby spring mix (baby greens or lettuce)
2 tablespoon Dijon mustard
1/3 of cup of green bellpeppers mix with onion (I'm using the frozen kind,use fresh if you want to.)
1 tablespoon milk
salt and black pepper to taste
Beat the egg with the milk and season with black pepper to taste and a pinch of salt. (Do not add too much salt, we will be adding some Parmesan cheese later on... and the cheese is kind of salty.) Set aside.
In skillet on medium low heat, cook the egg mixture for about 2 minutes, flip it around and cook for 30 seconds. Add the Parmesan cheese over one half of the omelet, cook for 30 more seconds, fold the omelete in half, and cook for 30 more seconds. Remove it from the heat. Set aside for a minute.
Cook the ham and the bacon until slightly brown. 3 minutes on each side.
In the same skillet, melt the butter and cook the bell peppers and onions for 2-3 minutes, just to warm them through.
Let's build the Panini...
Spread the Dijon mustard over the bread slices.
Top one of the slices with the omelette, add the mixture of bell peppers and top it with a slice of cheese.
Top the second one with the ham, followed by the baby greens and the second slice of cheese, top it with the bacon. Put both sides together.
If you have a panini maker, go ahead and press your panini.
If you don't have a panini maker, you can cook your Panini on a large skillet, a gridlle, a toaster oven or a regular oven.
On a skillet or a griddle: add a teaspoon of olive oil or butter, toast your Panini until golden brown on the bottom, flip around and continue to toast the second side, press down with your spatula or with a second skillet to flatten it up. Let the Panini get nice and brown on both side, and let the cheese melt. 3-4 minutes first side. Second side will take less to toast since it will be pressed down. (2 min.)
In a toaster oven or regular oven: Preheat oven to 375ºF. Bake Panini until golden brown and the cheese has melted. (5 minutes) If you want your Panini to be flat like a Panini should be, just top it with a larger cast iron skillet as soon as it goes into the oven.
Friday, November 25, 2011
Classic Apple Pie


Classic Apple Pie
Yield: one 9 inch pie
Enough cored, peeled, and sliced apples to fill a 9 inch pie tin, mounded (use Granny Smith or another tart, firm apple, usually 5-10 apples, depending on size)
1/2-1 cup sugar
3-5 TBS flour
1/2 tsp cinnamon
dash nutmeg
1 TBS lemon juice
Place apples in a large pot. Start with the smallest amount of sugar and flour; add the spices and lemon. Stir thoroughly. Cook over medium low heat, covered, until the apples are slightly soft and the juice is thickened. Stir frequently to prevent scorching. Taste. Add sugar and flour as necessary until the sweetness and thickness are right. Remember that the filling will be thicker when it cools than it is when it is hot. The apples do not need to be fully cooked, as they will continue to soften when baked in the pie shell. To reduce the chance of lump formation when adding more flour, add it by placing the flour in a small strainer and tap a small amount into the filling at a time. Let filling cool before adding to an unbaked pie shell. Pour cooled filling into the pie shell, cover with the top crust. Be sure there are vents in the top of the pie to allow steam to escape. If desired, brush the top of the crust with an egg yolk wash and sprinkle with sanding sugar. Bake at 400° F for 25-35 minutes, or until the crust is nicely golden. Let pie cool before serving. Can be served at room temperature or chilled.
Thursday, November 24, 2011
Artichoke Dip
One of my all-time favorite appetizers...


Artichoke Dip
Adapted from a friend
1 large can artichoke hearts, not marinated
1 cup parmesan cheese, shredded
1/2 cup mayonnaise
1/2 cup sour cream
1- 8 oz. package cream cheese
small can of diced green chilies, drained (I used 3/4 of the can)
pinch of garlic salt
Dice artichoke hearts fine. Mix together with everything else. Bake, uncovered, in flat casserole dish for 20-30 minutes at 350, or until bubbly. Serve with chilled vegetables or crackers.
Thanksgiving Dressing


I'm not a big fan of stuffing a turkey. I like mine a little on the drier side rather than a big ball of mush. So I tried this recipe last week for our feast, and I loved it! I couldn't find Mrs. Cubbison's herb dressing in the store, so I used the entire box of seasoned dressing and added my own herbs--sage, thyme, and celery salt.
Jessica Sedgwick
1 cup butter
1 1/2 cups chopped celery, include leaves
1 cup onion, chopped
1/2 box Mrs. Cubbison Herb Dressing
1/2 box Mrs. Cubbison Seasoned Dressing
3/4 cup cooked wild rice
3/4 cup dehydrated cranberries
3/4 cup chopped peeled apples
1 1/2 cups chicken stock
Melt butter in 8-12 quart pot. Saute the celery and onions until limp. Add the herbed and seasoned dressings, rice, cranberries, and apples. Toss to mix well. Pour the chicken stock over the dressing evenly and toss to stir. Spray a 9x13 dish with non-stick vegetable spray. Lightly fill pan level. Do not pack. Cover with foil and bake at 350 for 35-40 minutes. Serves 8-10.
Tuesday, November 22, 2011
IHOP Corn Cake Pancakes
 |
| Photo from tasteandtell blog |
Weird, right? I know these sound crazy but they are really good and tastes a lot like the IHOP pancakes. I would add more flour next time to the batter--I thought it was a bit runny. I served it with the delicious buttermilk syrup. Hmm...yummy!
IHOP Corn Cake Pancakes
Recipe from tasteandtellblog
Makes 16 pancakes
1 1/2 cups all-purpose flour
1/3 cup cornmeal
1 teaspoon baking powder
1/2 teaspoon baking soda
1/2 teaspoon salt
2 eggs
2/3 cup granulated sugar
1 cup milk
3/4 cup buttermilk
1/3 cup butter, melted
Preheat a griddle to medium.
Combine flour, cornmeal, baking powder, baking soda and salt in a medium bowl.
In another medium bowl, mix eggs and sugar with an electric mixer on medium speed for 30 seconds. Add the milk, buttermilk and melted butter; mix well.
Mix the dry ingredients into the wet ingredients with the mixer until smooth. Let the batter sit for 10 minutes.
Spray the hot griddle with nonstick spray. Spoon 1/4 cup portions of the batter onto the hot griddle and cook for 2 to 3 minutes per side until brown. Serve hot with butter and maple syrup.
Green Bean Casserole from Scratch

I have always been a fan of the idea of green bean casserole. I mean who wouldn't be? Fresh green beans swimming in a savory mushroom sauce with crunchy onions on top? Sounds pretty good when it's put that way, huh? Unfortunately, being a scratch girl, not only do I never have canned cream of mushroom soup on hand, I am not a big fan of it's commercial taste. The use of frozen green beans over canned was an automatic; there was no debate there at all.
Last week I decided to make my own green bean casserole, from scratch. What that means is simply making a homemade sauce versus opening a can. It's pretty quick and easy, and boy was it good! I'm going to make it again later this week for the big day. Here's how it goes...
Green Bean Casserole from Scratch
Yield: 8-12 servings
3 TBS butter
1 medium onion, diced
8 oz baby bella mushrooms, diced
1/4 cup cream sherry
1/8 tsp garlic powder
1/2 cup flour
1 tsp salt (or to taste)
1/4 tsp pepper
4 cups whole milk, warmed
2 1/2 lbs frozen cut green beans, cooked and drained
1 1/2 cups french fried onions
Preheat the oven to 375° F. Melt butter in a deep skillet. I prefer using a stainless pan so I get better browning on the bottom, leading to a richer flavored sauce. Add the onions and cook over medium high heat until translucent and starting to caramelize. Add the mushrooms and cook until they are tender and browned. Add the sherry and stir vigorously to deglaze the pan and lift up all the browned bits on the bottom of the pan.
Mix the flour, salt, pepper, and garlic powder together. Add to the skillet and stir to mix. Slowly add the warmed milk, stirring as you go to minimize lumps. Once all the milk is added, cook, stirring continuously until it just comes to a boil and is thick. It will thicken more as it bakes and then cools. Add the green beans and stir to coat. Pour the mixture into a greased 9x12x1 inch baking dish (or similar). Sprinkle the top evenly with the french fried onions. Bake at 375° F until bubbly through and the onions are nicely browned, about thirty minutes. Cool slightly before serving.

Monday, November 21, 2011
Pork Roast with Apples and Onions
 Pic courtesy of Pioneer Woman
I saw this recipe a couple weeks ago on Pioneer Woman and it just spoke to me. It looked so yummy and different and Fall-ish. I'm not a huge fan of pork and I really don't do roasts all that often any more, but I knew I just had to try this. I'll quote Pioneer Woman on this, "Oh, how I love life. For life includes dinners like this. " True, true, true. This was so different from any roast I have ever had. I loved the sweetness of the apples and the saltiness of the roast and onions. It's convinced me to start making roasts again (every once in a while isn't so bad, right?!).
Pork Roast with Apples and Onions
adapted from Pioneer Woman
Pork Roast with Apples and Onions
adapted from Pioneer Woman
- Pork Roast (shoulder, butt, or any roast you prefer)
- 3 Tablespoons Olive Oil
- Salt And Pepper, to taste
- 4 cups Apple Juice
- 1 cup Beef Stock
- 3 whole Apples, Cored And Cut Into Wedges
- 3 whole Medium Onions, Sliced
- 1 whole Bay Leaf
OPTIONAL: Saute onions until brown. (Or you may just add them raw to the roast.)
To make the pork roast, heat olive oil in a large pot over high heat. Salt and pepper pork roast, then sear on all sides to give it some color. Reduce heat to low. Add apple juice, beef stock, apple slices, onions, and bay leaf. Cover and simmer for 3 hours. (Or you may place in a 300 degree oven if you prefer.)
When the roast is done, remove the roast, apples, and onions to a platter. Raise heat to medium-high (to high) and boil liquid, reducing it until thick and rich. For a little extra thickness, whisk 1/4 to 1/2 cup warm water with 2 Tbl flour and then whisk into gravy sauce.
Spoon thick sauce over the roast, then cut the roast into slices. Serve with apples, onions, and mashed potatoes.
Pear Pastry Pockets

Hi Everyone! Today's recipe is a very easy and delicious dessert, perfect for any occasion specially for the Holidays, it will save you tons of time and you will for sure impress your guests with this delicious pastry. (This idea was taken from The Costco Connection magazine issued Sept. 2011. I made some modifications but the idea came from the magazine. My husband asked for this particular recipe, so I decided to share it with you all. All credits go to The Costco Connection Magazine for this delicious and super easy dessert!)
Makes 16 pockets
Ingredients:
4 large pears
2/3 cup granulated sugar
1 1/2 teaspoon cinnamon
1 egg beaten
2 packages puff pastry sheets
1/2 cup apricot preserves
2 tablespoons melted butter
Preheat oven to 400ºF.
Combine sugar and cinnamon together, mix well and set aside.
Wash the pears, cut them in half, remove the seeds, and then cut each half into 1/4 inch slices, cut the slices in half.
Pour the melted butter over the pear slices sprinkle half the sugar mixture over the pears. Combine and set aside for a minute.
Cut puff pastry sheet in half then each half in half. (it will make 4 equal size squares.)
Add some of the pears over each pastry square, sprinkle with a teaspoon of the sugar mixture. Brush the edges of each square with the egg wash. Close the pocket by bringing the four corners of each square close together over the center of the pastry. Try to cover as much of the fruit as you can. Press down lightly to seal the pocket. Brush with the egg wash.
Keep on repeating these last steps until you are done with all the pockets.
1.-place some of the pears over the pastry square
2.-sprinkle with 1 tsp. of sugar mixture.
3.-brush the edges with the egg wash
4.-close pocket by bringing all four corners of each square together
5.-Brush the whole pocket with the egg wash
Bake at 400º F for about 20-25 min. or until golden brown.
Serve with whipped cream or vanilla ice cream! Enjoy!
Friday, November 18, 2011
Snickerdoodle Muffins
 |
| Photo from tastykitchen.com |
These seemed a little high maintenance, but they were easier than I thought they would be and they were really delicious. The dough seemed to runny to roll in cinnamon but it actually worked well.
Snickerdoodle Muffins
From tasty kitchen blog
Ingredients
- 1 cup Butter, Softened
- 1 cup Sugar
- 2 whole Eggs
- 2 teaspoons Vanilla
- 2-¼ cups Flour
- ¾ teaspoons Baking Powder
- ¾ teaspoons Baking Soda
- ¾ teaspoons Cream Of Tartar
- ½ teaspoons Salt
- 1 cup Sour Cream
- ¼ cups Buttermilk
- _____
- FOR THE TOPPING:
- ⅔ cups Sugar
- 2 Tablespoons Cinnamon
Preparation Instructions
Preheat the oven to 350ºF. Prepare a muffin tin with liners. (I learned the hard way that they are too fragile for just cooking spray.)In a mixer, combine the butter and sugar and cream until fluffy. Add the eggs and vanilla and combine.
In a separate bowl, combine the dry ingredients. Add half of the dry ingredients to the mixing bowl and stir to combine. Add the sour cream and buttermilk and mix to combine. Add the rest of the dry ingredients and mix until you have a smooth batter.
In a small bowl, combine the sugar and cinnamon for the topping.
Use scooper and plop a scoop of batter into the bowl with the sugar and cinnamon. Gently roll the batter in the sugar and cinnamon. Place the ball into the muffin liner.
When you have completed all of the muffins, sprinkle the leftover cinnamon sugar onto the tops of all of the muffins.
Bake the muffins at 350ºF for about 15-18 minutes or until they are golden on top and just baked through.
Wednesday, November 16, 2011
Baked Pull-Apart Pumpkin French Toast
I had my doubts about this recipe, but I made it this morning and loved it! It is really rich, so I didn't eat too much. My kids weren't big fans, but if you love pumpkin, this would be a fabulous Thanksgiving morning breakfast--tastes almost like pumpkin pie!
adapted from SimpleBites.net
 Baked Pull-Apart Pumpkin French Toast |
Yield: 4 to 6 servings
Ingredients
- 1 loaf hearty whole wheat bread, sliced
- 3 large eggs
- 1 cup milk or cream
- 3/4 cup pumpkin puree
- 1/4 cup salted butter, melted
- 2 Tablespoons molasses
- 2 teaspoons pumpkin spice blend
- 1/4 cup brown sugar
Instructions
The night before…
- In a medium mixing bowl, whisk together eggs, milk, pumpkin puree, 2 Tablespoons melted butter, molasses and 1 teaspoon pumpkin spice blend.
- Dip each slice of bread into the mixture to coat well, then place, one layer thick, on a 13×17 baking sheet. Drizzle any remaining pumpkin mixture on top of the bread.
- Place plastic wrap over the soaking bread slices and refrigerate for 8 hours or overnight.
In the morning…
- Preheat the oven to 350°F. Generously butter an 8 x 11 baking dish. Mix together brown sugar with remaining teaspoon of spice blend.

- Remove plastic wrap from the soaked bread and brush tops lightly with remaining 2 Tablespoons of melted butter. Sprinkle French toast tops all over with cinnamon sugar mixture.
- Starting with the smaller pieces, arrange the slices of bread in the buttered baking dish, propping them up on top of each other until the pan is full. Place on the middle shelf of the oven and bake for 35-40 minutes until the tops are crispy.
- Serve at once with pure maple syrup and whipped cream.
Monday, November 14, 2011
EASY Chicken Lettuce Wraps

picture courtesy
EASY Chicken Lettuce Wraps
adapted from Katie Worthington
Cook two chicken breasts in 1 T sesame oil. in frying pan (you can use veg.oil- the sesame just adds a lot of flavor). Chop (I use my food chopper). Return to pan.
Add
1 c. fresh mushrooms - chopped small
1 can water chestnuts drained - chopped small (I use a food chopper for these things as well)
5 green onion stalks sliced 3/4 of the way up
1 T. minced garlic
salt and pepper
Sauce for Stir Fry
8 tbsp. soy sauce
8 tbsp. brown sugar
2 tsp. rice wine vinegar (I substituted white wine vinegar and it was great!)
Pour on top of stir fry and saute for another couple of minutes.
Spoon mixture into washed and dried iceburg lettuce cups and top with rice noodles prepared as directed on package (optional).
24 Hour Italian Beef ( a.k.a.French dip)

picture courtesy
We are such a chicken family. I don't really like red meat for various reasons. But on occasion I like to throw a little variety into my kitchen. I went for this Italian beef recipe that Katie gave to me and I was SO glad I did. Definitely will become a family favorite and will be on our rotation. Don't let the 24 hour thing scare you- it was a beautiful thing! I put the roast in on Saturday night and then we ate on Sunday. It was great, easy and a big crowd pleaser (not to mention impressive!). Recipe adapted from Katie Worthington.24 Hour Italian Beef
3-5 lb roast (bottom or butt)
2 c water
1pkg Good Seasons Italian Dressing mix
1 pgk. Au Jux Gravy mix (McCormick makes it)
1 t. Italian seasoning
Buttered and toasted french bread or buns
Provolone cheese (optional)
Mix water, dressing, au jus mix, Italian seasoning in bowl. Put roast in crock pot and pour mix over roast. Cook on low overnight. In morning shred and discard any fat. Return shredded roast to crock pot and cook on low until served. Serve on toasted and buttered buns (optional) with a bowl of au jux (the juices from the crock pot) on the side. I also served this with provolone cheese. YUM!
Friday, November 11, 2011
Poppyseed Lemon Cupcakes with Vanilla Cream Cheese Frosting
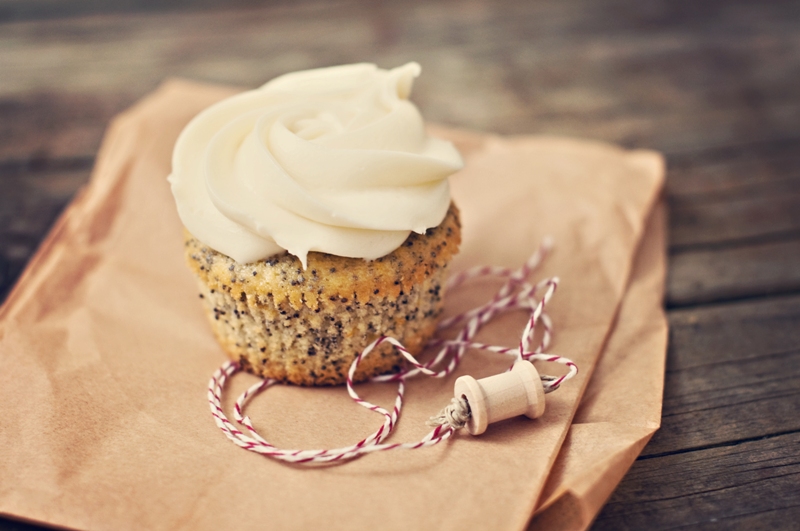 |
| Photo from indiansimmer.com |
So, don't let the fanciness of this recipe scare you. I never sift anything and it all turned out great. I only used lemon juice from the little plastic yellow lemon and it turned out great. The frosting on these is spectacular! These were super good, please make them--but only when you're having friends over because you want to share these, I promise.
Poppyseed Lemon Cupcakes with Vanilla Cream Cheese Frosting
Recipe from Indiansimmer.com
Yield: 12 cupcakes
Prep Time: 20 minutes
Cooking Time: 30 minutes
Ingredients:
1/2 cup butter, room temperature
1 1/2 cups cake flour
1/2 tsp Baking powder
1/4 tsp baking soda
1/4 tsp salt
1 cup sugar
2 large eggs
zest and juice of one meyer lemon
1 tsp vanilla extract
1/2 cup buttermilk
1/4 cup poppy seed
Method:
1. Preheat oven to 350°F. Line 12 cupcake tins with paper or silicone liners.
2. Sift flour, baking powder, baking soda and salt into a small bowl.
3. In bowl of a stand mixer, beat butter and sugar until fluffy, about five minutes.
4. Beat in eggs one at a time, ensuring they are completely incorporated before continuing to the next one.
5. Mix in the zest, lemon juice and vanilla.
6. Add flour and buttermilk to batter in two separate additions, beating completely between additions.
7. Fold in poppyseeds.
8. Fill cupcake liners 7/8 of the way to the top. Bake for 25-30 minutes, rotating half way through baking time.
9. Remove from oven and cool completely before frosting.
Vanilla Cream Cheese Frosting
1/2 cup butter, room temperature
4 oz cream cheese, room temperature
1 tbsp vanilla extract (or one vanilla bean + 1 tsp vanilla extract)
1 1/2-3 cups icing sugar
1. Beat butter and cream cheese together until fluffy.
2. Slowly add in vanilla.
3. Slowly stir in icing sugar on low speed one cup at a time.
4. Pipe onto cupcakes and serve immediately.
Wednesday, November 9, 2011
Lemon Cupcakes

To watch this video recipe Click HERE!
Hi Everyone!Sorry about the delay in this recipe! My vacations are a week away and I'm very busy making sure everything is ready.Also my microphone broke, so I had to get a new one! I hope you like this recipe! Enjoy!
Makes 12 cupcakes
Ingredients:
1 1/2 cups cake flour
1 cup plus 1 tablespoon granulated sugar
1 1/2 sticks unsalted butter soften
1/4 cup sour cream
3 eggs room temperature
1/2 tablespoon lemon zest
1/4 cup fresh lemon juice
1 teaspoon baking powder
1/2 teaspoon salt
1/2 teaspoon vanilla extract
1 teaspoon lemon extract
Lemon Cream Frosting: (makes enough to frost 6 cupcakes)
8 ounces cream cheese, soften,
1/2 stick unsalted butter, soften
1 1/4 cups powdered sugar
1 teaspoon vanilla extract
1/2 tablespoon lemon juice
Chocolate Mousse Frosting (makes enough to frost 6 cupcakes)
1 1/4 cups heavy cream
4 ounces semisweet chocolate chips
2 1/2 tablespoons powdered sugar
1/2 teaspoon vanilla extract
Chocolate sprinkles for garnish
(this Mousse frosting needs to be refrigerated before using as a frosting)
Preheat oven to 325ºF.
Combine flour with baking powder, salt and the zest of the lemon, mix together and set aside.
In two different bowls, separate the egg whites from the yolks and set aside.
In an electric mixer blend butter, sugar and sour cream together until well combined and fluffy, for about 2-3 minutes on medium high.
Reduce the speed to low and add the egg yolks one at time,make sure to beat each yolk for about 30 seconds before adding the next one, scrape down the sides if you need it to, reduce the speed to medium low and add the lemon and vanilla extract, also add in the lemon juice. Blend for 30 seconds, on medium high.
Reduce the speed to the lowest and add the flour mixture a little at a time, scrape down the sides again if you need to. Once the flour is thoroughly combined you can remove the batter from the mixer, and set aside for a minute, remember do not over-mix your batter,
if you do over-mix, the cupcakes will be hard as a rock, and we don't want that.
In an electric mixer, beat the egg whites until very think and fluffy. Once the egg whites are ready, we are going to combine them with the cake batter. Add a third of the egg whites into the batter and slowly fold them together, take your time, this step will make the cupcakes super moist and delicious so do not skip it. By folding the egg whites into the batter we will have a perfect cupcake, rich, moist and fluffy in the inside. Continue to slowly fold in the egg whites with the batter until you are done.
Spray your cupcake pan with cooking spray and pour the batter into the pan, bake at 325º for 25-30 minutes. When you insert a toothpick in the middle of your cupcake, you want the toothpick to have little crumbs on it, if it comes out clean, it means you over cooked your cupcakes, and they will just get drier as they cool. So just cook your cupcakes until the top feels springy and toothpick comes out with few crumbs on it.
Let them cool completely before you put on the frosting.
Chocolate Mousse Frosting:
Microwave 1/2 cup of the heavy cream for about 40 seconds, mix in the chocolate chips, stir together for 15 seconds, cover the cream and set aside, for 5 minutes so the chocolate continues to melt completely. If the chips do not melt completely, you can microwave again
for about 30 seconds.
In an electric mixer, blend the rest of the heavy cream, vanilla extract and the powdered sugar, blend until the heavy creamy is light and fluffy, for about 3 minutes on high speed.
Now we are going to fold the whipped cream into the chocolate mixture, make sure the chocolate is cold and completely melted. Add 1 third of the whipped cream into the chocolate
and slowly fold them together with small circular motions, keep on doing this until the whipped cream is well combined with the chocolate, refrigerate for about 20 minutes before frosting the cupcakes.
Lemon Cream Frosting:
In an electric mixer on medium, blend the cream cheese and the butter blend until well combined, for about3 minutes.
Add the lemon juice, and the the vanilla extract, blend for 1 minute. Reduce the speed to low and slowly add in the powder sugar, blend at low speed until the sugar is
completely dissolved, for about 2-3 more minutes.
That's about it, the frosting is done, now we have to make sure the cupcakes are cold before frosting them.
You can decorate your cupcakes any way you want... you can use a pastry bag
a Ziploc bag or a butter knife to decorate the cupcakes. It is all up to you,
I'm using my pastry bag with a large round decorating tip.
Fill the pastry bag with the frosting, and start frosting from the outside and swirl into the center of the cupcake. So start on the outer edge, and slowly circle the cupcake until you reach the center. That's about it. Keep on repeating this step until you are done!

I garnish the lemon cream frosting with lemon zest and garnish the chocolate frosting with chocolate sprinkles.
Tuesday, November 8, 2011
Cinnamon Bun Popcorn

picture courtesy
Cinnamon Bun Popcorn
Ingredients:
2 regular size bags of popcorn, de-kerneled ( you can used air-popped or something NON buttery. I have used Orville Redenbacher's "Tender White")
1 c. chopped pecans
1 c. brown sugar
3/4 t. cinnamon
1/2 t. baking soda
3 squares of white almond bark
1/4 c. Karo syrup
1 stick of butter
1 t. vanilla
Combine the following in a large glass bowl:
1 c. brown sugar
3/4 t. cinnamon
Add:
1/4 c. light Karo syrup
1 stick butter
Melt in the microwave for 30 seconds, then take out and stir. Microwave for 2 minutes then stir. Two minutes again. Bowl will be very hot! Stir well.
Now combine in a small bowl:
1 t. vanilla
1/2 t. baking soda
Add this to the caramel mixture. It will foam and fizz. When fizz goes down, quickly pour over popcorn mixed with chopped pecans in a very large bowl (maybe even two bowls to have room to mix). Work quickly here. Mix well. Microwave for another 30 seconds and stir again.
Melt three squares of almond bark in a mocriowave safe bowl stirring every 30 seconds until smooth. Spread popcorn out over a sprayed cookie sheet and then drizzle on melted almond bark.
*I like to toss it ALL in almond bark although the recipe calls for a drizzle. I use the same amt.- 3 squares.
Monday, November 7, 2011
Pumpkin Streusel Bars
 Pic courtesy Google images
My SIL, Macy made these for dessert a few weeks ago and I fell in love with them. So much so, that I made them a week later for a dinner party we went to. I'm not usually a huge fan of pumpkin, but these were amazing. Seriously. I think I'm going to forgo the pumpkin pie at Thanksgiving this year and go for these instead.
Pumpkin Streusel Bars
1 box yellow cake mix
1/2 cup butter, melted
1 egg
Stir together cake mix, melted butter, and egg until well combined. Reserve one cup for topping. Press remaining mixture into the bottom of a 9x13 pan.
1 (15 ounce) can pumpkin puree
1 egg
2/3 cup sugar
1 t. vanilla
1/4 t. salt
1 t. cinnamon
1/4 t. nutmeg
Whisk together pumpkin, egg, sugar, vanilla, salt and spices. Spread filling over pressed crust.
1 cup reserved cake mix
1/2 cup sugar
1 T. cinnamon
3/4 cup old fashioned oats (I used quick oats with great results)
1/2 cup cold butter, cut into pieces
whipped cream , for serving
Stir together reserved cake mix, sugar, cinnamon, and old fashioned oats. Cut in cold butter with a fork or pastry cutter until mixture resembles course crumbs. Sprinkle over filling and bake in a 325 oven for 35-40 min.* , or until topping is lightly browned (do not over bake). Serve with whipped cream.
*Mine took more closer 50 minutes to bake.
Friday, November 4, 2011
Key Lime Pie
 We've recently joined a dinner club. Each month we get together to have dinner with three other couples and, each month, there is a different theme. Last month the theme was "Florida Cuisine" and I was responsible for bringing a dessert. After some web searches, it became obvious that the only choice for dessert was a key lime pie.
Fortunately, living in Florida, fresh key limes were in my neighborhood grocery. If you can't find fresh key limes in your area, you may be able to find bottled key lime juice. Regardless, you can always buy it online. In a pinch, you could use regular limes. But as you can see below, they are not the same. Key limes are small little things. A bugger to juice, truth be told. But the flavor is distinct. This pie is not overly sweet. It is tart and has a slight bitter twist to it, kind of like what I associate with most grapefruit.
 You start with the crust. This is a graham cracker crust. It has a little extra sugar in the crust, again to help balance that tart punch. I mix mine in a food processor and then dump it into a pie pan. Spread it out with your hands and then use a cup of some kind to press it down and make it even. Bake the pie crust while you prepare the limes.
 Before you juice, you'll need to zest enough of them to obtain one loose tablespoon. Then you can cut the limes and juice away. Because they're so small, they can be tiring to juice. If you have one of those squeeze type juicers, you may be better off than I was. You need 2/3 cup of juice, which requires approximately one pound of key limes. Don't juice your limes too early, as the juice can develop additional bitterness when it sits too long.
 Don't be dismayed if your crust comes out of the oven looking really funky. It tends to puff up when baking, but returns to normal dimensions as it cools. The first time I made this crust I thought I had ruined it when I first took it out of the oven Don't fret, it'll work itself out.
 As the pie cools, you can mix up the filling. Start by mixing the egg yolks and zest together. Mix on medium-high for a few minutes until the mixture has increased slightly in volume and is thick and pale yellow (with green flecks in it, of course).
 The next step is to add a can of sweetened condensed milk. This is some very thick, sweet stuff. So sweet, in fact, that it provides all the sweetness this pie needs. By the way, please note the proper color of this product. If you open your can and find that it is a caramel brown color, as I did when I first made this pie, perhaps you are not using sweetened condensed milk often enough, or, as in my case, not rotating your stock well. The date on my can of brown sweetened condensed milk? "Best by Nov 2004." Yikes! And, even more pressing, how many stinking military moves did that can of milk participate in, anyway, before I ended up throwing it away? Needless to say, I will be more vigilant.
 Bake the pie at the same temperature as you baked the crust for 25 minutes. The pie filling will be set and maintain its shape upon gentle shaking, but will not be brown in any way. Remove from the oven and let cool to room temperature.
 I think this pie requires a little sweet border to help balance it out. I like a whipped topping. You could make whipped cream right before serving, but I think piping a stabilized whipped cream border really looks like a million bucks. I like to then zest a little lime on the border for color. Be sure to thoroughly chill the pie before serving. This pie keeps well and can be made one to three days in advance.
Key Lime Pie
Yield: one 9" pie
Adapted from King Arthur Flour
Crust:
1 1/2 cups graham cracker crumbs (one pouch plus two whole crackers)
1/4 cup powdered sugar
1 egg yolk
1/3 cup melted butter
dash salt
Filling:
1 TBS loosely packed key lime zest
3 large egg yolks
1 14-ounce can sweetened condensed milk
2/3 cup fresh (or bottled) key lime juice
whipped cream and additional lime zest for garnish (optional)
Mix together the crust ingredients. Pour into a 9" pie pan. Spread evenly and pack down with a measuring cup. Bake at 325° F for 15 minutes. Crust may look uneven and strange upon removal from the oven, but will return to a more normal shape upon cooling. Let crust cool while preparing filling. Leave oven on at 325° F.
Beat the zest and egg yolks together on medium-high speed for a few minutes, until the yolks have increased in volume and become thickened and a pale yellow. Add the sweetened condensed milk and beat on a fairly high speed for 2-3 minutes. Lastly, add the lime juice. Stir until well incorporated, but do not over mix. Pour into the baked crust and return to the oven to bake for 25 minutes. The filling will be set and no longer loose in the middle, but will not be browned in any way. Let cool to room temperature. Prepare and pipe a border of stabilized whipped cream, if desired. Refrigerate for at least four hours before serving.
This pie keeps well and can be made 2-3 days in advance.
Chicken Tortilla Soup

To watch this video recipe click HERE!
Hi Everyone!
I hope you are all doing great! It is getting pretty cold in my side of the world, the summer is gone and this fall is starting to feel more like winter, so to warm me up I decided to make a delicious, and super easy Tortilla Soup! I hope you like it! This is one of my favorite Mexican's soups!
Serves 6
Ingredients:
2 chicken breasts
2 cups chicken broth
1 can Chipotle in adobo sauce
1 1/2 cups chopped celery
1 1/2 cups chopped carrots
1 onion
4-5 small potatoes
1/4 cup chopped cilantro
3 garlic cloves
1 1/2 tablespoons chicken bouillon seasoning
1 15oz can corn kernels
Limes for garnish
Avocados for garnish
Corn tortillas about 2-3 per persons.
1/2 tablespoon olive oil
Vegetable oil for frying the tortilla chips or cooking spray for baking them
Roughly chop the onion and mince the garlic. Cut the chicken into bite size pieces. Chop the potatoes into bite size pieces.
In a large saucepan, heat up 1/2 tablespoon of extra virgin olive oil, cook the garlic and onion for about 3 minutes or until the onion becomes transparent. Add in the chicken, season with 1 1/2 tablespoons of chicken bouillon seasoning and some of the Chipotle in Adobo sauce, (I usually add 2 Chipotle peppers and about 2 tablespoons of the sauce, but you can add as many or as little as you like. A Few teaspoons of the Chipotle sauce are good enough to add tons of flavor without adding any heat.)
Stir together and let the chicken cook for 4 minutes, the chicken will be almost cook, but not completely. Add in the carrots, the celery and the potatoes, season with 1/2 teaspoon of each, ground black pepper and salt, stir together and add 2 cups of chicken broth and about 4 cups of water, add the cilantro and the corn kernels, stir again, cover with a lid, let it cook for about 15 minutes or until it comes to a boil.
Cut the tortillas into bite size pieces, to make some tortilla chips. Fry them in vegetable oil until golden brown and crisp. Drain them on paper towels, sprinkle with salt. ( or you can also bake the tortilla chips at 400º for about 8-10 minutes, don't forget to spray them with cooking spray and sprinkle them with salt before they go into the oven!)
When the soup comes to a boil, taste the flavor and add more salt or chicken bouillon if needed. (If you do add more seasoning, let it continue to boil for about 2 more minutes then serve.)
Serve your soup in a bowl, garnish with chopped avocado,fresh cilantro and a squeeze of lime juice, add more of the Chipotle sauce if you want to. Top it with the tortilla chips and that's it! Enjoy!
Cheddar and Herb Biscuits
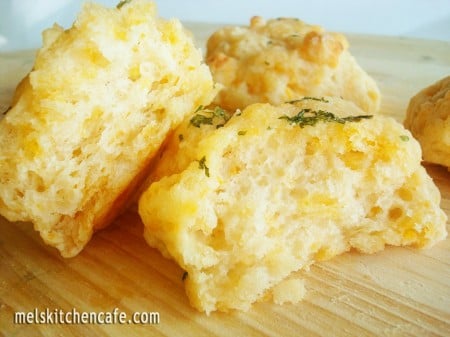 |
| Photo from melskitchencafe.com |
Party in your mouth! These things melt in your mouth and then you have to eat like 5 more. Seriously, like 5 more. These are amazing! FYI, I also froze some of these and they tasted great the next time we ate them.
Cheddar and Herb Biscuits
Recipe from melskitchencafe.com
2 cups all-purpose flour
1 tablespoon baking powder
1/4 teaspoon garlic powder
1/2 teaspoon salt
2 tablespoons shortening
3 tablespoons butter, cold
1 cup buttermilk
1 1/4 cups grated sharp cheddar cheese
Preheat oven to 425 degrees. In a medium bowl, combine flour, baking powder, garlic powder and salt. Cut in shortening and butter until coarse crumbs are formed. Lightly mix in grated cheese. Mix in buttermilk just until moist (dry spots here and there are ok – the biscuits will be tough if they are overmixed). Drop the biscuits onto a greased or lined baking sheet. Bake for 12-14 minutes, until browned and golden. While the biscuits are baking, in a small bowl combine three tablespoons melted butter, 1/4 teaspoon dried parsley flakes, 3/4 teaspoon garlic powder and a pinch of salt. Right when the biscuits come out of the oven, brush the butter/herb mixture over the biscuits evenly (alternately, you can dip the top of the biscuit into the butter mixture). Serve immediately.
Thursday, November 3, 2011
Tillamook Baked Macaroni and Cheese

Kinda bummed that we don't have Tillamook out here in Georgia. Would it have been tastier? Probably. Everything is with that stuff, right? I just made sure to use sharp cheddar and you HAVE to have freshly shredded. None of that waxy pre-shredded junk, mmkay? Anywho...this was still pretty dang good. I served it with the BBQ pulled pork sandwiches (I used chicken though)and that recipe you can find on this blog.
Tillamook Baked Macaroni and Cheese
Ingredients
o 1 (12 ounce) packages macaroni
o 4 tablespoons Tillamook butter
o 4 tablespoons flour
o 1 cup milk
o 1 cup cream
o 1/2 teaspoon salt
o fresh ground black pepper, to taste
o 2 cups Tillamook cheddar cheese, shredded
o 1/2 cup breadcrumbs, buttered (I added 2 T butter to crumbs)
DIRECTIONS:
1. Preheat oven to 400°F.
2. Cook and drain macaroni according to package directions; set aside.
3. In a large saucepan melt butter.
4. Add flour mixed with salt and pepper, using a whisk to stir until well blended.
5. Pour milk and cream in gradually; stirring constantly.
6. Bring to boiling point and boil 2 minutes (stirring constantly).
7. Reduce heat and cook (stirring constantly) 10 minutes.
8. Add shredded cheddar little by little and simmer an additional 5 minutes, or until cheese melts.
9. Turn off flame.
10. Add macaroni to the saucepan and toss to coat with the cheese sauce.
11. Transfer macaroni to a buttered baking dish.
12. Sprinkle with buttered breadcrumbs.
13. Bake 20 minutes until the top is golden brown.
14. (You can also freeze this recipe in zip-lock bags for later use - once you have mixed the macaroni along with the cheese sauce allow to cool to room temperature before adding to your freezer - I generally pull it out the night before and allow macaroni and cheese to reach room temperature; I then add the macaroni and cheese to a buttered baking dish, sprinkle with bread crumbs and then bake for 20 to 30 minutes, until golden brown on top and bubbling. (I am sooooo doing this with the leftovers!)
Gooey Chocolate Chip Sandwich bars

Hello love. When I looked at this picture (from recipegirl.com) and saw this gooey layer in the middle and read the title I knew these bars had to be made. Um...yeah. I made them for a ward trunk-or-treat. Boy do I regret that! I got the equivalent of a bite. Serious. But I heard all about them. I should've saved and ate the whole pan. :) This is also the time that I should mention that I won the chili contest (with a total of about thirty entries) and served the White Chicken Chili found on this blog. Enjoy!
GOOEY CHOCOLATE FILLING:
2 cups semi-sweet chocolate chips
One 14-ounce can sweetened condensed milk
2 teaspoons vanilla extract
COOKIES:
1 cup (2 sticks) unsalted butter, at room temperature
1 cup light brown sugar
1/2 cup granulated white sugar
1 large egg
1 large egg yolk
1 tablespoon vanilla extract
2 cups all-purpose flour
1 cup quick-cooking or old-fashioned rolled oats (I used quick- they worked great)
1 teaspoon baking powder
1 teaspoon baking soda
1 teaspoon kosher salt (I used regular salt)
3 cups semi-sweet chocolate chips (I only used two here...I thought 5 cups of chocolate chips between the filling and dough was a bit much...so I opted for a more reasonable number of four! AH!!)
Directions:
1. Preheat oven to 350 degrees F. Lightly butter a 9x13-inch pan with parchment paper, allowing enough overhang on the long side to lift the bars from the pan.
2. Prepare the gooey chocolate filling: Place the chocolate chips and condensed milk in a small saucepan over the lowest possible heat and cook, stirring constantly, until the chocolate has melted and the mixture has thickened, 3 to 5 minutes. Turn off the heat, add vanilla, and stir until smooth. Set aside to cool to room temperature.
3. Prepare the cookie dough: Place the butter and sugars in a large bowl. Beat with an electric mixer until smooth and creamy. Add the egg, egg yolk and vanilla. Beat well. Whisk together the flour, oats, baking powder, baking soda and salt in a medium bowl. Add to the butter mixture. Beat until everything is well incorporated, scraping down the sides of the bowl as needed. Stir in the chocolate chips.
4. Prepare the bars: Using half of the batch of cookie dough, place dollops into the prepared pan and press down lightly to even it out. Pour the cooled chocolate mixture over the dough and then add small dollops of the remaining dough on top. Don't worry if the dollops don't completely cover the chocolate mixture. Just spread it together as much as you can, and let some chocolate peek through.
5. Bake until lightly browned, 20 to 25 minutes. Set aside to cool completely, then cut into 32 bars.
**TIP: Refrigerate bars to firm up and then cut while chilled. Serve room temperature.
Wednesday, November 2, 2011
Caramel Apple Cheesecake Bars
 Pic courtesy of Mels Kitchen Cafe
The first time I made these, I pulled them out of the oven and dropped the pan on the floor. After an hour + in prep time, I cried. I just cried. Disclaimer: I'm pregnant. I knew it was good and I was dying to really try it, so I made it again about a week later. And, this time it made it safely from the oven to the cooling rack. And, it was delicious. Truly delicious. Also, you should know that I halved the recipe both times I made it and it was still a ton of dessert.
Caramel Apple Cheesecake Bars with Streusel Topping
from Mel's Kitchen Cafe
from Mel's Kitchen Cafe
INGREDIENTS:
Base:
2 cups all-purpose flour
1/2 cup firmly packed brown sugar
¼ teaspoon salt
½ teaspoon cinnamon
1 cup (2 sticks) butter, softened
Cream Cheese Layer:
2 (8-ounce) packages cream cheese, softened
1/2 cup sugar
2 large eggs
1 teaspoon vanilla extract
Apples:
3 Granny Smith apples, peeled, cored and finely chopped
2 tablespoons sugar
1/2 teaspoon ground cinnamon
1/4 teaspoon ground nutmeg
Streusel Topping:
1 cup firmly packed light brown sugar
1 cup all-purpose flour
½ teaspoon cinnamon
1/2 cup quick cooking oats
1/2 cup (1 stick) butter, softened
Caramel Sauce:
4 tablespoons butter
1 cup firmly packed light brown sugar
½ cups half-and-half or cream
Pinch of salt
1 tablespoon vanilla
DIRECTIONS:
Preheat oven to 350 degrees F.
In a small bowl, stir together chopped apples, two tablespoons sugar, cinnamon, and nutmeg. Set aside.
In a medium bowl, combine all the streusel topping ingredients and mix until crumbly. Set aside.
In a medium bowl, combine flour and brown sugar. Cut in butter with a pastry blender or two forks until mixture is crumbly but combined. Press evenly into a 9X13-inch baking pan lined with aluminum foil. Bake for 10 minutes or until lightly browned.
While the crust is baking, in a large bowl, beat cream cheese with 1/2 cup sugar until smooth. Then add eggs, one at a time and then the vanilla. Mix well. Pour over the warm crust.
Spoon the apple mixture evenly over the cheesecake layer. Sprinkle the streusel topping over the apples. Bake for 30 minutes until the filling is set.
Cool the bars to room temperature. Drizzle with the caramel topping (or plate individual slices and drizzle with topping one by one).
For the caramel sauce, mix butter, brown sugar, half-and-half or cream, and salt in a saucepan over medium-low heat. Bring the mixture to a simmer and cook while whisking gently for 5 to 7 minutes, until thickened slightly. Add the vanilla and cook another minute to thicken further. Turn off the heat and pour the sauce into a jar. Refrigerate until cold. If the caramel sauce has cooled in the fridge long enough to harden, warm slightly before drizzling on bars.Tuesday, November 1, 2011
Easy Doughnuts

Hi everyone! Today's recipe is Easy Doughnuts!
On Saturday, my sister sent me a picture of my mom and my aunt making doughnuts, and the doughnuts looked so good that I had to make some. I love doughnuts, I used to have them every day for breakfast when I was in Mexico! My dad owns a convenience store and he always gets fresh doughnuts from the bakery, so of course, every day he will save two doughnuts for me, a chocolate one and sugar coated one! I hadn't had a doughnut since last December, but seriously after seen the picture my sister sent me, I couldn't wait any longer! and I made these super Easy Doughnuts! I hope you like them, of course they are not from scratch, but they are really good! The preparation time is about 5 minutes, and the cooking time is less than 15 minutes!
Anyway, don't worry, I promise I will bring back their home-made doughnuts recipe when I return from my vacations!!!
Makes 8 doughnuts +8 doughnuts holes
Ingredients:
1 package Pillsbury Grands Home-style biscuits
3 cups vegetable oil for frying
1/4 cup sugar
1/2 teaspoon cinnamon
1 tablespoon vanilla extract
Optional
1 Baker's semi sweet chocolate squares
1 Baker's premium white chocolate square
chocolate sprinkles for garnish
Combine sugar and cinnamon together, and set a side.
In a bowl add 1 tablespoon of vanilla extract, set aside.
Using a small round cookie cutter, cut a whole in the middle of each biscuit to make the
doughnuts and just continue to do this until you are done with all the biscuits.
Dip each biscuit-doughnut in the the vanilla extract, just dip one side and set aside for about 3 minutes, just so the dough can absorb the extract.
On a medium-low heat, heat up about 3 cups of vegetable oil, let the oil reach 350ºF.
Cook the doughnut holes for about 2 minutes or until golden brown and crisp. Drain on paper towels.
Cook the doughnuts for about 1 minute and 25 seconds on each side, or until golden brown, crisp and completely cooked in the inside. (If the oil is too hot, the doughnuts will get burned without cooking completely in the inside, and if the oil is too cold, the doughnuts will be extremely oily and disgusting, so make sure the oil is at the right temperature before you start frying the doughnuts.
Just keep on frying the doughnuts until you are done! Drain them on paper towels.
Roll the doughnuts on the sugar mixture until they are completely covered with the sugar.
I'm going to coat two of my doughnuts with semi sweet chocolate and the last two with white chocolate, so I melted the chocolate squares in the microwave and with a small knife I will coat one side of the doughnut and garnish with chocolate sprinkles.
and that's about it...
Enjoy!
Subscribe to:
Comments (Atom)