Friday, April 27, 2012

Queso Blanco Dip


photo from cooking-mexican-recipes.com
Finally a cheese dip that doesn't clump up!  I did do a lot of altering.  First, I would half this because it makes a ton and the cheese isn't cheap.  Second, I would switch the amounts of monterrey jack vs. american because I personally prefer the taste of monterrey jack.  And third, I didn't add any of the veggies except for the tomato which is technically a fruit anyhow.  I like a plain cheese myself.


Queso Blanco Dip

From Annie’s Eats

Yield: about 2 cups

Ingredients:

1 tbsp. canola or vegetable oil

¼ cup onion, finely chopped

1 jalapeño pepper, seeded and finely chopped

12 oz. white American cheese, shredded*

4 oz. Monterey jack cheese, shredded

¼-2/3 cup milk

1 tomato, seeded and finely diced

2 tbsp. cilantro, minced

*White American cheese can be found at the deli counter in most grocery stores.

Directions:

Heat the oil in a medium saucepan over medium-high heat.  Add the onion and jalapeño to the pan and cook, stirring occasionally, until tender, about 5 minutes.  Reduce the heat to medium-low.  Add both of the shredded cheeses and ¼ cup of the milk.  Whisk or stir until completely melted.  Mix in the tomato and cilantro, and add additional milk gradually as necessary to achieve desired consistency.  Transfer to a warmed serving bowl and serve immediately.

Wednesday, April 25, 2012

Rice Noodles and Shrimp Stir Fry

To watch this Video-Recipe please click HERE!!

Hi Everyone! Today's recipe is an Asian inspired dish: "Rice Noodles and Shrimp Stir Fry!", I'm only using 1 tablespoon of oil, so this recipe is healthy enough for any diet. You can substitute the noodles for wheat noodles to get an even healthier low carb version!

Ingredients:
Rice Noodles (7oz to serve 2 or 13.5oz package to serve 4)
1 lb Jumbo Prawns (1½lb jumbo prawns if you are using the 13.5 oz package of noodles.)
1½ cups sugar snap peas
1 large carrot cut in very thin strips
1 tablespoon minced garlic,
2 tablespoons minced ginger
2 green onions finely chopped
1/2 tablespoon sugar
2 tablespoons of soy sauce (+1tbsp if you are using 13.5oz noodles)
2 tablespoons of fish sauce (+1tbsp if you are using 13.5oz noodles)
1 tablespoon of vegetable oil
**2 tablespoons of Asian seasoning
**you can replace  the Asian Seasoning with 1 teaspoon of each: garlic powder, ground ginger, sesame seeds and pinch of salt, black pepper and sugar.**

Cook the rice noodles according to the instructions on the package. (The instructions on mine were to soak the noodles in hot water for about 30 minutes.) Drain and set them aside for a minute.

Peel and devein the shrimp. Pat them dry with a paper towel, and season with 1 tablespoon
of the Asian seasoning, mix well and set them aside until ready to use them.

Combine 2 tablespoons of soy sauce and 2 tablespoons of fish sauce with 1/2 tablespoon of sugar, whisk together and set aside for a moment.

In a large skillet or wok, add 1 tablespoon of vegetable oil, the garlic and the ginger, stir fry for about 2 or 3 minutes or until the garlic becomes a little translucent and the ginger become aromatic.

After 2 minutes or so, add in the carrots, and the sugar snap peas, stir fry together for 2 more minutes. (Stir fry for longer if you want your vegetable very well cooked. I like mine to be a little crunchy.)

 Add in the shrimp and cook for 4-5 minutes or until the shrimp is cooked. You will know the shrimp is cook when it turns a pink opaque color. Remove everything from the skillet and set aside for a minute.

Reheat the skillet and heat up the soy sauce mixture for about 1 minute. Add in the noodles, give them a quick stir and season with 1 tablespoon of the Asian seasoning. (If you are using the whole 13.5oz package of noodles, now is the time to add 1 more tablespoon of Soy sauce and 1 more tablespoon of fish sauce.) Continue to stir fry the noodles for 1 more minutes or until they are well coated with the sauce mixture.

Bring in the rest of the ingredients and cook for 2-3 more minutes or until everything is well heated through. Garnish with the green onions and serve at once.

Enjoy!

Black Bean Brownies


So....why am I, Claire, posting this??? When I could probably out-eat any person in my family in a sugar-eating contest? Something to brag about, I know. After all, I have eaten a dozen krispie kremes in one day. Annnnnyway, the results of eating all that sugar got to me. So, I am participating in a local biggest loser contest. So, in order to satisfy my INSANE sugar craving to some degree so I don't become a serial killer, I have been on the hunt for fake-out recipes. I found this and was very skeptical of its worthiness as a "brownie" because after all, they did get a five star rating on allrecipes.com. They were great! Awesome! Would I eat them if I weren't dieting? Sure, you bet. Brownie to brownie they are definitely not as rich, but an absolutely excellent substitute. Not to mention it could really be a meal considering the protein. And I loved the texture. TRY them but do NOT omit chocolate chips...they are the real favor in this. Next time I am going to try and even use half applesauce half veg. oil to cut calories and maybe even splenda instead of real sugar!

BLACK BEAN BROWNIES

Ingredients


1 (15.5 ounce) can black beans, rinsed and drained

3 eggs

3 tablespoons vegetable oil

1/4 cup cocoa powder

1 pinch salt1 teaspoon vanilla extract

3/4 cup white sugar

1/2 cup milk chocolate chips
Directions: combine all ingredients except for chocolate chips in blender. Pour in prepared, greased pie dish then sprinkle with chocolate chips. Cook at 350 for 30 minutes.  Calories: 126 per slice.

Tuesday, April 24, 2012

Scalloped Potatoes and Onions


  • This is an amazing recipe for scalloped potatoes that is free of all the creamed soups and cheese!  It is so delicious, you would never know it.  And I even accidentally left out the onions.  That's how good it is...
  • Scalloped Potatoes and Onions

  • adapted from allrecipes.com

  • 5 large potatoes, peeled and thinly sliced
  • 3/4 cup chopped onion
  • 3 tablespoons butter or margarine
  • 1/4 cup all-purpose flour
  • 1 3/4 cups chicken broth
  • 2 tablespoons mayonnaise
  • 3/4 teaspoon salt
  • 1/8 teaspoon pepper
  • Paprika
  1. In a greased 2-1/2-qt. baking dish, layer potatoes and onion.
  2. In a saucepan, melt the butter; stir in flour until smooth. Gradually add broth, mayonnaise, salt and pepper; cook and stir for 2 minutes or until thick and bubbly. Pour over potatoes. Sprinkle with paprika.
  3. Cover and bake at 325 degrees for 2 hours or until tender.

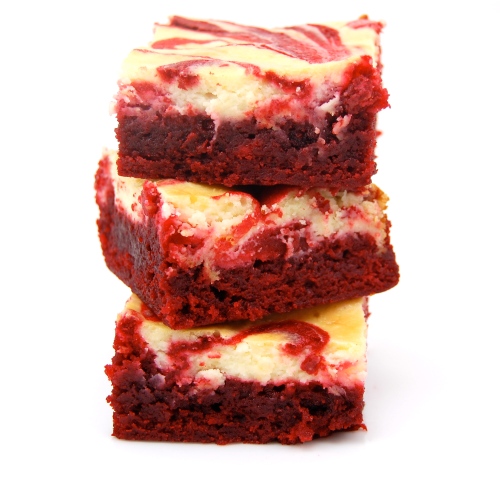
Red Velvet Cheesecake Brownies


Photo from sweetpeaskitchen.com
I want everyone to know that I don't eat all of this stuff by myself.  I sound like a real porker!  I made these for someone else.  I might have eaten several of them-but certainly not all of them.  They were good.  Real good.  I had to bake them about twice as long--weird, I don't know why--but don't give up!  They were good.  Real good.


Red Velvet Cheesecake Brownies

Recipe from sweetpeaskitchen.com


Ingredients:

  • 1/2 cup butter

  • 2-oz dark chocolate, coarsely chopped

  • 1 cup sugar

  • 2 large eggs

  • 1 tsp vanilla extract

  • 1 1/2 tsp red food coloring

  • 2/3 cup all purpose flour

  • 1/4 tsp salt

  • 8-oz cream cheese, room temperature

  • 1/3 cup sugar

  • 1 large egg

  • 1/2 tsp vanilla extract
Directions:

  1. Preheat oven to 350F. Butter the bottom and sides of a 8 inch metal baking pan. Put a long piece of parchment paper in the bottom of the pan, letting the parchment extend up two sides of the pan and overhang slightly on both ends. (This will make it easy to remove the bars from the pan after they have baked.) Butter the parchment.

  2. In a small, heatproof bowl, melt butter and chocolate together. Stir until combined and very smooth. Set aside to cool for a few minutes.

  3. In a large bowl, whisk together sugar, eggs, vanilla extract and red food coloring. Add chocolate mixture and stir until smooth. Add flour and salt and stir until just combined and no streaks of dry ingredients remain.

  4. Pour into prepared pan and spread into an even layer.

  5. To prepare cheesecake mixture, beat cream cheese, sugar, egg and vanilla extract in a medium bowl until smooth. Distribute the cheesecake mixture in 8 dollops over batter in the pan. Swirl in with a knife or spatula.

  6. Bake for 35-40 minutes, until brownies and cheesecake are set. A knife inserted into the cheesecake mixture should come out clean and the edges will be lightly browned.

  7. Let cool completely in pan on a cooling rack before lifting out the parchment paper to remove the brownies.

Saturday, April 21, 2012

Vegetarian Kebabs


To watch this Video-Recipe click HERE!!

Hi Everyone! I hope you are all having a great Saturday! Today's recipe is another vegetarian Dish! By now, you can probably tell I am really enjoying this vegetarian cooking! Everything I have made so far has been really delicious! I haven't missed the meat at all, I will try to keep this recipes coming, I don't really mind eating vegetables, but my husband is kind of picky! Lucky me, he hasn't complained about any of the recipes I have made, so he is enjoying the veggies as much as I am! Anyway, let's go back to the recipe!

Makes 10-12 kebabs
Ingredients:

1 red bell pepper
1 yellow bell pepper
1 onion
1 Idaho potato or 3 small potatoes
2 ears of yellow corn
2 medium zucchini
2 small carrots

For the dressing:

4 tablespoons extra virgin olive oil
1 tablespoon apple cider vinegar
1/2 tablespoon Dijon mustard
1 teaspoon dry oregano
1 teaspoon black pepper
1/2 teaspoon garlic powder
1/2 teaspoon basil
1/2 teaspoon dry rosemary leaves
1/2 teaspoon ground thyme (You can replace these last 4 ingredients with 2 teaspoons of Italian Seasoning if you like)
pinch of salt
10-12 wooden Skewers

Soak the wooden skewers in water for at least 20 minutes before using them.

Preheat oven to 450ºF.

Cut the carrots, zucchini, potatoes and corn in thick slices(1½-2in slices.) Cook them in boiling water until "Al Dente". (Until almost cooked, but do NOT overcook.) Drain them and set them aside.
Zucchini and Carrots will cook in about 5-6 minutes.
Potatoes will take about 7-8 minutes
Corn will take 10-12 minutes.

Chop the onion in big chunks.
Remove the stems and veins from the bell peppers. Also chop the Bell peppers in big chunks. Set aside.

To make the dressing: Combine oil, vinegar, mustard, and the dry herbs. Mix well and set aside.

Once the vegetables are cooked. Dress all the vegetables (including onion and bell peppers) with the herbs dressing. Make sure to coat every single piece with the dressing.

Build the kebabs. Alternate the vegetables onto the skewers. Arrange the vegetables any way you want, and keep alternating the vegtables until you are done with all the kebabs.


Bake at 450ºF for 8-10 minutes or until the Onions and Bell Peppers are soft, and the rest of the vegetables are heated through.

Serve with rice, or eat all by themselves! Enjoy!

Friday, April 20, 2012

Throw and Go BBQ Chicken

photo from realmomkitchen.com
Don't you just love crock pots?  The house smells good all day.  You look and smell like an awesome wife.  Yet-all you did was throw some junk in a pot and push start.  I love it!  This is a really yummy recipe.  I was a little worried that there wasn't more liquid in the pot, but it all worked out-don't worry!  I actually halved the recipe and it made 6 sandwiches for us.  Don't forget the money maker--throw a dill pickle on there (lesson learned from Claire, thank you!)


Throw and Go BBQ Chicken
Recipe from realmomkitchen.com
  • 5 boneless skinless chicken breasts
  • 1/2 tsp garlic powder
  • 1/2 tsp onion flakes
  • 1/2 tsp salt
  • 1/4 cup brown sugar
  • 1 cup spaghetti sauce
  • 1/2 cup Kansas City Style bbq sauce (I used Cattlemen’s Kansas City Classic)
  • 1 Tbsp. liquid smoke
  • rolls or buns to serve on
  • butter
  1. Place all the ingredients in the crock pot in the order listed above.
  2. Cook in the crock pot on high for at least 6 hours.  Remove the chicken and shred.  Return to the crock pot and mix into the sauce.
  3. Butter the inside of your buns or rolls.  Place them on a cookie sheet.  Broil them in the oven on the second highest level for the oven rack (this prevents burning).  Broil until golden brown.  You want them toasty because this bbq chicken is so moist and saucy you will end up with soggy bread if you don’t toast them.  Sandwich bbq chicken inside toasted buns or rolls.

Wednesday, April 18, 2012

Lo Mein


I was dying over this meal tonight--so fresh and healthy! I couldn't get enough, and sadly, my husband wasn't home to enjoy it with the rest of the fam. I'll just have to make it again (can't wait!)...

Lo Mein

adapted from thesisterscafe.com

1 – 1 1/2 pounds chicken breast, sliced very thinly (optional--try it without for a vegan meal)

Chicken Marinade:

1 Tb soy sauce
1 1/2 tsp cornstarch

Sauce:
2 Tb oyster sauce (can substitute stir-fry sauce)
2 tsp soy sauce
4 Tb beef broth
1 Tb granulated sugar

8 ounces linguine, prepared to al dente
1 tsp sesame oil

1/4 cup canola oil
1 clove garlic, chopped
1 large carrot, chopped into 1/2-inch pieces
1/2 cup chopped cabbage, such as Napa
1 cup snap peas
1-2 cups bean sprouts
3 green onions, sliced in 1 inch segments, white and green parts
*note: I like to chop up the white parts small and leave the green parts in longer pieces

This part is optional (I left the chicken out to make a healthy vegan meal): Combine marinade ingredients with the chicken and allow to sit for 20 minutes. While the chicken is marinating, prepare the remaining ingredients.

In a small bowl, combine the oyster sauce, soy sauce, beef broth, and sugar. Set aside.

Boil noodles as per package instructions. Drain the noodles and toss with the sesame oil.

Heat a wok (or large, deep frying pan) over medium-highheat. Add the 1/4 cup of oil. Add the chicken. Stir fry chicken until cooked – about 5 minutes. Remove from wok and set aside.

Add another 1 Tb of oil to the wok if needed. When the oil is hot, add the garlic. Stir-fry until garlic browns, then add the carrots. Stir-fry for about 1 minute, then add the shredded cabbage and peas. Cook for 2 more minutes. Add the noodles, bean sprouts, and green onions and cook for about 2 more minutes.

Add the sauce to the wok. Return the chicken to the pan. Mix everything together and serve hot.

Tuesday, April 17, 2012

Burger Wrapped in Bacon

To watch this Video-Recipe click HERE!!

Hi Everyone! Today's recipe is a delicious, juicy and super easy to make Burger, this is what I called a "Gourmet Burger", but don't let that title scared you, like I said, this one is super easy to make, the preparation time is around 6 minutes, but we have to let the meat rest for at least 10 minutes before cooking it; so prep. work would be around 20 minutes, and the cooking time is around 15 minutes! I really hope you give this one a try. And hopefully you will love it as much as I did.

Serves 4.
Ingredients:
1lb. ground meat ( I used turkey, but these ingredients work amazing with beef, pork, chicken and lamb!)
3 green onions finely chopped
1/2 cup finely chopped fresh parsley
1 tablespoon extra virgin olive oil
2 tablespoon Worcestershire sauce
1 teaspoon ground thyme
1 teaspoon dry rosemary
1 teaspoon garlic powder
1 teaspoon ground black pepper
1 tablespoon chicken flavor bouillon (even if you use other than poultry, this works fine with other meats)
Bacon Slices at least 2 per burger (Canadian or Italian bacon works great too)
Cheese Slices 1 per burger
3 tablespoon all purpose flour


To serve:
Hamburger buns
lettuce
1 sliced tomato
1 sliced onion
French fries

Combine the ground meat, with the green onions and the fresh parsley, season with 1 tablespoon of chicken flavor bouillon and 1 teaspoon of each: garlic powder, ground black pepper, ground thyme and dry rosemary. Also add in 1 tablespoon of extra virgin olive oil and 2 tablespoons of Worcestershire sauce.

Using a fork or with clean hands, combine all the ingredients together, until thoroughly combined.

Once the meat is well combine with the rest of the ingredients, start making the patties. Divide the meat mixture in 4 equal sections. (or make them the size you prefer.)

Grab a section of the meat and form the patty, then coat it with the flour
and set it a side. Keep on repeating these steps until you have all the patties ready. Let the patties rest in the fridge for at least 10 minutes, this will allow the meat to absorb the flavors of all the other ingredients.

After 10 minutes or so, wrap the patties in bacon.

Grab 2 slices of bacon, place one of top of the other to form a bacon cross


Add the patty right in the middle of the bacon cross.


Wrap the patty with the bacon pieces, use toothpicks to keep the bacon in place. (DON'T FORGET TO REMOVE THE TOOTHPICKS BEFORE SERVING!!!)


Cook the patties on medium heat for about 6 to 7 minutes, or until well cooked. (Top the patties with a slice of cheese just before they are ready. Let the cheese melt.)

While the patties cook, get the buns ready, spread each half of the buns with Mayo and Mustard, and toast them on medium heat for 1 minute on each side, or until warm and slightly crisp.

Once the patties are cooked, you are ready to serve. Build your burgers any way you want!

(I top one half of the bun with lettuce, place the patty on top, add some grilled onions, and fresh tomato slices! You can also add avocado, banana peppers, jalapeno peppers, etc)


Serve with french fries and Enjoy!!

Whole Wheat Pasta

There's just something about homemade pasta. In particular, there's really something special about homemade whole wheat pasta. In my opinion, most store bought whole wheat pasta just isn't worth a darn. Now, I won't lie to you... making pasta is definitely more labor intensive than opening a box, but I'd say it's worth it - at least some of the time. What does that mean? It means that depending on what I've got going on, either I will open a box or I will prepare a batch of noodles from scratch. The nice thing, is that you can make extra when you do make homemade noodles and freeze or dry them for future convenience.

Making whole wheat pasta surprisingly provides you with a plethora of options. Not only can you decide how much whole wheat flour you want to use... go with 100% or 25%, whatever you fancy, but you can decide which type of whole wheat flour to use. Five years ago, when I first came across white whole wheat flour, it was a bit tricky to find. Now days, however, it seems to be everywhere. White whole wheat is only different from your typical whole wheat in the type of wheat berry that is ground up. Your regular wheat flour is usually a hard red wheat. White whole wheat is hard white wheat, which is lighter in color and more delicate in taste. In the picture below, you can see the differences (from left to right) between white whole wheat, regular whole wheat, and all purpose flours. I chose to use white whole wheat for this pasta because it would have a softer, milder flavor that I think is better in a pasta. After all, for the most part, pasta is a vehicle for other flavors; it shouldn't overpower them.

I strongly advise using a stand mixer to make this pasta. While you can mix the dough by hand and roll it through a hand-crank pasta mill... phew! I've done it. it's hard work! The KitchenAid will do most of the heavy lifting for you. Mix all the ingredients in the bowl of the mixer, fitted with a dough hook. Turn the mixer to speed 2 and process until the mixture is completely wetted. Notice that it will never completely come together on its own, but will continue to look like crumbles. Once it is completely mixed, continue processing for another 2 minutes.

Because ambient humidity can lead to significant differences in the moisture of the dough, you will need to test the moisture level of the dough. To do this, turn the mixer off and grab a small handful. Squeeze it together. If it forms a cohesive mass, then you are good to go. If it falls back apart, crumble the handful back into the mixer bowl and add another tablespoon of water. Mix for 1-2 minutes before testing again. Continue until the moisture level is right.

Grab handfuls of crumbles and press them together to form balls. Shoot for 8-9 balls. Place them in a plastic bag to keep them from drying out. Let them rest for 20-30 minutes. You will be amazed what that short amount of time will do to the texture of this dough. When you first shape them, the dough will be fairly rigid and slightly crumbly. Afterwards, it will be more tender and malleable. It's still a stiff dough, but you will definitely be able to tell the difference.

After the dough has rested, pull one dough ball out at a time. Press the ball flat on the counter.

Feed the dough through the flat roller fitted to your stand mixer. Start with the widest setting. The first couple of feeds, all on setting one, are a continuation of the kneading process, so don't skip them. I run it through the first time just as the flattened disk. Then I fold the result over and feed it folded seam first back through the roller, still on setting one.

After doing that a few times, the shape is often a bit funky, so I fold it up like a tri-fold brochure.

I then feed the tri-fold brochure through the roller open end first. This leaves you with a nicely shaped piece of dough. It takes a little practice to get it perfect, but remember, even if it doesn't look perfect, it will still taste good!

Now you can start reducing the width of the rollers. Once I get off setting one, I only roll it once each through the remaining settings. In this case, I went up to setting seven; I wanted my pasta fairly thin.

The dough gets really dang long, so I cut it into manageable lengths with a pizza cutter. In this case, I cut them into 6-8 inch lengths. The dough is dry enough that it can be stacked without the layers sticking together.

The next step is to cut the pasta. I made fettuccine. I placed a large bowl underneath the cutter to catch the pieces. What is that in the bottom of the bowl, you might ask? Semolina flour, which is a coarsely ground flour works really well to keep pasta from sticking together. What is great about using the semolina in this function, is that it falls off the dough when you cook the pasta. If you use all purpose of whole wheat flour to keep the dough from sticking, it gets goopy and sticky when the pasta cooks and makes a bit of a mess of it.

Periodically, toss the pasta around to get it well coated so that it doesn't stick together.

Lay it out on sheet pans while you cut the rest of the pasta. You now have a couple of options: you can cook the pasta immediately, you can let the pasta sit on the counter until you are ready to cook the pasta, you can spread the pasta out a single layer thick for a few days until it is brittle dry, or you can gently place it into bags and freeze it.

If prepared fresh, this pasta takes almost no time to cook... 2-3 minutes at most, so be prepared!

Whole Wheat Pasta
Yield: 1 - 1 1/2 pounds of dough

3 1/2 cups flour (for proper hydration, use at least 50% whole wheat)
1/2 tsp salt
4 large eggs
water
semolina flour, for dusting

In a stand mixer fitted with a dough hook, mix the flour and salt. In a liquid cup measure, break four whole eggs. Gently beat and then add enough water to make one cup of liquid. Add the liquid to the flour mixture. Process on speed 2 until it is completely wetted. Check for proper hydration by taking a small handful of the mixture and squeezing it into a ball. If the ball falls apart, add another tablespoon of water and process again. Continue in this manner until the dough forms a nice clump, then mix another 2 minutes. Press the crumbles into 8-9 balls of dough. Place in a plastic bag to rest for 20-30 minutes. The dough is then ready to be processed in a pasta mill. For details of this processes, see the above post.

Banana Bars with Brown Sugar Frosting

photo from kuki's kookbook blog


 These were good the first day, better the second, and divine the third.  They were like Pringles, once you pop one you just can't stop!

Banana Bars with Brown Sugar Frosting
From kuki's kookbook blog
·                     1 stick butter, at room temperature
·                     2 cups sugar
·                     2 eggs
·                     1 1/2 cups mashed bananas
·                     1 teaspoon vanilla
·                     2 cups flour
·                     1 teaspoon baking soda
·                     1/2 teaspoon salt
preheat oven to 350 degrees. cream together butter, sugar, eggs, banana and vanilla until light and creamy. add flour, soda and salt. pour into an 11x13 inch jelly roll pan. bake for 25-30 minutes or until cake bounces back when pressed on. cool completely and then top with frosting.

brown sugar frosting:
·                     1 stick butter, softened
·                     8oz cream cheese, softened
·                     1/2 cup brown sugar
·                     2 cups powdered sugar
·                     2 teaspoons vanilla
·                     1/4 teaspoon salt
·                     milk, if needed
in a medium bowl with an electric mixer, whip all ingredients together until light and fluffy. if frosting is too thick, add milk, 1 tablespoon at a time, until you reach the desired consistency.

Sunday, April 15, 2012

Coconut Chocolate Bars

If you are looking for a sweet, sticky indulgence, look no further. These are the sorts of treats that are too dangerous for me to keep around on a regular basis. They're just so darn tasty! I could eat a whole pan by myself in less than 24 hours. Since I can't justify making them that often, I love it when I have a good excuse. When I don't have a good excuse, I just send the majority of the pan to work with my husband. I do hope that I'm not responsible for someone failing their PT test! No, really, these little suckers are absolutely divine.

I first was introduced to these bars at a friend's house almost a decade ago. I immediately asked for the recipe. I just knew that I would want to eat them again, and soon. However, I was disappointed with the process for how they were put together. The recipe I was given had you simply layer ingredients, but I found that led to a crumbly (albeit tasty) mess. I suspected that mixing the ingredients together first would produce a more cohesive product, and I was right.

First, make graham cracker crumbs out of the graham crackers. I use my food processor and then add the melted butter right in to mix completely. These days, I suppose, you could buy the pre-ground crumbs and save yourself some time. Make sure the crumbs and butter are thoroughly mixed and press into the bottom of a 9x13x2 inch pan. This is also a good time to start preheating the oven to 350° F.

In a bowl, mix the sweetened condensed milk, chocolate chips, flaked coconut, and walnuts together. It will be a sticky, gloppy mess.

Spread the sticky mixture over the pressed crumbs as evenly as possible.
Gently press down the topping; you don't want it to end up pressed so tightly it bakes into a solid rock!

Bake at 350° F for 25-30 minutes, or until everything is golden brown. Remove from the oven and cool completely before cutting. This dessert has so much butter in the crust, that if you use a non-stick pan, you really have no worries about it coming out. If you refrigerate the bars for a bit, you can easily pull the whole 9x13 sheet out so that you can cut it easily on a cutting board with a pizza cutter. Bars can be stored in an air tight container for up to a week.

Chocolate Cookie Bars
Yield: approximately 18 bars

1 stick of butter, melted (1/2 cup)
2 cups graham cracker crumbs
1 14 oz can sweetened condensed milk
2 cups semi-sweet chocolate chips
2 cups flaked coconut (sweetened or unsweetened)
1 cup chopped walnuts

Preheat the oven to 350° F. Mix the melted butter and graham cracker crumbs together until well mixed. Press evenly into a 9x13x2 inch non-stick baking pan. In a separate bowl, mix together the condensed milk, chocolate chips, flaked coconut, and walnuts. Spread over the crumb crust and gently press even. Bake 25-30 minutes or until the bars are nicely golden. Cool completely before cutting and serving. Cutting the bars is much easier if you refrigerate the pan for a few hours first. The whole 9x13" sheet can be removed from the pan to be cut with a pizza cutter on a cutting board. Bars keep up to a week at room temperature in an air-tight container.

Saturday, April 14, 2012

Southwestern Style Chicken Soup

In the last year, we've experienced a bean revolution in our household. It seems like every time I turn around, I come across evidence that beans are practically a super food. Not only are they apparently super healthy, but they are cheap and really tasty. Now, I throw them in all kinds of dishes. A lot of the time, I use them instead of adding meat. In this soup, however, the beans play a supporting role. And what a supporting role it is. I love both the flavor and texture of this soup. The creaminess of the beans contrasts perfectly with the pop of the corn kernels. The slight tang of the lime brings out the warm spice of the cumin. This is a hearty and delicious soup!

Southwestern Style Chicken Soup
Yield: 4 servings

1 TBS vegetable oil
1 onion, diced
1 TBS garlic, minced
4 cups water
1 1/2 cubes Knorr chicken bouillon
1 1/2 cups cooked, shredded chicken
1 cup frozen corn kernels (or fresh)
1 can black beans, rinsed
1 can diced tomatoes, drained
1 TBS lime juice
2 tsp cumin
1 TBS chopped cilantro
salt & pepper, to taste

Heat the oil over medium-high heat in a large soup pot. Cook the onions until they are translucent and softened. Add the garlic and continue to saute for two minutes. Add the water and bouillon. Bring to a boil. Add the chicken and remaining ingredients. Simmer for five minutes.

Friday, April 13, 2012

Creamy Crockpot Hot Cocoa

photo from mrshappyhomemaker.com
So good, so rich, so yummy, so easy for a crowd!

Creamy Crockpot Hot Cocoa
recipe courtesy of MrsHappyHomemaker.com


  • 1.5 cups whipping cream
  • 1 14oz can sweetened condensed milk
  • 6 cups milk
  • 1 teaspoon vanilla
  • 2 cups of milk chocolate chips


Stir together the whipping cream, milk, vanilla, and chocolate chips in a crockpot.

Cover and cook on low for 2 hours, stirring occasionally, until mixture is hot and chocolate chips are melted. Stir again before serving. Garnish as desired.

Thursday, April 12, 2012

Pork Chops with Feta

I know I've been a little MIA lately... every time we're staring another military move in the face, I start getting antsy trying to get my ducks in a row. In addition, the weather's been freaking fantastic! I have to take advantage of it while I can. Hell will be here soon enough. I've been riding my horse a lot... trying to get my fill before I have to find her a new home, and I've been trying to get a lot done around the house and yard; we'll be renting our current house to another military family when we leave. I'm sad to report that there's been a lot of take out lately. Shhhhhhh! Don't tell!

Tonight, however, I wanted to make an old fashioned, from scratch dinner. This combination turned into a winning one. So yummy!

I sliced the onions into long strips. I used two small onions. I put a little olive oil in a large saute pan and then cooked the onions, stirring frequently until they started to brown nicely.

I then cut a pint of baby portobello mushrooms in large chunks. I minced 3-4 cloves of garlic as well and added these to the pan to cook with the onions. When everything was nicely browned, I deglazed the pan with about 1/4 cup of Madeira.

I dumped the sauteed goods into a bowl to hang out while I cooked the pork chops. At this point, the pan was fairly clean again.

I drizzled a little more olive oil into the pan. When it was hot, I added the pork chops, cooking them over medium heat. I sprinkled them with salt and pepper. I let them cook without disturbing until it naturally let go from the pan and had a nice brown crust. I them cooked them on the other side until almost cooked through.

I returned the sauteed onions and mushrooms to the pan and threw in the thyme. I stirred everything together and turned the heat down to low.

The sauce was a little thinner than I preferred, so I temporarily removed the pork chops for a moment. I sprinkled a little cornstarch into the mixture and stirred until it was thickened.

I returned the pork chops to the pan and then sprinkled the feta over top. I turned the heat off and served them immediately.

Pork Chops with Feta
Yield: 4 small or 2 large servings

1 TBS olive oil
2 small onions, sliced
1 pint baby portobello mushrooms, cut in large chunks
3-4 garlic cloves, minced
1/4 cup Madeira
1 TBS olive oil
4 boneless pork loin chops
1 TBS fresh thyme, minced
1/2 -1 tsp cornstarch (optional)
1/3 cup crumbled feta cheese
salt and pepper to taste

In a large saute pan, heat the olive oil over medium high heat. Add the onions and cook until they soften and start to brown. Add the mushrooms and garlic. Continue to cook until the onions are tender and the mushrooms are nicely golden. Deglaze the pan with the Madeira. Pour the mixture into a bowl and set aside.

Add the other tablespoon of olive oil and let it heat up. Pat the pork chops dry before adding them to the pan. Sprinkle with salt and pepper. Let the chops cooks without disturbing them until they release naturally from the pan and are nicely browned. Then, flip them over and let them cook on the other side until they are almost cooked through.

Add the onions and mushrooms back to the pan. Add the thyme and stir. Reduce the heat to low. If the sauce is too thin, remove the pork chops and sprinkle a little cornstarch into the sauce until it is the thickness you prefer. Return the chops and sprinkle the feta over top. Turn the heat off and serve immediately.