Tuesday, May 29, 2012

Green Smoothie

photo from lindawagner.net

Never thought I would be a morning smoothie girl but this is my new favorite go-to breakfast.  I like to add about a teaspoon or orange juice concentrate...
Green Smoothie 
From lindawagner.net
This recipe is super simple. All you need is a blender and the following ingredients:
§  1-2 bananas
§  1/2 cup frozen peaches
§  1/2 cup frozen mango
§  a couple handfuls of spinach
§  water
§  ice (if desired)
Add enough water to blend and enjoy, that’s it! Forget the dehydrating morning latte and get the glow with a Green Smoothie instead.

Monday, May 28, 2012

Levain Bakery Chocolate Chip Cookies


We had a dessert recipe exchange for  young women's the other night and we all brought the dessert for everyone to try. Another leader brought these chocolate chip cookies which are the copy cat recipe from the Levain bakery in NY. I don't remember the last time I bit into a cookie and thought.. "this is the best cookie i've ever had" but i sure did with this one. They are amazing! I made them last night and they were again..amazing! i know there are a lot of chocolate chip recipes on here but this one is worth a shot.

i didn't want to make giant cookies like it calls for so i made them smaller and adjusted the time. but i also learned that you can't do them too small either. they don't spread out very much so be generous in their size. also they taste better when they're a little bigger rather then little bite size cookies.


Ingredients
·         2 sticks ‘cold and cubed’ good quality unsalted butter
·         3/4 cup granulated sugar
·         3/4 cup brown sugar – not packed too hard. Just spoon it in the cup(s) and press down lightly when full, sweeping off any extra that runs over.
·         2 eggs (room temperature)
·         3 1/4 to 3 1/2 cups All Purpose flour – Spoon and Sweep method. (feel the dough, it should be moist, kind of like cold cookie dough in a tube . . . but not super sticky, so you can portion the cookies with your hands)
·         3/4 teaspoon Kosher salt
·         3/4-1 teaspoon baking powder ( I don’t fill the tsp fully, hence the 3/4 tsp)
·         1/4 tsp baking soda
·         1 T cornstarch
·         1 cup Guittard brand milk chocolate chips
·         1 cup Guittard brand semisweet chocolate chips
·         1 cup walnuts (Toast the nuts for more flavor, if desired and/or use any kind of nut you like.)- i usually don't like nuts in my desserts but they add an amazing flavor and there are already enough chunks that it doesn't ruin the texture either. add them!!

Directions
Preheat oven to 350 degrees.
1.        In bowl of electric mixer fitted with paddle, cream together butter and sugars until well blended and fluffy.
2.        Add eggs, one at a time and beat until well incorporated.
3.        In a separate bowl, sift together flour, salt, baking soda, baking powder, cornstarch. Add slowly to the wet ingredients and mix until just combined.
4.        Gently fold in chocolate chips and nuts
5.        Transfer dough to clean work surface and gently mix dough by hand to ensure even distribution of ingredients. Divide into 12 equal portions, **about 4 oz each.
6.        Place each on sheet pan lined with parchment paper and bake in the preheated oven 16-23 minutes depending on how gooey and raw’ish you like the middle. Bake until lightly browned, taking care not to overbake. Let cool on rack and store what you don’t immediately eat, in an airtight container. To freshen them after a few days (if they last that long), give them a quick nuke in the microwave for 5-10 seconds.

Thursday, May 24, 2012

White Chicken Enchiladas with Green Chile Sour Cream Sauce


photo from danellemphotography.com

Hold up. Let me wipe the drool from my chin.  Yeah, these were good.  I mean really good.  I mean, let's have these leftovers the next night and they even taste better good.  I liked them.

White Chicken Enchiladas with Green Chile Sour Cream Sauce

From letsdishrecipes.blogspot.com

Ingredients

8-10 soft taco size flour tortillas

2 cups shredded Monterrey jack cheese, divided

2 cups shredded cooked chicken

3 tablespoons butter

3 tablespoons flour

2 cups chicken broth

1 cup sour cream

1 (4 oz) can diced green chiles

Chopped, fresh cilantro for garnish (optional)

Directions

Preheat oven to 425 degrees. Mix together 1 cup of the cheese and the chicken. Place an equal amount of the chicken mixture into each tortilla.  Roll up and place seam side down in a lightly greased, 9 x 13-inch pan.

In a skillet or saucepan, melt the butter. Stir in the flour and cook for 1 minute. Add the chicken broth, whisking until smooth. Cook over medium heat until thick and bubbly. Stir in the sour cream and green chiles. Pour sauce over the top of the enchiladas; sprinkle with remaining shredded cheese. Bake for 20 to 25 minutes. Sprinkle with cilantro, if desired.

Wednesday, May 23, 2012

Raspberry Mousse

After preparing my menu for that party I catered a couple weeks ago, I came across some pre-made phyllo cups and pre-made chocolate cups in my pantry. I figured this event would be a great opportunity to use them up before our big move... but what to put in them? I thought about making a rich chocolate pudding. I thought about making a tart and sassy lemon curd. I finally settled on trying a gloriously pink and fresh tasting raspberry mousse. Not only was the color absolutely fantastic, but the flavor tasted so strongly of freshly picked raspberries and the mousse had a perfect balance of sweet and tart.

Now, I'm going to tell you a wonderful secret: I made it using frozen raspberries from the grocery store! I'm not sure it would have tasted any better or different if I had used fresh. What a wonderful thing!

The first step, after letting the raspberries thaw, is to puree them with some of the sugar. Once they are pureed, run them through a sieve to remove the vast majority of the seeds. Nothing ruins the great mouth feel of this mousse faster than getting a mouth full of raspberries seeds.

In a small bowl, sprinkle the gelatin over the cool water so that it can soften. After about 5 minutes, place the bowl of softened gelatin in the microwave and gently heat on low until the gelatin becomes a clear liquid. Pour it into the strained raspberries and whisk to mix.

In a bowl over gently simmering water, whisk the egg whites with 1/4 cup of sugar until they reach about 140° F. Remove the bowl from the heat and beat with an electric mixer until stiff peaks form. Gently fold the egg whites into the raspberries.

Using the same bowl you used for the egg whites, whip the cream until it also forms firm peaks. Gently fold the whipped cream into the raspberries as well. The last step is to test for sweetness. Obviously, the amount of sugar required will vary depending on the tartness of the raspberries and personal preference. If the mixture needs a little more sugar, stir in powdered sugar until it tastes right to you.

If you are serving the mousse in bowls, divide the mousse between them and refrigerate up to two days before serving. If you are planning on putting the mousse into small tart shells, phyllo cups, or chocolate cups, you can pipe immediately into the vessels and refrigerate until serving or you can place the mousse, covered, into the refrigerator until you are ready to pipe. If you are using phyllo cups, I strongly recommend waiting to fill them until the last minute, lest the phyllo lose its snap.


Raspberry Mousse
Yield: approximately 6-8 cups
Adapted from Food & Wine

2 tsp unflavored gelatin
2 TBS cool water
2 10-ounce bags of frozen raspberries, thawed
3/4 cups of granulated sugar, divided
2 large, room temperature egg whites
1 cup heavy whipping cream
powdered sugar (optional)

Sprinkle the gelatin over the cool water to soften for five minutes. Puree the thawed berries with 1/2 cup of the sugar and run through a sieve to remove the seeds. Heat the softened gelatin in the microwave on low heat until the gelatin has melted and the mixture is clear. Stir the gelatin into the raspberries.

Over a pan of gently simmering water, whisk the egg whites with 1/4 cup of sugar until they reach about 140° F. Remove the bowl from the heat and use a mixer to whip the egg whites to stiff peaks. Fold the egg whites into the raspberry mixture.

In the same bowl used for the egg whites, whip the heavy cream until it makes stiff peaks as well. Fold the whipped cream into the raspberry mixture. Taste the mousse and add a little powdered sugar, if necessary, to balance the tartness of the berries.

Divide into bowls and chill, pipe immediately into small tart shells (or other shells) and chill, or place all of the mousse in an air tight container to chill until ready to pipe into tart shells. The mousse holds well in the refrigerator for up to two days.

Oh, I almost forgot... garnishing this mousse with curls of white chocolate is the perfect complement! What a delightful combination.

Vegetarian Sloppy Joe

To watch this Video-Recipe please click HERE!!

Todays' recipe is going to be a "Vegetarian Sloppy Joe", super easy to make and full of flavor! This version has all the flavors of a Meat Sloppy Joe without all the fat and calories! It is super easy to make and  so delicious that you wont miss the meat in this one! I hope you like it as much as I did!


Serves 2 (to serve 4, just add 1 extra can of kidney beans and season to taste.)
Ingredients:

1 large onion cut in thin slices
1 bell pepper, finely chopped (any color)
1 15oz. can of kidney beans
1 carrot finely chopped
1 15oz. can of diced tomatoes in tomato juice
2 garlic cloves finely chopped
3 tablespoons ketchup
1 tablespoon yellow mustard
1 teaspoon cayenne pepper
1 teaspoon brown sugar
1/2 Tablespoon extra virgin olive oil
salt and ground black pepper to taste
Your favorite buns to serve

Rinse and drain the beans, set a side for a minute. (Slightly mash the beans with a fork if you like.)

In a sauce pan, add in the olive oil, onion and garlic, stir together and cook for about 3 minutes or until the onion and garlic become translucent.

After 3 minutes or so add in the carrots, bell peppers and the can tomatoes, give it a stir and also add in the kidney beans, stir together and season with 3 tablespoons of ketchup, 1 tablespoon of mustard
a pinch of cayenne pepper, and 1 teaspoon of brown sugar stir together, taste the flavor and add salt to taste.

Cover with a lid and cook on medium low heat for about 30-45 minutes or until all the vegetables are nice and soft.

Warm up the buns on a griddle, and serve the bean mixture over half a bun, cover with the second half and enjoy!

Saturday, May 19, 2012

Peanut Butter Bars


To watch this Video-Recipe please click HERE!

Hi Everyone!
I hope you are doing great!
So today's recipe is "Peanut Butter Bars", I really love how these came out, they have the texture of a "Protein Bar", smooth and chewy. They are really sweet and peanut buttery.

I added whole old fashion oats and chocolate chips to give them some texture and a little bit of a crunch. I drizzled them with melted chocolate! So for me, these are the perfect snack, or even better, they are the perfect Breakfast!

I think they are amazing...however, my lovely husband didn't like them! Can you believe it? I seriously CAN'T! How dare he say he didn't like them!!!

He said they were too sweet for him... oh well... too bad for him... good for me. I get to eat them all!


Seriously I was really disappointed because I LOVED them! If you do give these a try, please let me know what you think! I would really appreciate some feedback on this particular recipe!

Makes 10 1½  x  4½ bars
Ingredients:
1 ½ cups creamy peanut butter
3 ½ cups old fashion oats
1/2 cup brown sugar
1/2 cup unsalted butter
1 teaspoon vanilla extract
1/2 cup of chocolate chips (optional)


In a blender or a food processor, blend 3 cups of the old fashion oats for about a minute or so, or until you get a powder-like consistency. Combine the powder oats with the whole oats, mix well and set aside for a minute.

In a saucepan on medium low heat, add in the butter and the vanilla extract, cook for 1 minute or until the butter has melted a little bit.

Add in the brown sugar, stir together, and continue to cook for 2 more minutes.

Add in the peanut butter, stir together and continue to cook on medium low heat until all the ingredients are well combine into a very soft sauce.

Once all the butter is melted into a soft sauce, pour this sauce onto the oats, mix well until thoroughly combined.

Cover a baking sheet with foil or parchment paper, (for easy cleaning), pour the peanut butter mixture onto the baking sheet. Use a spoon or a spatula to smooth the peanut butter batter into an even layer about 1 or 1½in thick.

Sprinkle some chocolate chips over the batter, use the same spoon to press down the chocolate chips into the batter. Refrigerate for 30 minutes.

Melt the rest of the chocolate chips and drizzle the melted chocolate over the peanut butter bar. Refrigerate for 2 hours.

After 2 hours the peanut butter bar should be firm enough to cut into smaller bars.
Make the bars any size you like. And enjoy!

Keep refrigerated!

Friday, May 18, 2012

The Ultimate Marinade


photo from howsweeteats.com
I don't know if it's because of the amazing Costco steak, or the amazing marinade-but HOT DOG! this stuff was good.  Seriously, I don't need to go out to eat if Jake can grill me up an amazing slice of beef like this!


The Ultimate Marinade

Recipe from howsweeteats.com


1/3 cup soy sauce

2 tablespoons olive oil

1/4 cup sherry wine

1-2 tablespoons brown sugar

2-3 garlic cloves, minced

1/4 teaspoon ginger powder


Combine all ingredients together and mix in a large bowl or baking dish. Whisk until sugar has disolved and pour over meat, seafood or veggies.

Herbed Tenderloin Toasts

This gem of an appetizer is great because it is pretty darn easy to make. Not cheap... but easy. I suppose you could always substitute a different cut of beef for the tenderloin, but it's the butter-like consistency of the beef slice that makes it so memorable. The only real cooking involved in this appetizer is with the tenderloin, which is super easy.

To really make your life simple, purchase a two pound, trimmed center-cut tenderloin. The only tenderloin I could find without going to a specialty market was a whole "peeled" tenderloin (meaning the fat has been cut away but it still has the silver skin... which is a pain to remove). Preheat your oven to 425° F. Rub the tenderloin down with some vegetable oil and sprinkle with salt, garlic powder, pepper, and ground thyme. Place on a foil lined roasting pan and roast until a thermometer in the center of the cut reads 140-145° F. Depending on the size of your tenderloin, it can happen fairly quickly... as in less than a half hour. Let the roasted tenderloin cool to room temperature, wrap it tightly in plastic wrap, and then refrigerate until well chilled. Chilling the meat prior to slicing makes life much easier. You want thin slices! Once chilled, slice the tenderloin into approximately 1/8 inch thick slices. The roasting and slicing of the meat can be done up to 3 days ahead of time.

On the day you plan to serve this dish, slice a fresh baguette into 1/4 inch thick slices at a slight angle, so that they slice into longish ovals. Turn on your broiler. Brush or spray (I recommend spraying) both sides of each slice. Lay them out one layer thick on a sheet tray and toast until lightly golden, flip, and toast again on the other side.

Meanwhile, let a package of Boursin cheese (if you have never tried this spreadable cheese, you are missing out!) come to room temperature. Then open a jar of roasted red peppers and slice a bunch of thin strips, about an inch and a half long and 3/8 of an inch thick.

To assemble, spread a small bit of Boursin on the toast. Lay a small piece of sliced tenderloin on the cheese. Add another little spread of cheese on top of the meat and lay two slices of roasted red pepper in an X pattern. That'ts it! These are so yummy! They were one of the more popular dishes I served.

I made 75 of these with about two pounds of tenderloin, 2 baguettes, one decent sized jar (maybe 12 ounce range?) of roasted red peppers, and roughly 8 oz of Boursin cheese.

Thursday, May 17, 2012

Vegetarian Quinoa Chili

Before you scream and run in the other direction, give me a moment to tell you that this meal was very delicious, extremely satisfying, and I felt like such a good mom after I made it.  We all need a little bit of that every now and then, right?  :)  Did I mention that its healthy? (as if I needed to..."Quinoa" is in the title).  There are eight, EIGHT different kinds of veggies in this meal.   You know they say you consume less calories when you have less to choose from at the dinner table, aside from the main course.  No need for fancy sides, this one has it all built in.  If you're nervous to try quinoa, this is the perfect meal to take a baby step in the right direction.

Vegetarian Quinoa Chili

1/2 cup quinoa, rinsed
1 cup water
1 tablespoon olive oil
1 small onion, chopped
3 cloves garlic, minced
1 jalapeno pepper, diced
1 large carrot, peeled and chopped
2 celery stalks, chopped
1 green bell pepper, chopped
1 red bell pepper, chopped
1 medium zucchini, chopped
2 (15 ounce) cans black beans, drained and rinsed
1 (15 ounce) can red kidney beans, drained and rinsed
3 (15 ounce) cans diced tomatoes
1 (15 ounce) can tomato sauce
2-3 tablespoons chili powder, depending on your taste (we used 3)
1 tablespoon ground cumin
Salt and black pepper, to taste
Optional toppings: green onions, avocado slices, cheese, sour cream, Greek yogurt, chips, crackers, etc.
In a medium saucepan, combine quinoa and water.  Cook over medium heat for 10-15 minutes, or until water is absorbed. Set aside.  In a large stockpot, heat olive oil over medium-high heat.  Add onions and cook until soft and translucent, about 5 minutes.  Stir in garlic, jalapeño, carrot, celery, peppers, and zucchini. Cook until vegetables are tender, about 10 minutes.  Add the beans, tomatoes, and tomato sauce.  Stir in the cooked quinoa and all of your seasonings.  Simmer chili on low for about 30 minutes.  Serve warm with desired toppings.

Wednesday, May 16, 2012

Smoked Salmon on Cucumber

Being a proud native Pacific Northwesterner, who grew up on smoked salmon, I just can't pass up any opportunity to introduce it to the masses. For the party I catered last week, I smoked a small filet and then mashed it together with a little cream cheese. I probably smoked about one and a half pounds of salmon (pre-cooking weight) and then once it had chilled in the refrigerator, I mixed it with approximately one 8 oz package of room temperature cream cheese. I crumbled all the fish first and added the cream cheese a bit at a time until I reached the consistency and taste I wanted. Add a little salt and pepper, if necessary.

Prepare these appetizers within an hour of serving. The salmon spread can be prepared a few days in advance, but the cucumbers get weepy and floppy if they are cut to early. If you do cut them ahead of time, be sure they are kept refrigerated until the last minute. Be sure to use the hothouse cucumbers for this dish and do not slice them too thickly. Aim for about 3/8 of an inch. If you use too much cucumber or the standard market cucumbers, the cucumber flavor can start to overwhelm the delicate nature of the smoked fish.

Use two spoons or your fingers to mound about a teaspoon or two of the salmon mixture onto the cucumber slice. Add a small bit of green herb to the top. I used curly parsley as it does not have an overwhelming flavor of its own in such a small piece. Lastly, and this part is optional, I ground a little Salish Smoked Salt to finish it off. Looks good and adds a small burst of smokey salt when you first put the round in your mouth.

These little appetizers are so gorgeous and the contrast of the fresh, crisp cucumber with the smooth, smokey taste of the salmon makes for a dish sure to wow your guests. I highly recommend them!

Tuesday, May 15, 2012

Nachos for Dinner

To watch this Video-Recipe please click HERE!!

Hi everyone! Today will be all about "5 de Mayo", so I have a perfect dish to Celebrate "La Batalla de Puebla", which celebrates the Mexican victory over the French on May 5, 1862, this battle was held in Puebla, which is located in East-Central Mexico, just between Mexico City and Oaxaca.

You might be a little surprise to know that this date is a minor Holiday in Mexico, we don't really celebrate it as people celebrate it in the United States.
I lived in the North of Mexico for over 20 years and in those 20 years we never celebrated it, not at home or schools; there were no parades, no festivals, no mariachis and no fiestas at all!

So when I came to the United States, I was somewhat surprised to find out that 5 de Mayo was such a huge deal! Anyhow, I'm all about the parties, and celebration!

So today I'm bringing you a great idea for your 5 de Mayo party! This dish is so easy and delicious that is just perfect for any day, dinner, lunch or even breakfast, as a main dish or as an appetizer!

This one is one of my husband's top choices for dinner! If he could choose what to eat everyday, it will be wihout a doubt my "Ground Meat and Beans Nachos!" Hopefully you will like this one as much as he does!

Serves 4 main dishes or 10-12 as an appetizer
Ingredients:

1lb ground meat (I used turkey)
1 14.5oz can black beans
1 14.5 can Diced tomatoes with jalapeno peppers in rich juice
4-5 tablespoons taco seasoning
2-3 cups shredded cheese (Mexican blend or your favorite)
1 package of corn tortillas to make home-made nachos or 1 family bag of nachos
**Oil for frying, in case you are making home-made nachos**

Pico de Gallo:
¼ cup onion finely chopped
½ cup chopped cilantro
1 lime
2 teaspoons salt
2 teaspoons oregano
½ teaspoon garlic powder
½ teaspoon crushed red pepper
ground black pepper to taste

To garnish:
Sour Cream
Pickled Jalapeños

Drain the can tomatoes, reserve the juice.

Rinse and drain the black beans. Season with 1 teaspoon of each, salt and dry oregano, mix well and set aside.


To make the Pico de Gallo:
Combine the can tomatoes, (remember to drain the juice, and reserve it, we will use the juice to season the meat), combine the tomatoes with the onion and cilantro, season with 1 teaspoon of each: salt and oregano; also add in the juice of 1 lime and ½ teaspoon of each: garlic powder and crushed red pepper. Mix well, taste the flavor and add any salt or ground black pepper if needed. Set aside until ready to use it.

To make the Home-made nachos: (or buy your favorite brand of nachos)
Cut the tortillas in quarters. In a large skillet, heat up 1-2cups of oil, bring to a temperature of 350ºF, fry the tortillas until golden brown and crisp. Drain on paper towels and while still warm season with a pinch of salt. Reserve until ready to use them.(If you prefer, bake the tortillas at 450ºF for 10-12 minutes or until golden brown.)

In a large non-stick skillet cook the meat on medium-high heat, for about 10 minutes or until brown. Add in the grated onion and continue to cook for 1 more minute. Season with 4-5 tablespoons of Taco Seasoning and add in the tomato juice (from the can of tomatoes) and ¼ cup of water, also bring in the beans, stir together and continue to cook for 4-5 more minutes or until the beans are heated through.

And that's it, serve at once!

If you are making this for a party, I recommend you set all the ingredients as a buffet,(Nachos, Meat Mixture, grated cheese, Pico de Gallo, Pickled Jalapenos and the sour Cream)so your guests can build their nachos whenever they are ready.

If you are serving this as an appetizer: Place the meat mixture right in the middle of your plate, add some cheese,  top it with the Pico de Gallo, jalapeños and sour cream, arrange the nachos around the meat.

If you like melted cheese, place your plate of nachos in the oven for about 5 minutes or until the cheese
is melted.

Enjoy!

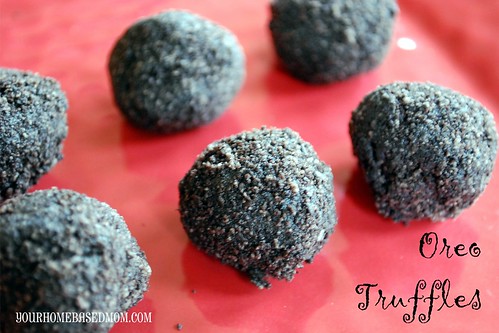
Oreo Truffles


photo from yourhomebasedmom.com
I know these have been a 100 times or more but here's why I like this recipe: no dipping involved!  I am averse to dipping things.  It never works for me and it never looks pretty.  These were awesome because they were so quick.  I just rolled them in crushed oreos after.  Oh, and they are so good, and yet so bad!


Oreo Truffles
allrecipes.com


1 16 oz. package of Oreos, divided.  Total of 45 oreos

1 8 oz. package of cream cheese, softened

Crush 9 Oreos in blender and set aside.  Crush remaining 36 Oreos.  Beat cream cheese until smooth and add 36 crushed Oreos.  Beat until well mixed.  Form into 1 inch balls and then roll in remaining crushed Oreos.  Refrigerate until firm.  Enjoy!

Sunday, May 13, 2012

Party for Sixty

A good friend of ours recently retired from the Air Force after 24 years of active duty service. When his wife told me how much they were quoted by a local caterer to provide food for the party they were hosting in honor of the event, I liked to have choked. The price was obscene! As I've been toying with the idea of pursuing some kind of personal chef service when we move the D.C. area this summer, I thought it would be a great trial run to see if I would enjoy that type of work... and I did!

They wanted to provide heavy appetizers for up to sixty guests this past Friday evening. The picture above shows just one of the tables of goodies. Based on estimates that I found online, I prepared over 1000 pieces/servings. As I was also a guest at the party, I had the opportunity to see the reactions to my food. The feedback was great! While I developed some new menu items, which I will be posting in the near future, I also served a lot of items I have already shared with you.

I made my prosciutto and cheese calzone. I made the crust from scratch as well. I just love the salty punch the prosciutto gives to this calzone. For such a simple list of ingredients inside, the flavor is amazing!

Because no party is complete without chips and dip, I decided to serve my
black bean dip.

And because my husband would have disowned me if I hadn't included
deviled eggs on the menu, I managed to shell four dozen very tricky eggs. You know, it's bad enough when you are trying to peel a couple of eggs that won't peel easily, but with this amount, I am amazed I didn't end up with eggs being thrown all over the house! Fortunately, the ugly side goes down and they still ended up looking pretty decent.

I made a monstrous bowl of my
chicken salad. Instead of serving it on french type bread, I baked a loaf of soft sandwich bread and made little finger sandwiches.

Of course, there had to be dessert! I made my favorite
lemon biscotti, but instead of making two logs out of the dough, I made three to make cute little biscotti. I learned a good lesson in that if you cover the biscotti before the icing is 100% completely dry, the biscotti lose their snap. Fortunately, a short trip in my food dehydrator on the lowest setting cured what ailed them.

I made two pans of my
devilishly good brownies!

I couldn't resist making a batch of my delicious little gingersnaps. They're the perfect finger food. So snappy and gingery!

And, lastly (of the things I've already posted, anyway), I served up a dish of crack... aka toffee butter crunch. I think I've gotten a few more people addicted to it deliciousness. Sorry!

There were a bunch of other dishes I prepared, including sausage stuffed mushrooms, some toasted french bread slices with herbed cheese and tenderloin, a smoked salmon spread on cumber slices, chicken satay, mini twice baked potatoes, and spinach and feta triangles. I'll be sharing these recipes with you over the next week or so!

Saturday, May 12, 2012

Ham and Potato Soup

We've been having unusually cold weather this week, so I wanted to make some soup to warm us up a bit.  This one was the highest rated soup on Allrecipes.com and for good reason.  It was easy and delicious.  If you have leftover ham, this would work perfectly.  You could also sub the celery for sweet peas- or just use both.
courtesy allrecipes.com

Ham and Potato Soup
Adapted slightly from allrecipes.com

4 cups diced red potatoes
1/2 cup diced celery (add more veggies of your choosing, if desired- corn, carrots, etc.)
1/2 cup diced onion
3/4 cup diced, cooked ham
3 1/2 cups water (or enough to just cover all of the vegetables)
2 1/2 Tbs. chicken bouillon
1 tsp. salt, or to taste
1 tsp. ground white pepper (or black pepper)
5 Tbs. butter
5 Tbs. all purpose flour
2 cups milk 

Combine the first 5 ingredients in a large stockpot.  Make sure the water is just covering everything.  Bring to a boil, and then cook over medium heat until potatoes are tender, for 10-15 minutes.  Stir in the chicken bouillon, salt and pepper.  Meanwhile, in a small saucepan, melt butter and then add flour.  Whisk together until thick, about one minute.  Slowly stir in milk and whisk until thick- about 4-5 minutes.  Stir this mixture into the stockpot and cook soup until heated through.  Serve immediately.

Cutest Little Caprese Ever!

The last week was a whirlwind of cooking for me. It culminated in my providing the food for a not insignificant party last night. I'll post the details of what I served and add the recipes for those items I made that I haven't shared with you yet over the next week or so. But, I was so excited to share these little gems with you, that I just couldn't wait.

I love a good caprese salad, but it's not always user friendly for a buffet of appetizers. I came up with these cute little skewers to keep things contained. Are they not the cutest things ever??? They were a huge hit. It's the perfect bite with the perfect mixture of cheese, tomato, and basil.

Each toothpick has a grape tomato cut in half. I purchased a container or small, fresh mozzarella balls. The ones available in my grocery were in a herbed oil, but you can use plain mozzarella balls as well. I cut the cheese balls in half as well so that everything fit on my toothpicks. I then picked some basil and cut the large leaves into strips. The smaller leaves I used whole.

The only drawback to these guys is that they need to be prepared the same day as they are to be eaten. Keep refrigerated until serving.

Tuesday, May 8, 2012

Springtime Spaghetti

This recipe took about 20 minutes to make with ingredients I had on hand, and was one of the best dishes I've made in a long time!  All my kids loved it, too!


Springtime Spaghetti

from allrecipes.com

Ingredients

  • 8 ounces spaghetti
  • 2 tablespoons butter
  • 1 large zucchini, julienned
  • 3 large carrots, julienned
  • 2 teaspoons minced garlic
  • 3/4 cup heavy cream
  • 3/4 cup grated Parmesan cheese
  • 1 tablespoon chopped fresh dill

Directions

  1. Bring a large pot of lightly salted water to a boil, cook spaghetti for 8 to 10 minutes, until al dente, and drain.
  2. Melt the butter in a skillet over medium heat, and saute the zucchini, carrots, and garlic until tender. Stir in the heavy cream, Parmesan cheese, and dill. Cook and stir until thickened. Mix with the cooked spaghetti to serve.

Pasta with Pecorino Romano and Black Pepper

This is my new favorite pasta recipe- so easy, affordable, quick, amazingly delicious and vegetarian.  It affirms my belief that I could most certainly live off of eating pasta every day for the rest of my life.  Brian (not a pasta lover, and therefore the sole reason I can't make pasta every day) raved about this meal- ate seconds both nights we had it.  We absolutely and completely loved this recipe.  And, it makes a ton...hooray for leftovers!!
Pasta with Pecorino Romano and Black Pepper
The Best of America's Test Kitchen 2011

4 oz. Pecorino Romano, grated fine, plus extra for serving
1 lb. angel hair pasta (or your favorite pasta)
1 1/2 tsp. salt
2 Tbs. heavy cream
2 tsp. extra virgin olive oil
1 1/2 tsp. fresh cracked black pepper

Add the grated cheese to a medium heatproof bowl.  Bring 8 cups of water to a boil in a large pot. Add the spaghetti and the salt, and cook, stirring frequently, according to package directions until the pasta is al dente. Before draining the pasta, reserve 2 cups of the pasta water and set aside.  A little at a time, whisk 1 cup of the pasta cooking water into the grated cheese. Once it's completely incorporated, add the heavy cream, olive oil and pepper. Whisk until combined - the sauce should be mostly smooth though mine had a few small bits of cheese that weren't melted completely. (Don't worry about it too much, those bits will melt in the next step.) Pour the cheese sauce over the pasta, a little at a time, tossing to coat. Once you've added all of the sauce, let the pasta rest for about 1 minute, tossing it frequently, and adjusting the consistency with the remaining reserved cooking water until it's to your liking. Serve garnished with extra grated cheese and freshly ground black pepper.

Ground Meat Fajitas

To watch this Video-Recipe click HERE!
Hi everyone! Here you have another easy and delicious recipe for the "5 de Mayo" Celebration! Another traditional dish, "Fajitas" this one is made with Ground meat; I have a Chicken Fajita recipe right HERE!

The flavors are quite different but both versions are delicious and you can feel proud of serving this to your guests. It's easy to make, full of flavor and very figure friendly too!  It's also a very versatile dish, you can serve it on a Tostada, in a taco, with beans, rice and some guacamole or all by itself with some flour tortillas. I hope you give this one a try!

Serves 6 
Ingredients:
1 lb ground meat (any kind, I used turkey)
1 onion cut in thin slices
1 red bell pepper
1 green bell pepper
1 yellow bell pepper
1-2 jalapeno pepper
¼ cup fresh cilantro finely chopped
1 sprig fresh rosemary (about 4-5 inches long)
2 sprigs fresh thyme (4-5 inches long)
2 fresh bay leaves
1 teaspoon ground garlic
1 tablespoon chicken bouillon seasoning
1 teaspoon ground cumin
¼ cup white wine (optional)
½ tablespoon extra virgin olive oil
1 teaspoon ground black pepper
2 teaspoons of dry oregano
salt to taste
Juice of 1 lime

To serve:
Corn Tortillas / Flour Tortillas /Tostadas
Sour Cream
Lime Wedges
Guacamole 

Wash the peppers. Remove the veins and stems from all the peppers. Cut them in thin slices. Set aside for a minute.

In a large skillet, heat ½ tablespoons of oil, add in the meat (break it down), also add in the rosemary, thyme and bay leaves (no need to remove the leaves from the sprigs), season with ½ tablespoon of chicken bouillon seasoning, 1 teaspoon of ground cumin and garlic powder. Give it a quick stir, and cook on medium-high heat for 10-15 minutes or until the meat is nice and brown.

Remove the meat from the skillet, and set aside for a minute. Dispose of bay leaves, and the rosemary and thyme sprigs. The meat is already impregnated with their flavor, so there is no need to leave them in there anymore.

In the same skillet, add the white wine and cook for 1 minute or until it reduces to half, add in the onion and cook for 2 minutes or until the onion becomes soft. (if you are not using wine, just add a tiny splash of oil and cook the onions.)

Add in the the peppers, give it a quick stir and season with ½ tablespoon of chicken bouillon seasoning, 1 teaspoon of ground black pepper, 1 teaspoon of dry oregano and the the juice of ½ a lime. Stir together and cook for 1-2 more minutes (cook longer if you like the peppers to be really soft, I like mine to be kind of crisp).

After a minute or so bring back the meat to the skillet, also add in the rest of the lime juice and the fresh cilantro. Cook for 3-4 minutes or until the meat is well heated through.


You can serve this dish with rice and beans, or serve it on Tostadas, or in Tortillas, garnish with sour cream, fresh cilantro and Guacamole.

Enjoy!

Saturday, May 5, 2012

Tamarind Balls (Traditional Mexican Candy)


Hey everyone! Here you have my third recipe for the "5 de Mayo Celebration", this one is one of the most famous "Candies" in Mexico and it is my favorite treat of all times! I would eat this every single day for the rest of my life if I could! I admit, I do eat it almost every day when I am in Mexico, and that's why I always gain weight when I'm there! I just can't help it, this delicious treat is spicy, sweet, tangy and everything in between! My mouth is watering just by talking about it, seriously I can almost taste this delicious goodness all over again!

If you ever go to Mexico, go to the Markets or the main Plazas, and there you will find some Tarahumara (Native American) man or woman selling this Tamarindo Balls, they sell a bunch of different candies, Coconut candies, Guava candies, Palanquetas, Masapanes, and all kinds of toasted seeds, everything is just delish! But Tamarindo Balls are my #1 when it comes to Traditional candies!

If you have never had one before, and you like spicy-tangy flavors, you should definitely give this one a try! It will hit all the right spots for your cravings!

Makes 6 2in Balls
Ingredients:
300 grams Tamarind pods
½ cup sugar
¼cup of water
2-3 tablespoons of cayenne pepper
½ teaspoon salt

For garnish:
2 tablespoon granulated sugar
1 tablespoon cayenne pepper
1 teaspoon of salt

Peel off the tamarind pods. Press them in between your finger tips and their shell will break right away, peel them off and remove the veins that run along the tamarind pods.

For the garnish:
Combine 2 tablespoons of sugar, with 1 tablespoon of cayenne pepper and 1 teaspoon of salt, mix well and set aside until you are ready to use it.

In a sauce pan combine the water, sugar, salt and cayenne pepper, stir together and bring to a boil. When it starts to boil, add in the tamarind pods and continue to cook on medium low heat for about 10-15 minutes or until the liquid evaporates and the tamarindo dissolves into a paste. Set it aside to cool.

After it cools, remove some of the seeds. Do not remove all the seeds! They will add some texture to the Tamarind balls. Every single Tamarind candy I had eaten in my life has had seeds!

Grab some of the tamarind paste and form it into a ball with your hands. If the paste is too sticky, sprinkle more sugar and cayenne pepper over it. Don't worry if the balls don't look like a perfect-ball at first. You will finish shaping them later.

Once all the balls are ready, roll them over the spicy-sugar mixture. Rub a little bit of this mixture on the palm of your hands, grab the ball once again and roll it with your hands until you have a nice round ball. Keep on doing this until you are done. And that's it! They are ready to be eaten! Yummm. Enjoy!

Oatmeal Pancake Mix

For all of the pancake recipes I've posted on this blog already, this is definitely my new favorite.  Mostly because its so easy, super healthy, and my kids LOVE it.  This is the best recipe for those crazy school mornings where everyone is trying to get out the door and you want a quick, hot breakfast.  I make the mix up when I have 10 extra minutes, store it in a ziploc in the fridge (where it will keep indefinitely) and then cook up these delicious pancakes when I need them-in less than 3 minutes.

images courtesy Mel's Kitchen Cafe
Oatmeal Pancake Mix
Mel's Kitchen Cafe

3 1/2 cups rolled (quick) oats
5 cups whole wheat flour (or 3 wheat + 2 white) 
3 tablespoons sugar
3 tablespoons baking powder
1 tablespoon salt
1 tablespoon baking soda
1 cup vegetable or canola oil

To Make the Mix:
In a blender or food processor, pulverize the oatmeal into a powder (optional- it makes a smoother pancake texture).  Then, mix all the dry ingredients together in a mixer with a paddle (or by hand). With mixer on slow speed (or gently by hand), drizzle the vegetable oil into the bowl slowly while the mixer is running. When all the oil has been added, stop the mixer and squeeze a clump of mix in your hand. If it stays together, it is just right. If it is still crumbly, add another tablespoon of oil at a time until the consistency is correct (I’ve never had to add additional oil). Store in an airtight container for up to two weeks at room temperature or indefinitely in the refrigerator or freezer.


To Make the Pancakes:
Whisk together 1 cup of mix, 1 cup buttermilk (if you don't have buttermilk, you can pour 1 Tbs. lemon juice into a 1-cup measure and fill remaining 1 cup with milk and let sit for a couple of minutes), and 1 egg. The mixture may seem thin at first but the oats will soak up the milk as it stands while the griddle preheats. Heat a griddle and drop the batter onto it. When the edges look dry and bubbles come to the surface and don’t break, turn the pancake over to finish cooking on the second side. As a sidenote, buttermilk can be frozen indefinitely for future batches of pancakes, so it’s worth keeping it around!
*1 cup of mix will make about 6-7 4-inch pancakes.

Friday, May 4, 2012

Strawberry (or Raspberry) Cupcakes


photo from realmomkitchen.com
Okay, funny story.  I had my back turned when Jake first tried these.  The noise he emitted scared me.  I turned around, very worried, and asked if he was okay.  His eyes were shining and he had an ethereal look on his face.  Then  he cried.  No, I'm kidding.  But he did say these were it--I mean IT!  His favorite!  **I'm not a huge fan of strawberry as the original recipe called for so I did raspberry.  I'd do it again just to see Jake's face.


Strawberry Cupcakes

Recipe from realmomkitchen.com

Cupcakes:

  • 1 white cake mix

  • 1 (3 oz) box of strawberry gelatin

  • 2/3 cup canola oil

  • 1/2 cup of frozen sliced strawberries in syrup, thawed

  • 1/2 cup water

  • 4 eggs
Frosting:

  • 2/3 cup frozen sliced strawberries in syrup, thawed

  • 1 1/2 cups butter, softened

  • 6 cups powdered sugar
  1. Preheat oven to 350 degrees and line muffin tins with 24 cupcake liners.

  2. In the bowl of a stand mixer, beat together the cake mix, gelatin, oil, 1/2 cup of the strawberries, and water until combined.  Then beat in the eggs 1 at a time until well incorporated.

  3. Fill cupcake liners 2/3 of the way full with batter, do not over fill.  If you have extra batter then make a couple more cupcakes because if you over fill the liners the cupcakes will spill over the edges and you will have more of a flat top cupcake.

  4. Bake at 350 for about 16 minutes until a toothpick inserted into the center of a cupcake comes out clean.  Allow to cool.

  5. Place the 2/3 cup of strawberries into a blender and puree.  Place the butter in a bowl and using a mixer beat until smooth.

  6. Add half the powdered sugar to the butter and beat until all combined and fluffy.  Then beat in the strawberry puree until well blended.

  7. Beat in the remaining powdered sugar until combined and fluffy.  Pipe frosting onto cooled cupcakes.