Barley is stated by historians to be the oldest of all cultivated grains. It seems to have been the principal bread plant among the ancient Hebrews, Greeks, and Romans. The Jews especially held the grain in high esteem, and sacred history usually uses it interchangeably with wheat, when speaking of the fruits of the Earth.
Among the early Greeks and Romans, barley was almost the only food of the common people and the soldiers. The flour was made into gruel, after the following recipe: "Dry, near the fire or in the oven, twenty pounds of barley flour, then parch it. Add three pounds of linseed meal, half a pound of coriander seeds, two ounces of salt, and the water necessary." If an especially delectable dish was desired, a little millet was also added to give the paste more "cohesion and delicacy." Barley was also used whole as a food, in which case it was first parched, which is still the manner of preparing it in some parts of Palestine and many districts of India, also in the Canary Islands, where it is known as gofio .
In the time of Charles I, barley meal took the place of wheat almost entirely as the food of the common people in England. In some parts of Europe, India, and other Eastern countries, it is still largely consumed as the ordinary farinaceous food of the peasantry and soldiers. The early settlers of New England also largely used it for bread making.
Barley is less nutritious than wheat, and to many people is less agreeable in flavor. It is likewise somewhat inferior in point of digestibility. Its starch cells being less soluble, they offer more resistance to the gastric juice.
There are several distinct species of barley, but that most commonly cultivated is designated as two-rowed, or two-eared barley. In general structure, the barley grain resembles wheat and oats.
Simply deprived of its outer husk, the grain is termed Scotch milled or pot barley . Subjected still further to the process by which the fibrous outer coat of the grain is removed, it constitutes what is known as pearl barley . Pearl barley ground into flour is known as patent barley . Barley flour, owing to the fact that it contains so small a proportion of gluten, needs to be mixed with wheaten flour for bread-making purposes. When added in small quantity to whole-wheat bread, it has a tendency to keep the loaf moist, and is thought by some to improve the flavor.
The most general use made of this cereal as a food, is in the form of pearl, or Scotch, barley. When well boiled, barley requires about two hours for digestion.
Sunday, June 30, 2013
Thursday, June 27, 2013
Cherry-Tomato, Watermelon Summer Salad

I recently ordered this book to get more info on eating a plant based diet and have loved reading it. I mainly ordered it for the 150 recipes he includes at the back which are pretty amazing. It has been a great resource for wanting to incorporate healthier meals into my diet.
I made this tomato watermelon salad tonight and it is the PERFECT quick summer salad. Watermelon is all the rage this summer :) and this recipe incorporates every fresh summer flavor your little heart could desire. I halved the recipe and sat down and ate the whole thing. It would be perfect to take to a summer BBQ as well. Yum!
2 Boxes of Cherry or grape tomatoes halved (large amounts of lycopene which fights cancer and heart disease)
1 Bunch of Cilantro (2 handfuls) chopped (detoxifies colon, pulls heavy metals out of body, relieves gas, prevents nausea, antiinflamitory)
3 Green onions, white and green parts chopped (Rich in Vit K which is good for bone health and immune system)
1/2 medium watermelon cut into bite-sized pieces (hydration assisting in weight loss, lycopene, vit A, potassium)
3 tablespoons of lemon juice and lemon or lime zest
3 tablespoons of balsalmic or sherry vinegar
Wednesday, June 26, 2013
Poultry Gravy and Waffles

Both sides of my family come from Pennsylvania Dutch country, so it's no surprise that I'm all about waffles and gravy. It amazes me how many folks turn up their nose at the mere thought, but they just don't know what they're missing!! It's reminiscent of biscuits and gravy, but so much better. Of course, I would take a waffle over a biscuit any day. (By the way, make sure you are using a waffle recipe that does not have added sugar... this is a savory application and sugar would be weird). While you can make this with chicken or turkey, since I grew up with it usually being turkey (I think my mom only thought about making it in the midst of Thanksgiving excess), that's what I prefer.
And wouldn't you know that the other day I found a pack of turkey thighs at the grocery! Who knew they sold such a thing!?! Turkey's not just for Thanksgiving anymore! And it was darn reasonably priced, too. I paid less than $2.00 a pound. Can't complain about that!

Before you get started with the actual cooking, it's good to have the veggies ready. I used a standard combination of onion, carrot, celery, and garlic, just like I would use to make chicken broth.

In a large Dutch oven or stock pot, add a small drizzle of oil to get things going. Heat the pan over medium-high heat until the oil shimmers. Add the meat, skin side down and let sizzle until most of the fat is rendered and the meat in nicely golden. Flip the meat as necessary to brown all sides. Drain off the fat and set aside for later.

Add the water, vegetables, and herbs and cook uncovered for about an hour or until the turkey is well cooked and falling off the bones.

Remove the broth from the heat and remove the meat and let cool until it can be handled without burning the bejeepers out of yourself. Discard the skin and bones and pull the meat into bite sized pieces.

Strain and reserve the broth. Skim any excess fat, if necessary. Hopefully, you'll have somewhere around four cups of liquid. If you have too much, let it simmer and reduce until it's about right. If you don't have enough, add water to make four cups. In the now empty pan, add 3-4 TBS of the reserved fat and the flour. Mix thoroughly and then slowly add the broth, whisking constantly over medium heat. Continue whisking until the mixture has thickened. Remove from the heat and add the shredded meat. Add salt to taste. Oh, and don't forget to make the waffles!!
Poultry Gravy and Waffles
Yield: 6 entree servings
For the broth:
1-2 tsp vegetable oil
2 turkey thighs or 2 lbs chicken thighs
6 cups water
1 medium onion, quartered
2 celery stalks, chopped
5-6 small/baby cut carrots
2 garlic cloves
2 bay leaves
1/4 tsp dried thyme
1/4 tsp dried rosemary
1 tsp salt
1/4 tsp pepper
For the gravy:
4 cups of broth
3-4 TBS reserved fat
4 TBS flour
reserved meat
salt to taste
Heat a large Dutch oven or stock pot over medium-high heat. Add the oil. When the oil is heated and shimmering, add the meat, skin side down. Brown the meat and render out the fat, turning as necessary. Drain the fat and reserve.
Add the water and remaining broth ingredients. Simmer uncovered for one hour, or until the meat is well cooked and falling off the bones. Remove the meat to let cool and strain and reserve the liquid (skim any fat, if necessary). You want close to 4 cups of liquid. If there is too much, you can simmer it down; if there is not enough, add water to make 4 cups. When the meat is cool enough to handle, discard the skin and bones and shred the meat into bite sized pieces. Set aside.
In the now empty pan, over medium heat, add 3-4 TBS of the reserved fat. Stir in the flour and mix thoroughly. Slowly add the broth, whisking constantly. Continue to cook and whisk until the mixture comes just to a boil and thickens. Remove from the heat. Add the reserved meat and stir. Add salt to taste. Gravy can be made in advance and reheated or used immediately. Serve over waffles (savory waffles - be sure to use a waffle recipe that does not include added sugar). Serve immediately after pouring over waffles.
Nutty Sticky Buns

To watch this Video-Recipe click HERE!!
Hi everyone! Today's recipe is another fantastic yet very easy dessert, it does take some time for the dough to rise, but once you beat everything together, you just let the yeast do its job and wait for the dough to be ready! Every minute of this recipe is well worth it, these Buns are Delicious! I hope you like these Buns as much as my family and I.
Ingredients:
- 3 cups all purpose flour
- 1¼ cups chopped pecans
- 2/3 cups Maple Syrup
- ¼ cup of granulated sugar
- ½ cup brown sugar
- 1 package Quick Rising Active dry yeast (11g)
- 1 teaspoon of salt
- 8 tablespoons soften butter
- 1 egg at room temperature
- 2 teaspoons of ground cinnamon
- 1 cup of warm water (130ºF)
With 2 tablespoons of softened butter, grease a 13 x 9 in baking pan. Spread the pecans and Maple Syrup all over the bottom of the pan on an even layer. Set aside until ready to use it.
In a small bowl, combine brown sugar and cinnamon. Mix well and set aside until ready to use it.
In a large bowl, combine 2 cups of flour with the granulated sugar, 1 tsp. of salt and 1 package of quick rising yeast, mix well until well combined. Add in the water, 2 tablespoons of softened butter and 1 egg, stir well, until everything is incorporated into a sticky dough, then add in the remaining 1 cup of flour. Mix everything with your hands, until you have a soft and elastic dough. (not sticky anymore) Once the dough is ready. cover it with a clean kitchen towel and let it rise until doubled. (30-40 minutes)
On a floured surface roll out the dough to a 16 x 13 in rectangle, about ½ inch thick. Cover the surface of this rectangle with the remaining butter, and sprinkle the brown sugar and cinnamon mixture all of the surface of the butter rectangle.
Starting with the 16 inch side of the rectangle, roll it up tightly. Cut into 16 slices and place the slices in the prepare pan with the nuts and maple syrup. Cover them with a clean kitchen towel and let them rise for another 30 minutes.
Preheat oven to 375ºF.
Uncover buns and bake them until golden brown and completely cooked, for about 30 minutes. Let them rest for 1 minute before transferring them to a cold surface.
Enjoy.
Sunday, June 23, 2013
Oven-Bakes Parmesan Rosemary Fries
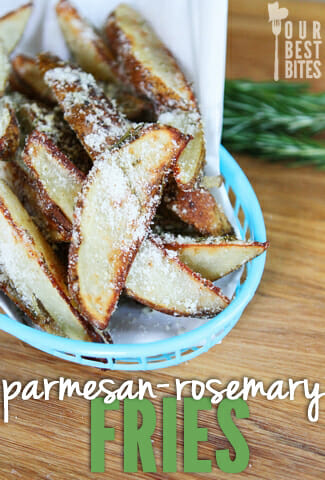
I don't know who else saw these on OBB but I decided to make them tonight for sunday dinner and they were mm mm good! The only ingredient I had to go get was some fresh rosemary but other then that they are relatively and easy make. And I would definitely recommend getting the fresh stuff. Also, put the pan on a rack closer to the top if you like them crispier.
Ingredients:
4 medium Russet potatoes
2 tablespoons extra-virgin olive oil
1 teaspoon kosher salt
1 teaspoon garlic powder
1/4 teaspoon freshly ground black pepper
1 tablespoon corn starch
1 1/2-2 tablespoons chopped fresh rosemary, plus more for garnish if desired
Canned Parmesan cheese
2 tablespoons extra-virgin olive oil
1 teaspoon kosher salt
1 teaspoon garlic powder
1/4 teaspoon freshly ground black pepper
1 tablespoon corn starch
1 1/2-2 tablespoons chopped fresh rosemary, plus more for garnish if desired
Canned Parmesan cheese
Instructions:
Preheat oven to 400 and line a baking sheet with aluminum foil (lightly crumple it if you want to; that will help ensure even browning) and spray with non-stick cooking spray. Set aside.
Cut each potato into 8 wedges and set aside ( you can also cut them like you do for this recipe). In a large, wide bowl, combine the olive oil, salt, garlic powder, black pepper, corn starch, and rosemary. Add the potato wedges and toss to coat them evenly with the olive oil mixture. Spread evenly over the prepared foil and bake in the preheated oven for about 40 minutes or until the fries are golden brown. Remove from oven and sprinkle generously with Parmesan cheese and toss to combine. If desired, sprinkle with additional rosemary and salt. Serve immediately.
Wednesday, June 19, 2013
Chipotle Chicken Kabobs with Avocado Cream Sauce

Adapted from Annies Eats
chipotle chicken kabobs with avocado cream sauce
Yield: about 4 servings
INGREDIENTS
For the chicken:
Juice of 2 limes
½ cup of vegetable or canola oil
1 tsp. kosher salt
¾ tsp. chili powder
¾ tsp. paprika
½ tsp. cumin
¼ tsp. cayenne pepper
2 cloves garlic, minced
1 tbsp. brown sugar
1 chipotle in adobo, seeded and minced
2 lbs. chicken breasts and/or thighs, cut into 1½-2 inch pieces
Minced fresh cilantro, for serving
For the avocado cream sauce:
1 avocado, split and pitted
½ cup low-fat greek yogurt
1 clove garlic, minced
Juice of 1 lime
Salt and pepper, to taste
1 avocado, split and pitted
½ cup low-fat greek yogurt
1 clove garlic, minced
Juice of 1 lime
Salt and pepper, to taste
DIRECTIONS
- In a medium bowl or a baking dish/pie plate, combine the lime juice, oil, spices, garlic, brown sugar, and chipotle. Whisk together to combine. Add the chicken pieces to the marinade and mix well to ensure that they are all coated and mostly submerged. Cover, refrigerate, and let marinate for 30-60 minutes.
- Meanwhile, heat a grill to medium-high and oil the grates. When the chicken is done marinating, thread the pieces onto skewers for grilling. (If using wooden skewers, be sure to soak them first to prevent charring/burning.) Dispose of the excess marinade. Place the kabobs on the grill and let cook, turning once or twice, until all sides are slightly browned and the internal temperature registers 160˚ F on an instant-read thermometer. Remove to a plate and let rest 5-10 minutes. Sprinkle with minced fresh cilantro, if desired.
- To make the sauce, combine the avocado, yogurt, garlic and lime juice in the bowl of a food processor or a blender. Process until smooth. Season to taste with salt and pepper. Serve alongside the kabobs for dipping.
Monday, June 10, 2013
Lentil and Brown Rice Salad

For those of you who are trying to get that bod in swimsuit shape for the summer and love a hearty salad try this one! I seriously inhaled this one and it was a piece of cake to make. If you haven't been able to tell I've been trying to eat more plant based whole foods and share my recipes. I am feeling awesome and have had so much fun trying new fun ingredients. Even if you consider yourself a picky eater, I don't care it's worth the benefits to make healthier choices.
via wellvegan.com
Ingredients
- 1/2 cup green lentils (if you live near a trader joes they have precooked lentils that are cheap)
- 1/2 cup brown rice (trader joes also has a brown rice medley that you store in the freezer and throw in the microwave for 3 min as is makes for quick prep for this meal)
- 2 large carrots
- 2 radishes
- handful of cherry tomatoes halved
- 2 ribs celery sliced thin
- 1/4 cup currants or craisins
- 1/4 cup walnuts
- 4 cups mixed greens or any other lettuce. I used mixed greens mixed with kale
- Drizzle of balsalmic vinegar over the top
Instructions
- Cook rice and lentils according to package directions. Set aside to cool. While the rice and lentils are cooking, prep the rest of your ingredients.
- Assemble all tossing
Cinnamon Sugar Donut Muffins

Downtown Bakery and Creamery’s Cinnamon Sugar Donut Muffins
Yield: 24 standard size muffins (52-56 mini muffins)
For the muffins:
12 oz. (24 Tbs.) unsalted butter, warmed to room temperature
1-3/4 cups sugar
4 large eggs
1 lb. 11 oz. (6 cups) all-purpose flour
1 Tbs. plus 2 tsp. baking powder
1/2 tsp. baking soda
1-3/4 tsp. salt
1 tsp. ground nutmeg
1-2/3 cups milk
1/4 cup buttermilk
12 oz. (24 Tbs.) unsalted butter, warmed to room temperature
1-3/4 cups sugar
4 large eggs
1 lb. 11 oz. (6 cups) all-purpose flour
1 Tbs. plus 2 tsp. baking powder
1/2 tsp. baking soda
1-3/4 tsp. salt
1 tsp. ground nutmeg
1-2/3 cups milk
1/4 cup buttermilk
For dipping:
8 oz. (16 Tbs.) unsalted butter; more as needed
2 cups sugar
2 Tbs. ground cinnamon
8 oz. (16 Tbs.) unsalted butter; more as needed
2 cups sugar
2 Tbs. ground cinnamon
Put a rack in the middle of the oven and heat the oven to 350°F. In a stand mixer or a large bowl, cream the butter and sugar. Beat in the eggs, one at a time, until just mixed in. Sift together the flour, baking powder, baking soda, salt, and nutmeg. Combine the milk and buttermilk. With a wooden spoon, mix a quarter of the dry ingredients into the butter mixture. Then mix in a third of the milk mixture. Continue mixing in the remaining dry and wet ingredients alternately, ending with the dry. Mix until well combined and smooth, but don’t overmix. The batter is very thick. Grease and flour a standard-size muffin tin. Scoop enough batter into each tin so that the top of the batter is even with the rim of the cup, about 1/2 cup. (A #16 ice-cream scoop gives you the perfect amount.) Bake the muffins until firm to the touch, 30 to 35 minutes.
Melt the butter for the dipping mixture. Combine the sugar and cinnamon. When the muffins are just cool enough to handle, remove them from the tin, dip them into or brush them all over with the melted butter (I recommend the brush method- I did both and found that the dip method lead to them absorbing too much butter and got greasy). Then roll them- top, bottom, and sides- in the cinnamon sugar.
Make ahead: You don’t have to bake all the muffins right away; the batter will keep, covered and chilled, for up to three days in the refrigerator.
Mini muffins: I baked mine in a mini muffin tin. I made a half recipe and got 28 mini muffins. They took about 18 minutes to bake, but I would start checking at about 14 minutes.
Source:Fine Cooking
Helpful Hints:
- Cinnamon sugar is delicious, but powdered sugar, plain sugar, or vanilla sugar would be delicious too.
- Do not overmix, or you will not get fluffy, tender muffins.
- I added a splash of vanilla to the batter, as I can’t imagine any baked good without it

Saturday, June 8, 2013
Fried Empanadas

To watch this Video-Recipe please click HERE
Hi everyone! Today´s recipe is another very popular Mexican dish, it's really easy to make, and if you are expecting to save a lot of money and use any leftovers you might have in the refrigerator, this recipe is the perfect one for you. I hope you like this one as much as I do.
Ingredients:
- 2 lbs. Maseca (corn flour, it's very popular in the States, you will for sure find it at any Waltmart)
- 1 teaspoon Salt
- 1 tablespoon Baking Powder
- 1 1/2 quarts Water
Vegetable oil for frying - Plastic wrap for easy cleaning (optional)
For the Filling: (Use any left overs you have, Refried beans make a great filling, and you can also fill them with Mozarella Cheese.)
Meat and Potato stew for the filling:
Ingredients:
- 1 lb sirloin cut into small pieces
- 2 cups diced potatoes
- 2 cups your favorite salsa..
To make the Empandas:
In a large bowl, combine the Corn Flour with a teaspoon of salt, and a tablespoon of baking powder, mix well and add in some of the water, you will need about 1 1/2 quarts of water but start by adding a little bit at a time, mix well and continue to add more water as needed. Mix well until the flour and water are well incorporated into a soft dough, you want to get a nice and soft texture, not too wet or too dry and not sticky at all.
Once you get the right texture. You can start making your empandas. You can make them any size you want.
Grab some of the dough, roll it into a ball with your hands, and place it in between 2 layers of plastic wrap, then press the ball down with a tortilla presser, if you don't have a tortilla presser, you can use a plate or a skillet to press down the dough into a circle. You want the circle to be a 1/4 inch thick. If it is too thick it will absorb to much oil and it wont cooked completely and if it is too thin it will tear apart once you add the filling.
Once you have the empanada circle, now add some of the filling right in the middle of the circle, fold the circle in have like a taco, fold the the edges upward a little bit to prevent the filling from coming out of the empanada, then press down the edges with a fork once again to seal it completely. Keep on making the empandas until you are done.
Preheat plenty of vegetable oil to a temperature of 300°F.
Fry the empandas for about 3-5 minutes on each side, or until golden brown and completely cooked. To prevent the empandas from browning too much, you can flip them around for a total of 3-4 times.
Drain them on paper towels, then serve

Spicy, crisp chicken on Mint Avocado Salad
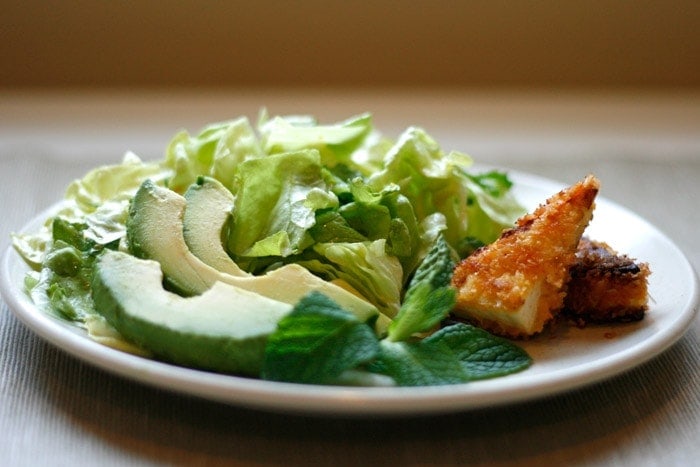
I made this for dinner tonight with Tofu and I really liked it, Beau not so much. I'm sure it would be great/better with chicken and has lots of great flavors. I've never cooked with mint but I loved it on the salad. I also added a little siracha sauce to make it more spicy. Panko can be found at the local grocery store in the asian isle. So when you're feeling adventurous I would try this salad out. Also I would add the dressing on individually rather then coat the entire salad in it before hand.
Ingredients
- 1 package regular tofu, firm or extra-firm, drained or a couple of chicken breasts cooked and sliced into strips
- 1/3 cup spicy Asian chile sauce, plus 1/2 teaspoon for dressing
- 1/2 teaspoon grated orange zest
- 2 tablespoons fresh orange juice
- 2 tablespoons extra-virgin olive oil
- Coarse salt
- 1 cup panko
- 3 tablespoons canola oil
- 2 heads butterhead lettuce, washed, dried, and torn into bite-size pieces
- 1 cup fresh whole mint leaves
- 1 avocado, halved, pitted, peeled, and thinly sliced lengthwise
Instructions
- Cut the tofu in half horizontally (slicing parallel to work surface). Keep the tofu stacked; cut crosswise in half to make 4 rectangles. Cut each rectangle into 2 triangles.
- In a large bowl whisk together 1/2 teaspoon chili sauce, orange zest, orange juice, and olive oil. Season the mixture with salt to taste. Set aside.
- Pour the remaining 1/3 cup chile sauce into a shallow bowl. Place the panko in a separate shallow bowl. Piece by piece, gently coat the tofu in the chile sauce and then the panko, patting it on each piece to coat.
- In a large, nonstick skillet, heat half the canola oil over medium heat. Gently place half the tofu in skillet. Pan-fry the tofu, turning once, until outsides are crisp and brown, about 3 minutes per side. Remove from heat. Repeat the process with remaining oil and tofu.
- Add lettuce and mint to bowl with dressing; toss to coat. Place equal mounds of salad in center of four plates; fan avocado slices on top. Arrange 2 tofu triangles next to the avocado and serve immediately.
Subscribe to:
Comments (Atom)