Thursday, October 27, 2011

Brown Rice and Black Bean Casserole

We LOVED this casserole...hearty, full of yummy vegetables, and easy to make. Great for leftovers too. We will definitely be making this one again- it really was delicious.
image courtesy allrecipes.com
Brown Rice and Black Bean Casserole

1/3 cup brown rice
1 cup vegetable broth
1 Tbs. olive oil
1/3 cup onion, diced
1 medium zucchini, chopped or thinly sliced
2 chicken breasts, cooked and diced (I used 1/3 of the Costco rotisserie chicken)
1/2 to 3/4 cup sliced mushrooms
1/2 tsp. cumin
Salt, to taste
Cayenne Pepper, to taste
1 (15 oz.) can black beans, rinsed and drained
1 (4 oz.) can green chilies
1/3 cup carrots, chopped small
2 cups shredded swiss cheese

Mix the rice and chicken broth in pot on stovetop, bring to a boil. Reduce heat to low, cover and simmer 45 minutes, or until rice is tender. Preheat oven to 350 degrees. Lightly grease a medium-sized casserole dish. Heat the olive oil in a skillet over medium heat and cook the onion until tender. Mix in the zucchini, chicken, and mushrooms. Season with cumin, salt and cayenne pepper. Cook and stir until zucchini is lightly browned and chicken is heated through. In a large bowl, mix the rice, onion, zucchini, chicken, mushrooms, beans, chilies, carrots, and half of the swiss cheese. Transfer to the baking dish and sprinkle remaining cheese on top. Cover casserole dish loosely with foil and bake for 30 minutes. Uncover and bake 10 more minutes, or until bubbly and lightly browned.

Wednesday, October 26, 2011

Chicken and Mushroom Kebabs

To watch t his video recipe please click HERE!

Hi everyone!

Today's recipe is super easy, very healthy and beyond delicious! I just made this yesterday and I had to upload it right away! I have like 8 more recipes in line to be edited, but this one couldn't wait! I hope you like it as much as I did!

Makes 8 skewers
Ingredients:

2 large chicken breasts
18 medium-large mushrooms (any kind)
18 grape tomatoes (or any other small tomato)
1/2 a large onion cut in chunks
Zest and juice of 1 lemon
2tablespoons chopped fresh rosemary
2 garlic cloves finely chopped
1 tablespoon salt
1 tablespoon ground black pepper
crushed red pepper to taste
3 tablespoons extra virgin olive oil
wooden skewers (8)

Preparation:

Soak wooden skewers in warm water for at least 20 minutes before using.
Preheat oven to 400ºF.

Cut the chicken into bite-size pieces. Season the chicken with the zest of one lemon
1 tablespoon of fresh rosemary,the chopped garlic, 1/2 tablespoon ground black pepper, 1/2 tablespoon salt, the lemon juice and 1 tablespoon of extra Virgin Olive oil. Add crushed red pepper to taste. Combine everything, make sure every piece of chicken is well seasoned and refrigerate for about 5 minutes while we prepare the rest of the ingredients.

Season the tomatoes and onions with 1/2 tablespoon of extra virgin olive oil and a pinch of salt and ground black pepper, also add crushed red pepper to taste. Stir together and set aside for a minute.

Clean the mushrooms with a wet paper towel or a clean wet kitchen towel. Season the mushrooms with 1 tablespoon of extra virgin olive oil and the rest of the rosemary, also add in a 1/4 of a tablespoon of each, salt and ground black pepper. Add crushed red pepper if desired. Make sure every mushroom is well coated with the oil and the seasoning.

And that's all the preparation work. Now we are ready to build the Kebabs.  Build your kebabs any way you want them.

My Kebab has 9 layers, the first one is onions, followed by a mushroom, a piece of chicken, a tomato, another piece of chicken, one more mushroom, more onion, another piece of chicken and finally topped with another tomato.

But feel free to build your Kebab any way you want, you can add as many layers as you like!

Bake at 400ºF for 12-15 minutes or until the chicken is completely cooked!
or

Grill for about 3-4 minutes on each side!

I served my Kebabs over white rice! And that's it, enjoy!

Tuesday, October 25, 2011

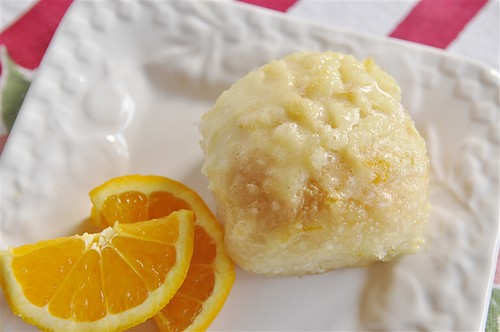
Quick and Easy Orange Rolls

Photo from Yourhomebasedmom.com

This is the best recipe for a really quick, delicious roll.  If you have time make the real ones, but if you  need something quick and easy these are really good.  Oh, I did not use Orange Essential Oil, I just used orange juice concentrate and it worked great.


Quick and Easy Orange Rolls   


Recipe from Yourhomebasedmom.com

12 frozen Rhodes dinner rolls, thawed
grated rind of one orange
1/2 C sugar


Citrus Glaze:
1 C powdered sugar
1 Tbsp melted butter
2 Tbsp orange juice
Mix together until smooth

Add in 2-3 drops Wild Orange Essential Oil or to desired taste (optional but oh so good!)
Thaw dough in the refrigerator over night or 2-3 hours prior to use. Cover with plastic wrap while thawing.
Grate orange rind and mix with sugar. Roll thawed roll in melted butter and then in sugar and rind mixture.
Place on greased cookie sheet or 9 x 13 pan. Cover with plastic wrap and allow rolls to double in size – approximately 1 hour. Remove plastic wrap and bake at 350 degrees for 20-25 minutes.
Let cool 5 minutes and frost with citrus glaze while warm.
Enjoy!

Sunday, October 23, 2011

Texas Sheet Cake

This recipe is another original from our sister's cookbook- submitted by Jessica. I've made it twice now and its amazing! It feeds a crowd and is great warm or cold- with or without ice cream. Plus, you should have most of these ingredients in your pantry/fridge. Next time you need a crowd-pleaser for a big crowd, put this one on your menu.
Texas Sheet Cake
Jessica Sedgwick

For the Cake:
2 c. flour
2 c. sugar
1 cup butter
4 Tbs. cocoa
1 c. water
1/2 c. buttermilk
2 eggs
1 tsp. soda
1/2 tsp. salt
1 tsp. vanilla

Mix flour and sugar in large bowl. Mix butter, cocoa, and water in saucepan. Bring to boil. Turn off heat and stir into flour and sugar mixture. Add buttermilk, eggs, soda, salt, and vanilla. Stir until well mixed. Bake in greased jelly roll pan (cookie sheet) for 20 minutes at 350 degrees. Remove cake from oven and sprinkle chocolate chips (see below) evenly over cake. Let stand about one minute- don't spread. Pour frosting evenly over all. Enjoy!

For the Frosting:
1 stick butter
4 Tbs. cocoa
6 Tbs. milk
1 lb. box powdered sugar
1 tsp. vanilla
1 bag chocolate chips (use 1/2 milk or 1/2 semi-sweet, or 1 whole bag of each)

Melt all ingredients, except sugar and vanilla and barely bring to boil. Shut off heat and add sugar and vanilla. Consistency should be to pour, not spread over chocolate chips.

Shortbread Bloody Witch Finger Cookies


To watch this video recipe click HERE!

Makes 2 dozens.
Ingredients:

3 cups all purpose flour
1 cup powdered sugar
1 1/2 tablespoons vanilla extract
3 sticks unsalted butter, soften
1/2 teaspoon salt
Bakers semi sweet baking chocolate squares (4), melted (for the nails)
Almonds (for nails optional)
Strawberry preserves or marmalade for garnish

Combine flour and salt, mix well and set aside

In an electric mixer,cream the butter at medium speed, blend until smooth and creamy,
scrape down the sides if you need to. Reduce the speed and slowly add the powdered sugar
blend until well combined. Add the vanilla extract, continue to blend for 1 more minute.

Reduce the speed to the lowest and slowly add in the flour. Blend until all the ingredients come together. Do not over mix.

Refrigerate for 30 minutes to 1 hour.

Preheat the oven to 350ºF


Grab about 1 tablespoon of the dough and roll it with your hands to form a finger shaped cookie. If you are using almonds as finger nails, press down the almond into one end of the cookie.

 If you are making the nails with the same dough, form the nail using a toothpick.

Make the nails big and chunky, they are witch fingers, they don't have to be pretty at all.


Fingers are not straight, to give the impression of knuckles, squeeze the cookie bellow the nail, and squeeze again near the end. For a more finger-like appearance make some marks onto the cookie below the finger nail and near the end.


Bake at 350ºF for about 15-18 minutes or until slightly golden brown.

Let the cookies cool a little bit.

Melt the chocolate squares. (instructions are in the back of the package)


Using a small knife, cover the finger nails with the melted chocolate. Repeat this step until done.


Dip the end of cookie in the strawberry marmalade for a bloody presentation.

Stablilized Whipped Cream

A couple of weeks ago, I made a chocolate pie for company. I wanted to include a whipped cream border that I could apply before my guests arrived and would hold until I was ready to serve my pie. I knew better. I really did. I knew that piped whipped cream would be all weepy and deflated by the time I went to cut that pie. And it did. It looked horrible.

But I knew there had to be a way. I mean, really, look at all those diners that have pies with beautiful whipped edges. Therefore, when I was taking a pie to another dinner last Saturday, I was determined to figure it out. Enter stabilized whipped cream, the answer to all my prayers.

By the way it is made, stabilized whipped cream is sort of like a mousse. You whip the cream and add gelatin for stability. It then holds its shape beautifully in the refrigerator for hours and hours. While the end texture is not quite the same as freshly whipped cream, it is still delicious and its beauty and convenience make it a winning choice!

Stabilized Whipped Cream
Yield: approx. 2 cups

1 tsp unflavored gelatin
4 tsp cool water
1 cup heavy whipping cream
1/4 cup powdered sugar

Mix the gelatin and water in a small microwave safe bowl. When the gelatin is soft, after a few minutes, place the bowl in the microwave and heat gently at ten second intervals until the mixture is melted and warm, but not hot. Mix the cold whipping cream and powdered sugar together in a glass or metal bowl. Mix on low speed until the sugar is incorporated, then increase to high speed.

When the cream reaches soft peaks, slowly add half the gelatin mixture (you will discard the remainder). Continue whipping until stiff peaks develop. Pipe onto your dessert and keep refrigerated until serving. If you want to make a double batch, double the cream and sugar, but simply use all the gelatin mixture.

NOTE: I mix twice the gelatin mixture needed for the single batch because it is easier to measure and because with such a small amount, so much ends up sticking to the inside of the bowl. Feel free to add any additional flavorings to your whipped cream as usual, such as vanilla, chocolate, lemon or lime zest, etc.

Friday, October 21, 2011

Chili Blanco

Pic courtesy of Google Images

We had a pot luck luncheon in my ward a couple weeks ago and one of the dishes there was this chili. The girl that made it said that her aunt makes it and wins all sorts of cook-offs with it. So, I asked for the recipe and gave it a whirl last night. And, it did not disappoint. It was so yummy and I loved the change up from regular, old tortilla soup. Just FYI, I had to change the recipe up a bit b/c she used dry beans and cooked it over the stove, but it still came out just as scrumptious!

Chili Blanco
adapted from Laura Shelley

3 cans Great Northern Beans
1 onion, diced
1 24-oz can chicken broth
2-3 small chicken breasts (I used frozen. If you use thawed ones, be sure to add more chicken broth)
1 (7 oz.) can chopped green chilies
4 cloves of garlic, minced
2 T dried oregano
3 tsp. ground cumin
1 tsp. cayenne pepper
1 cup sour cream
2 cups shredded Monterey Jack Cheese

Put all ingredients in crockpot , except for the sour cream and cheese. Cook on low for 6 hours or high for 4 hours. Add cheese and stir until all incorporated. Serve with chips, if desired. (You don't need to garnish with any more cheese or sour cream as there's already plenty!)