Friday, November 4, 2011

Key Lime Pie

We've recently joined a dinner club. Each month we get together to have dinner with three other couples and, each month, there is a different theme. Last month the theme was "Florida Cuisine" and I was responsible for bringing a dessert. After some web searches, it became obvious that the only choice for dessert was a key lime pie.

Fortunately, living in Florida, fresh key limes were in my neighborhood grocery. If you can't find fresh key limes in your area, you may be able to find bottled key lime juice. Regardless, you can always buy it online. In a pinch, you could use regular limes. But as you can see below, they are not the same. Key limes are small little things. A bugger to juice, truth be told. But the flavor is distinct. This pie is not overly sweet. It is tart and has a slight bitter twist to it, kind of like what I associate with most grapefruit.

You start with the crust. This is a graham cracker crust. It has a little extra sugar in the crust, again to help balance that tart punch. I mix mine in a food processor and then dump it into a pie pan. Spread it out with your hands and then use a cup of some kind to press it down and make it even. Bake the pie crust while you prepare the limes.

Before you juice, you'll need to zest enough of them to obtain one loose tablespoon. Then you can cut the limes and juice away. Because they're so small, they can be tiring to juice. If you have one of those squeeze type juicers, you may be better off than I was. You need 2/3 cup of juice, which requires approximately one pound of key limes. Don't juice your limes too early, as the juice can develop additional bitterness when it sits too long.

Don't be dismayed if your crust comes out of the oven looking really funky. It tends to puff up when baking, but returns to normal dimensions as it cools. The first time I made this crust I thought I had ruined it when I first took it out of the oven Don't fret, it'll work itself out.

As the pie cools, you can mix up the filling. Start by mixing the egg yolks and zest together. Mix on medium-high for a few minutes until the mixture has increased slightly in volume and is thick and pale yellow (with green flecks in it, of course).

The next step is to add a can of sweetened condensed milk. This is some very thick, sweet stuff. So sweet, in fact, that it provides all the sweetness this pie needs. By the way, please note the proper color of this product. If you open your can and find that it is a caramel brown color, as I did when I first made this pie, perhaps you are not using sweetened condensed milk often enough, or, as in my case, not rotating your stock well. The date on my can of brown sweetened condensed milk? "Best by Nov 2004." Yikes! And, even more pressing, how many stinking military moves did that can of milk participate in, anyway, before I ended up throwing it away? Needless to say, I will be more vigilant.

Bake the pie at the same temperature as you baked the crust for 25 minutes. The pie filling will be set and maintain its shape upon gentle shaking, but will not be brown in any way. Remove from the oven and let cool to room temperature.

I think this pie requires a little sweet border to help balance it out. I like a whipped topping. You could make whipped cream right before serving, but I think piping a stabilized whipped cream border really looks like a million bucks. I like to then zest a little lime on the border for color. Be sure to thoroughly chill the pie before serving. This pie keeps well and can be made one to three days in advance.


Key Lime Pie
Yield: one 9" pie
Adapted from King Arthur Flour

Crust:
1 1/2 cups graham cracker crumbs (one pouch plus two whole crackers)
1/4 cup powdered sugar
1 egg yolk
1/3 cup melted butter
dash salt

Filling:
1 TBS loosely packed key lime zest
3 large egg yolks
1 14-ounce can sweetened condensed milk
2/3 cup fresh (or bottled) key lime juice

whipped cream and additional lime zest for garnish (optional)

Mix together the crust ingredients. Pour into a 9" pie pan. Spread evenly and pack down with a measuring cup. Bake at 325° F for 15 minutes. Crust may look uneven and strange upon removal from the oven, but will return to a more normal shape upon cooling. Let crust cool while preparing filling. Leave oven on at 325° F.

Beat the zest and egg yolks together on medium-high speed for a few minutes, until the yolks have increased in volume and become thickened and a pale yellow. Add the sweetened condensed milk and beat on a fairly high speed for 2-3 minutes. Lastly, add the lime juice. Stir until well incorporated, but do not over mix. Pour into the baked crust and return to the oven to bake for 25 minutes. The filling will be set and no longer loose in the middle, but will not be browned in any way. Let cool to room temperature. Prepare and pipe a border of stabilized whipped cream, if desired. Refrigerate for at least four hours before serving.

This pie keeps well and can be made 2-3 days in advance.

Chicken Tortilla Soup

To watch this video recipe click HERE!

Hi Everyone!
I hope you are all doing great! It is getting pretty cold in my side of the world, the summer is gone and this fall is starting to feel more like winter, so to warm me up I decided to make a delicious, and super easy Tortilla Soup! I hope you like it! This is one of my favorite Mexican's soups!

Serves 6
Ingredients:
2 chicken breasts
2 cups chicken broth
1 can Chipotle in adobo sauce
1 1/2 cups chopped celery
1 1/2 cups chopped carrots
1 onion
4-5 small potatoes
1/4 cup chopped cilantro
3 garlic cloves
1 1/2 tablespoons chicken bouillon seasoning
1 15oz can corn kernels
Limes for garnish
Avocados for garnish
Corn tortillas about 2-3 per persons.
1/2 tablespoon olive oil
Vegetable oil for frying the tortilla chips or cooking spray for baking them

Roughly chop the onion and mince the garlic. Cut the chicken into bite size pieces. Chop the potatoes into bite size pieces.

In a large saucepan, heat up 1/2 tablespoon of extra virgin olive oil, cook the garlic and onion for about 3 minutes or until the onion becomes transparent. Add in the chicken, season with 1 1/2 tablespoons of chicken bouillon seasoning and some of the Chipotle in Adobo sauce, (I usually add 2 Chipotle peppers and about 2 tablespoons of the sauce, but you can add as many or as little as you like.  A Few teaspoons of the Chipotle sauce are good enough to add tons of flavor without adding any heat.)
Stir together and let the chicken cook for 4 minutes, the chicken will be almost cook, but not completely.  Add in the carrots, the celery and the potatoes, season with 1/2 teaspoon of each, ground black pepper and salt, stir together and add 2 cups of chicken broth and about 4 cups of water, add the cilantro and the corn kernels, stir again, cover with a lid, let it cook for about 15 minutes or until it comes to a boil.

Cut the tortillas into bite size pieces, to make some tortilla chips. Fry them in vegetable oil until golden brown and crisp. Drain them on paper towels, sprinkle with salt. ( or you can also bake the tortilla chips at 400º for about 8-10 minutes, don't forget to spray them with cooking spray and sprinkle them with salt before they go into the oven!)

When the soup comes to a boil, taste the flavor and add more salt or chicken bouillon if needed. (If you do add more seasoning, let it continue to boil for about 2 more minutes then serve.)

Serve your soup in a bowl, garnish with chopped avocado,fresh cilantro and a squeeze of  lime juice, add more of the Chipotle sauce if you want to.  Top it with the tortilla chips and that's it!  Enjoy!

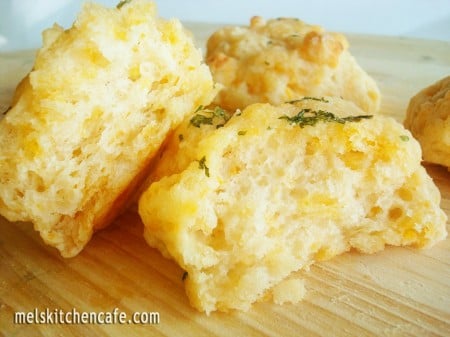
Cheddar and Herb Biscuits

Photo from melskitchencafe.com


Party in your mouth!  These things melt in your mouth and then you have to eat like 5 more.  Seriously, like 5 more.  These are amazing!  FYI, I also froze some of these and they tasted great the next time we ate them.


Cheddar and Herb Biscuits
Recipe from melskitchencafe.com


2 cups all-purpose flour
1 tablespoon baking powder
1/4 teaspoon garlic powder
1/2 teaspoon salt
2 tablespoons shortening
3 tablespoons butter, cold
1 cup buttermilk
1 1/4 cups grated sharp cheddar cheese

Preheat oven to 425 degrees. In a medium bowl, combine flour, baking powder, garlic powder and salt. Cut in shortening and butter until coarse crumbs are formed. Lightly mix in grated cheese. Mix in buttermilk just until moist (dry spots here and there are ok – the biscuits will be tough if they are overmixed). Drop the biscuits onto a greased or lined baking sheet. Bake for 12-14 minutes, until browned and golden. While the biscuits are baking, in a small bowl combine three tablespoons melted butter, 1/4 teaspoon dried parsley flakes, 3/4 teaspoon garlic powder and a pinch of salt. Right when the biscuits come out of the oven, brush the butter/herb mixture over the biscuits evenly (alternately, you can dip the top of the biscuit into the butter mixture). Serve immediately.

Thursday, November 3, 2011

Tillamook Baked Macaroni and Cheese

                                                            Recipe from macey's.com pic from allrecipes.com

Kinda bummed that we don't have Tillamook out here in Georgia. Would it have been tastier? Probably. Everything is with that stuff, right? I just made sure to use sharp cheddar and you HAVE to have freshly shredded. None of that waxy pre-shredded junk, mmkay?  Anywho...this was still pretty dang good. I served it with the BBQ pulled pork sandwiches (I used chicken though)and that recipe you can find on this blog.

Tillamook Baked Macaroni and Cheese

Ingredients
o 1 (12 ounce) packages macaroni
o 4 tablespoons Tillamook butter
o 4 tablespoons flour
o 1 cup milk
o 1 cup cream
o 1/2 teaspoon salt
o fresh ground black pepper, to taste
o 2 cups Tillamook cheddar cheese, shredded
o 1/2 cup breadcrumbs, buttered (I added 2 T butter to crumbs)

DIRECTIONS:
1. Preheat oven to 400°F.
2. Cook and drain macaroni according to package directions; set aside.
3. In a large saucepan melt butter.
4. Add flour mixed with salt and pepper, using a whisk to stir until well blended.
5. Pour milk and cream in gradually; stirring constantly.
6. Bring to boiling point and boil 2 minutes (stirring constantly).
7. Reduce heat and cook (stirring constantly) 10 minutes.
8. Add shredded cheddar little by little and simmer an additional 5 minutes, or until cheese melts.
9. Turn off flame.
10. Add macaroni to the saucepan and toss to coat with the cheese sauce.
11. Transfer macaroni to a buttered baking dish.
12. Sprinkle with buttered breadcrumbs.
13. Bake 20 minutes until the top is golden brown.
14. (You can also freeze this recipe in zip-lock bags for later use - once you have mixed the macaroni along with the cheese sauce allow to cool to room temperature before adding to your freezer - I generally pull it out the night before and allow macaroni and cheese to reach room temperature; I then add the macaroni and cheese to a buttered baking dish, sprinkle with bread crumbs and then bake for 20 to 30 minutes, until golden brown on top and bubbling. (I am sooooo doing this with the leftovers!)

Gooey Chocolate Chip Sandwich bars

                                                           Picture courtesy of recipegirl.com

Hello love. When I looked at this picture (from recipegirl.com) and saw this gooey layer in the middle and read the title I knew these bars had to be made. Um...yeah. I made them for a ward trunk-or-treat. Boy do I regret that! I got the equivalent of a bite. Serious. But I heard all about them. I should've saved and ate the whole pan. :) This is also the time that I should mention that I won the chili contest (with a total of about thirty entries) and served the White Chicken Chili found on this blog. Enjoy!

GOOEY CHOCOLATE FILLING:


2 cups semi-sweet chocolate chips

One 14-ounce can sweetened condensed milk

2 teaspoons vanilla extract


COOKIES:

1 cup (2 sticks) unsalted butter, at room temperature

1 cup light brown sugar

1/2 cup granulated white sugar

1 large egg

1 large egg yolk

1 tablespoon vanilla extract

2 cups all-purpose flour

1 cup quick-cooking or old-fashioned rolled oats (I used quick- they worked great)

1 teaspoon baking powder

1 teaspoon baking soda

1 teaspoon kosher salt (I used regular salt)

3 cups semi-sweet chocolate chips (I only used two here...I thought 5 cups of chocolate chips between the filling and dough was a bit much...so I opted for a more reasonable number of four! AH!!)

Directions:
1. Preheat oven to 350 degrees F. Lightly butter a 9x13-inch pan with parchment paper, allowing enough overhang on the long side to lift the bars from the pan.
2. Prepare the gooey chocolate filling: Place the chocolate chips and condensed milk in a small saucepan over the lowest possible heat and cook, stirring constantly, until the chocolate has melted and the mixture has thickened, 3 to 5 minutes. Turn off the heat, add vanilla, and stir until smooth. Set aside to cool to room temperature.
3. Prepare the cookie dough: Place the butter and sugars in a large bowl. Beat with an electric mixer until smooth and creamy. Add the egg, egg yolk and vanilla. Beat well. Whisk together the flour, oats, baking powder, baking soda and salt in a medium bowl. Add to the butter mixture. Beat until everything is well incorporated, scraping down the sides of the bowl as needed. Stir in the chocolate chips.
4. Prepare the bars: Using half of the batch of cookie dough, place dollops into the prepared pan and press down lightly to even it out. Pour the cooled chocolate mixture over the dough and then add small dollops of the remaining dough on top. Don't worry if the dollops don't completely cover the chocolate mixture. Just spread it together as much as you can, and let some chocolate peek through.
5. Bake until lightly browned, 20 to 25 minutes. Set aside to cool completely, then cut into 32 bars.

**TIP: Refrigerate bars to firm up and then cut while chilled. Serve room temperature.

Wednesday, November 2, 2011

Caramel Apple Cheesecake Bars

Pic courtesy of Mels Kitchen Cafe


The first time I made these, I pulled them out of the oven and dropped the pan on the floor. After an hour + in prep time, I cried. I just cried. Disclaimer: I'm pregnant. I knew it was good and I was dying to really try it, so I made it again about a week later. And, this time it made it safely from the oven to the cooling rack. And, it was delicious. Truly delicious. Also, you should know that I halved the recipe both times I made it and it was still a ton of dessert.

Caramel Apple Cheesecake Bars with Streusel Topping
from Mel's Kitchen Cafe

INGREDIENTS:
Base:
2 cups all-purpose flour
1/2 cup firmly packed brown sugar
¼ teaspoon salt
½ teaspoon cinnamon
1 cup (2 sticks) butter, softened

Cream Cheese Layer:
2 (8-ounce) packages cream cheese, softened
1/2 cup sugar
2 large eggs
1 teaspoon vanilla extract

Apples:
3 Granny Smith apples, peeled, cored and finely chopped
2 tablespoons sugar
1/2 teaspoon ground cinnamon
1/4 teaspoon ground nutmeg

Streusel Topping:
1 cup firmly packed light brown sugar
1 cup all-purpose flour
½ teaspoon cinnamon
1/2 cup quick cooking oats
1/2 cup (1 stick) butter, softened

Caramel Sauce:
4 tablespoons butter
1 cup firmly packed light brown sugar
½ cups half-and-half or cream
Pinch of salt
1 tablespoon vanilla

DIRECTIONS:
Preheat oven to 350 degrees F.

In a small bowl, stir together chopped apples, two tablespoons sugar, cinnamon, and nutmeg. Set aside.

In a medium bowl, combine all the streusel topping ingredients and mix until crumbly. Set aside.

In a medium bowl, combine flour and brown sugar. Cut in butter with a pastry blender or two forks until mixture is crumbly but combined. Press evenly into a 9X13-inch baking pan lined with aluminum foil. Bake for 10 minutes or until lightly browned.

While the crust is baking, in a large bowl, beat cream cheese with 1/2 cup sugar until smooth. Then add eggs, one at a time and then the vanilla. Mix well. Pour over the warm crust.

Spoon the apple mixture evenly over the cheesecake layer. Sprinkle the streusel topping over the apples. Bake for 30 minutes until the filling is set.

Cool the bars to room temperature. Drizzle with the caramel topping (or plate individual slices and drizzle with topping one by one).

For the caramel sauce, mix butter, brown sugar, half-and-half or cream, and salt in a saucepan over medium-low heat. Bring the mixture to a simmer and cook while whisking gently for 5 to 7 minutes, until thickened slightly. Add the vanilla and cook another minute to thicken further. Turn off the heat and pour the sauce into a jar. Refrigerate until cold. If the caramel sauce has cooled in the fridge long enough to harden, warm slightly before drizzling on bars.

Tuesday, November 1, 2011

Easy Doughnuts

To Watch this Video Recipe click HERE!

Hi everyone! Today's recipe is Easy Doughnuts!
On Saturday, my sister sent me a picture of my mom and my aunt making doughnuts, and the doughnuts looked so good that I had to make some. I love doughnuts, I used to have them every day for breakfast when I was in Mexico! My dad owns a convenience store and he always gets fresh doughnuts from the bakery, so of course, every day he will save two doughnuts for me, a chocolate one and sugar coated one! I hadn't had a doughnut since last December, but seriously after seen the picture my sister sent me, I couldn't wait any longer! and I made these super Easy Doughnuts! I hope you like them, of course they are not from scratch, but they are really good! The preparation time is about 5 minutes, and the cooking time is less than 15 minutes!
Anyway, don't worry, I promise I will bring back their home-made doughnuts recipe when I return from my vacations!!!

Makes 8 doughnuts +8 doughnuts holes
Ingredients:

1 package Pillsbury Grands Home-style biscuits
3 cups vegetable oil for frying
1/4 cup sugar
1/2 teaspoon cinnamon
1 tablespoon vanilla extract

Optional
1 Baker's semi sweet chocolate squares
1 Baker's premium white chocolate square
chocolate sprinkles for garnish

Combine sugar and cinnamon together, and set a side.

In a bowl add 1 tablespoon of vanilla extract, set aside.

Using a small round cookie cutter, cut a whole in the middle of each biscuit to make the
doughnuts and just continue to do this until you are done with all the biscuits.

Dip each biscuit-doughnut in the the vanilla extract, just dip one side and set aside for about 3 minutes, just so the dough can absorb the extract.

On a medium-low heat, heat up about 3 cups of vegetable oil, let the oil reach 350ºF.

Cook the doughnut holes for about 2 minutes or until golden brown and crisp. Drain on paper towels.

Cook the doughnuts for about 1 minute and 25 seconds on each side, or until golden brown, crisp and completely cooked in the inside. (If the oil is too hot, the doughnuts will get burned without cooking completely in the inside, and if the oil is too cold, the doughnuts will be extremely oily and disgusting, so make sure the oil is at the right temperature before you start frying the doughnuts.

Just keep on frying the doughnuts until you are done! Drain them on paper towels.

Roll the doughnuts on the sugar mixture until they are completely covered with the sugar.

I'm going to coat two of my doughnuts with semi sweet chocolate and the last two with white chocolate, so I melted the chocolate squares in the microwave and with a small knife I will coat one side of the doughnut and garnish with chocolate sprinkles.

and that's about it...

Enjoy!