Sunday, March 25, 2012

Strawberry Shortcake

It always amazes me how early things start this close to the equator. I was shocked when a friend mentioned that it was already strawberry season in these parts. Granted, it has been plenty warm for a whole month already. In fact, it kind of reminds me of a summer day back home... I can handle the mid-eighties. Too bad the bottom will fall out soon. This friend said they were thinking of going strawberry picking this week, and I was tempted, until I realized I still had plenty left from last year and that I am trying to start "drawing down" the food stores in preparation for our move this summer.

However, talk about strawberries got me to craving them. So, when I was thinking of a dessert to prepare for company last night, strawberry shortcake came to the forefront. I love this recipe for a number of reasons. First, it is super quick. I always have strawberry topping in the freezer, so all I have to do is pull out a container. If you don't keep this on hand, you can follow the instructions in that post to prepare the strawberries. I also always have whipped cream on hand. All that's left is making the shortcake.

I'm a traditionalist. While I love pouring strawberry topping on angel food cake, I would never stoop to calling that strawberry shortcake. Those little sponge cakes you buy in the produce section? Not shortcake either. True shortcake is very much like a scone. It's made in a very similar manner and tastes somewhat similar too... except maybe it's not quite so eggy as a scone. It takes less than five minutes to mix up the batter and only twenty to bake. The cake can then sit out at room temperature until you are ready to serve. So simple! And I love the flavor! The shortcake is not overly sweet, so it provides a nice contrast to the whipped cream and berries. I like to sprinkle the top of my cake with sanding sugar; I like the nice crunchy crust it gives the top of the cake.

Mix the dry ingredients in a bowl. Cut the cold butter into small pieces and rub into the dough with your fingers. When the mixture resembles coarse crumbs, add the milk and egg. Stir until well combined and dump into a greased nine inch round pan (or similar). It can be a little tricky to spread out, as it is fairly stiff. It does not need to be smoothed out very much, just try and make the thickness overall mostly even. If you desire, sprinkle some sanding sugar on the top before placing in the oven.

Bake in a hot, preheated oven until it is nicely golden. You can test with a toothpick or cake tester to be sure, but usually, if it is golden all over, it should be done inside. Let cool in the pan for a few minutes before carefully turning out onto a cooling rack to finish cooling completely. Although most folks cut their cake so that there is a top and bottom which is filled with strawberries and whipped cream, I like to serve mine as wedges. This way, each serving is freshly prepared and the cake does not getting too soggy before you are ready to serve your family or guests.

Strawberry Shortcake
Yield: 8 servings
Adapted from the Better Homes & Gardens New Cookbook

whipped cream for garnish

1/3 cup sugar
2 cup all purpose flour
2 tsp baking powder
1/2 cup cold butter, cut into small pieces
1 large egg
2/3 cup milk (preferably whole)
sanding sugar (optional)

To prepare the cake, preheat the oven to 450° F. Grease a nine inch round cake pan. Mix together the sugar, flour, and baking powder. Rub in the butter until the mixture resembles coarse crumbs. Lightly beat together the milk and egg. Add to the batter and stir until well mixed. Spread out into the prepared pan. Sprinkle the top with sanding sugar, if desired. Bake for 15-20 minutes, until the cake is golden and a tester comes out clean. Let cool 5-10 minutes before removing from the pan to finish cooling. Cake can remain at room temperature, uncovered, for up to 6 hours before serving. Once the cake is covered and stored, it still tastes great, but that nice crisp top will soften. Cut into wedges and top with the strawberries and whipped cream. Serve immediately.

Friday, March 23, 2012

BBQ Chicken Salad

photo from mariescookingadventures.blogspot.com

This is obviously a pretty basic recipe but sometimes I just like to be told what to do instead of thinking about it.  I really liked combining the bbq sauce with the ranch, too!
BBQ Chicken Salad (and some avocado dressing)
 Recipe from mariescookingadventures.blogspot.com
What you need

For the SALAD
  • 3 chicken breasts (boneless, skinless)
  • 2 cups BBQ sauce  (1 cup, 1 cup)
  • 1/2 cup water
  • lettuce (red, romaine, green leaf)
  • frozen corn (cooked and chilled)
  • 1 can black beans (rinsed and drained)
  • 1 cucumber (seeded and cubed)
  • 2 tomatoes (diced)
  • tortilla strips (if desired)
  • 1 green onion chopped
For the chicken: place chicken breasts and 1 cup BBQ sauce with 1/2 cup water in the CrockPot. Then, let cook 4-6 hours on LOW and shred for the salad.
For the salad: shred the lettuce, cook the corn, slice the cucumber and tomato, prepare the beans! I put all of the ingredients on a plate for serving, but could leave in bowls of tupperwares. 

BBQ Sauce Dressing 
  • 1 cup BBQ sauce
  • 1 cup ranch dressing
Simply combine the BBQ and ranch in a bowl and mix (or whisk) until blended. You can use more or less as desired, best results are obtained, in my opinion, from equal parts 

Thursday, March 22, 2012

Shrimp Kebabs

To watch this Video-Recipe please click HERE!!

Today's recipe: Shrimp Kebabs, another healthy, delicious and very easy to make recipe. This one is perfect with rice or over a bed of greens, or just by itself as an appetizer. Shrimp is a great source of protein, vitamins and minerals, it is low in fat and calories.

Makes 6 kebabs, 5 shrimp each.
Ingredients:

1 lb. Shrimp (about 30 shrimp) peeled and deveined
1 cup fresh parsley
1 green onion
1 garlic clove
1 1/2 tablespoon Parmesan cheese
Salt and ground black pepper to taste
1 teaspoon crushed red pepper
1 1/2 tablespoon extra virgin olive oil
1 red onion
1/4 cup of water
wooden secures

**(optional) 6 Campari tomatoes (1 for skewer) (optional)**
**(optional) 6-12 sugar snap peas (1-2 per skewer)(optional)**
**(optional) 3 mini bell peppers chopped in chunks (optional)**

Soak the wooden skewers in water for about 30 minutes before using them, this will prevent them from catching on fire.

In a blender add the parsley, green onion, garlic and the Parmesan cheese, season with 1 teaspoon of ground black pepper, 1/2 teaspoon of crushed red pepper
and 1 1/2 tablespoons of extra virgin olive oil, also add in 1/4 cup of water
and blend on high for about 2 minutes or until you have a soft paste. Add more water if needed. We want to get the consistency of a thick pesto sauce. Taste the flavor, add any salt if needed.

Pour this sauce over the shrimp and make sure every single shrimp is well coated with this mixture, marinate for at least 10 minutes in the refrigerator.

Chop the red onion in chunks. Set aside until ready to use.

Preheat oven to 400ºF.

**(Optional) Chop the mini peppers in chunks. Season the tomatoes and sugar snap peas with a dash of extra virgin olive oil, a pinch of salt and a pinch of ground black pepper. Set aside. (Optional)**

After 10 minutes marinating,the shrimp is ready. Start building the kebabs. Alternate the vegetable and shrimp onto the skewers. (if using only onions and shrimp add about 5 shrimp per skewer, if adding any more vegetables, add as many veggies and shrimp as you can fit.)

Keep on building the kebabs until you are done.

Bake at 400ºF for 8-10 minutes or until the shrimp is completely cooked.
Or Grill for 3 minutes on each side or until shrimp is cooked.

Enjoy!

Brown Butter Parmesan Chicken Linguine

Pic courtesy of How Sweet It Is

I'm still sitting at the dinner table as I write this. It was THAT good. There are some meals in life that are better than dessert. This is one of them. My kids had seconds. That never happens. It was seriously one of the best meals I've had in a long time. I could seriously go on, but just go make it and see for yourself.

Brown Butter Parmesan Chicken Linguine

adapted from How Sweet It Is

serves 4

1.5 pounds boneless, skinless chicken breasts (about 2 large breasts), cut into pieces

1 teaspoon salt

1 teaspoon pepper

1/2 teaspoon smoked paprika

1 1/2 tablespoons canola oil

5 tablespoons unsalted butter

1 medium sweet onion, sliced

4 garlic cloves, minced or pressed

3/4 cup dry white wine

1/2 to 3/4 pound whole wheat pasta (preferably noodles)

2/3 cup freshly grated parmesan cheese + more for topping

fresh chopped parsley for topping

Heat a large skillet oven medium-high heat and add canola oil. Pat chicken dry with a paper towel then toss with salt, pepper and paprika. Add to the skillet and brown on all sides, cooking for about 8-10 minutes total. Remove and set aside in a bowl. Turn heat down to low and add 1/2 tablespoon butter. Add sliced onions with a pinch of salt and stirring occasionally, cook until caramelized – about 15 minutes.

While onions are caramelizing, heat a small saucepan over low heat and add 5 tablespoons of butter. Whisk constantly until butter has brown bits on the bottom, then immediately remove from heat. I usually whisk for about 30 seconds more just to make sure the bits don’t burn. Set aside. At this time also prepare the water for your pasta and cook according to the directions.

After onions have caramelized, add garlic and cook for 30 seconds until fragrant. Increase the heat to medium and add wine. Let the wine bubble and cook for 2-3 minutes. Add chicken and pasta both to the skillet, tossing multiple times to coat. Turn off heat and stir in grated cheese. Drizzle brown butter (make sure you get the brown bits!) over top, tossing to coat a few more times. Serve with additional cheese and chopped parsley.


Thai Style Curry

Despite the fact that I have never been a big fan of curry dishes, I am, in fact, a huge fan of this particular dish. It's got some heat, but isn't overwhelming. It's got a lot of flavors that all complement each other, and I love the combination of peas and cauliflower.

I adapted this dish from a Cook's Illustrated recipe. There's was a vegetarian dish, which is quite tasty. When I want a one pot meal, however, I usually like a little meat in there to give it more substance. While I enjoy eating vegetarian meals, I often find I'm back in the kitchen within a few hours looking for some more grub.

This dish is pretty straight forward to make. If you prepare all of your ingredients first, you can be done lickety split. If you really want to make this a quick fix dish, lightly pre-steam the cauliflower in a Ziplock steamer bag before adding to the dish. The most time consuming part of making this dish is waiting for the cauliflower to cook.

In the picture above, I used green curry paste. I've made this recipe with both the green and the red curry. I don't personally discern a difference in the flavor, but there is a difference in the appearance. Using red curry paste gives the sauce a pink hue. For aesthetic reasons only, I prefer using the green curry as it helps to preserve the stark contrast of white and green in this dish, which I find very appealing. Served over rice, this dish is heaven in a bowl.

Thai Style Curry
Yield: 4 servings
Adapted from Cook's Illustrated

4 TBS fish sauce
1 tsp lime zest
4 tsp fresh squeezed lime juice
1 TBS brown sugar
1/8 tsp red pepper flakes (optional)
1 tsp garlic, grated with a Microplane
1 TBS ginger, grated with a Microplane
1 TBS Thai-style red or green curry paste
2 cups (or one can) coconut milk

1 TBS vegetable oil
12 oz diced chicken breast
1 10-oz package of steamable snow or sugar snap peas
1 head cauliflower cut into bit sized florets (about 4 cups)

steamed rice, for serving

Mix together the first eight ingredients in a small bowl. Set aside. Steam the peas in the microwave. To speed the cooking process, you may also lightly steam the cauliflower in a Ziplock steamer bag. Heat a large skillet over medium-high heat. Add the oil and let it heat until it shimmers. Add the chicken so that it is as spread out as possible. Cook, turning as needed, to brown all sides. Reduce heat, if necessary. Add the cauliflower and saute for 2-3 minutes. Add the sauce, stir to mix, and cover, cooking until the cauliflower reaches your preferred level of doneness (anywhere from a few minutes to 15, depending on your tastes). Add the steamed peas at the last minute, stirring to distribute. Serve over white rice.

Tuesday, March 20, 2012

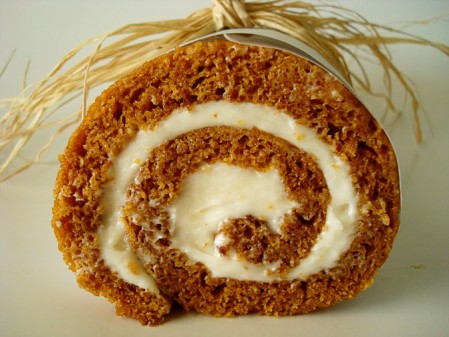
Perfect Pumpkin Roll

photo from melskitchencafe
So I admit that I had to scrap my roll the first time.  I only lightly greased the wax paper and mine needed to be heavily greased.  Other than that--this really is the perfect pumpkin roll.  So, so, so good!

Perfect Pumpkin Roll
From melskitchencafe
INGREDIENTS:
Cake:
1 cup sugar
3/4 cup flour
1 teaspoon salt
1 teaspoon baking soda
1/2 teaspoon cinnamon
3 eggs
2/3 cup mashed (canned) pumpkin
1/2 cup chopped walnuts (optional)
Filling:
8 ounces cream cheese, softened
1 tablespoon butter, melted
1 teaspoon vanilla
1 cup powdered sugar
DIRECTIONS:
Preheat the oven to 350 degrees. Grease a 15 X 10-inch jelly roll pan. Cut wax paper to fit the bottom of the pan and leave an inch overhang on each of the short ends of the pan. Lightly grease the wax paper and sides of the jelly roll pan.
Mix the sugar, flour, salt, soda, cinnamon, eggs and pumpkin in a large bowl. Once mixed, pour mixture over the waxed paper. Sprinkle the walnuts, if using, on top of the mixture. Bake for 14-15 minutes until edges pull away from the sides of the pan and center is done.
Lay a large dishtowel on the counter top (it is best to use a dishtowel without any texture – a tea towel or similar towel works best). Spread a thick dusting of powdered sugar all over the towel. When the cake comes out of the oven, turn the pan upside down on the powdered sugar-laden towel so the wax paper is on the top. Gently peel off the wax paper, being careful not to tear the roll. Starting at one of the short ends, roll the pumpkin cake up with the towel to cool. While the roll is cooling, mix the cream cheese, butter, vanilla, and powdered sugar together until it is light and creamy. Once the roll is cool, unroll and with an offset spatula, carefully spread filling in an even layer over the cake. Roll it up without the towel and place in the refrigerator (covered with plastic wrap or wax paper) for about an hour before serving.

Monday, March 19, 2012

ginger steak salad


I was craving salad tonight and found this recipe. It ended up being amazing! Beau and I couldn't eat it fast enough (its perfect serving sizes for dinner for 2)! I added a few more things to our salad and it turned out really good. I put in the cherry tomatoes she suggested, some raw halved walnuts for texture and goat cheese (soooo good). I also used a mixture of spring mix and butter lettuce and left out the jalepeno. I didn't worry about the sherry either for the marinade i just added a little cooking white wine that I had on hand but it would be fine without. Finally, like the last thing I posted, I cooked the steak on my iron skillet which is what ms. pioneer woman suggests and it turned out fabulous, tender, flavorful. I'm telling you if you don't have one get one.

Ingredients

  • MARINADE INGREDIENTS:
  • 2 Tablespoons Soy Sauce
  • 1 Tablespoon Sherry
  • 2 cloves Garlic, Minced
  • 2 teaspoons Brown Sugar
  • 1 whole Rib-eye, Strip, Or Sirloin Steak
  • 2 Tablespoons Olive Oil
  • _____
  • FOR SALAD DRESSING:
  • 2 Tablespoons Olive Oil
  • 2 Tablespoons Soy Sauce
  • 2 Tablespoons White Sugar
  • 1 Tablespoon Lime Juice
  • 2 cloves Garlic, Finely Diced
  • 1 Tablespoon Fresh Ginger, Minced
  • ½ whole Jalapeno, Seeded And Diced
  • _____
  • SALAD INGREDIENTS:
  • 2 whole Green Onions
  • 8 ounces, weight Salad Greens (baby Lettuce, Endive, Radiccio, Etc.)

Preparation Instructions

Combine steak marinade ingredients in a Ziploc bag. Mix and place steak into bag. Marinate for 30 minutes to 2 hours.

Combine salad dressing ingredients and slice green onion.

When steak is finished marinating, add 2 tablespoons olive oil to a hot skillet. Cook steak about 1 1/2 minutes per side, or until medium rare. Remove from skillet and keep on a plate, allowing to cool slightly.

Toss salad greens in 3/4 of the salad dressing. Place steak on cutting board and slice thinly, then pour juices from the plate over the top. Mound tossed salad on a platter, then place sliced steak on top of salad. Pour remaining salad dressing over the top. Sprinkle green onions over the salad, and add cherry tomatoes if that makes your skirt fly up.