Monday, July 23, 2012

Cheesy Chicken and Rice Bake

by  


4.19 Mitt(s)21 Rating(s)21 votes, average: 4.19 out of 521 votes, average: 4.19 out of 521 votes, average: 4.19 out of 521 votes, average: 4.19 out of 521 votes, average: 4.19 out of 5
Prep Time 
Cook Time 
Difficulty Easy
This is an easy recipe and most ingredients are on hand! And for someone that doesn't do leftovers this one was good the next day! 
A quick, easy and healthy casserole to throw together when you’re pressed for time!

Preparation Instructions

Preheat oven to 350F. In a large bowl, combine all ingredients except for cilantro and mix thoroughly to combine. Make sure the yogurt and cheese are stirred in throughout the entire bowl. Season with salt and pepper if desired. Transfer to an oven-safe dish and top with extra cheese if you would like. Bake for 20-25 minutes, or until heated through. Garnish with chopped cilantro.
To make this process easier, I always have cooked chicken on hand, and use Uncle Ben’s Ready Rice. If you have those two things, this can be throw together in a matter of minutes! It can also easily be made ahead of time and reheated.

Ingredients

  • 2 whole Boneless, Skinless Chicken Breasts
  • 4 cups Cooked Brown Rice
  • ¾ cups Frozen Corn
  • 15 ounces, fluid Can Black Beans, Drained And Rinsed
  • 1 cup Plain Greek Yogurt (or Sour Cream)
  • 4 ounces, fluid Can Green Chilis
  • ½ cups Salsa
  • 1 cup Low-fat Cheddar Cheese, Plus More For Topping
  • 2 Tablespoons Fresh Cilantro For Garnish

My Brothers Chicken Tacos


So I'm always looking for a way to mix up salads. I just made the chicken from this recipe and  topped it on top of a green salad with black beans, corn, and little ranch. We loved it! I'm sure the tacos are amazing though.

  |    |    |  

Ingredients

  • 16 whole Corn Tortillas (small Size)
  • 4 whole Boneless, Skinless Chicken Breasts, Cut Into Pieces
  • Salt, Cumin, Chili Powder To Taste (or Use Taco Seasoning)
  • 2 Tablespoons Canola Oil
  • 2 cans (4 Ounce) Diced Green Chilies
  • 1-1/2 cup Finely Grated Cheese (cheddar Or Cheddar/jack Mix)
  • Sour Cream
  • Hot Sauce (Chulula Or Other Brand)
  • 2 cups Thinly Sliced Romaine Lettuce (or Any Lettuce)
  • 4 whole Roma Tomatoes, Diced
  • Canola Oil, For Frying Tacos

Preparation Instructions

*Be careful frying with hot oil!*
Season diced chicken liberally. Heat 2 tablespoons oil in large skillet over medium-high heat. Add the chicken and cook for a couple of minutes. Dump in the diced green chilies. Stir and cook until chicken is totally done inside. Turn off heat and set aside.
Have all other ingredients---grated cheese, sliced lettuce, diced tomato, sour cream, and hot sauce---ready.
Also have a plate ready, as well as a stack of five or six paper towels to hold in your hand.
TO FRY
To fry the tacos, heat a couple of inches of canola oil in a heavy skillet over medium-high. Place some chicken in the middle of a tortilla, then fold tortilla in half. Clamp the tortilla shut with a pair of heat-proof metal tongs, then carefully lay the taco---one side down---in the oil. As you lay it in the oil, use the tongs to hold the top side down for a few seconds to form it in place. Once it stays put, repeat with two other tacos. Turn tacos after 30 to 45 seconds, or when each side gets light golden brown (not too brown.)
One at a time, remove tacos from the pan with tongs, holding sideways as you remove them to allow oil to drip out of the sides. Place the taco in the stack of paper towels. Fold the sides and corners around the taco to tightly hold it, then give it three or four shakes to remove excess oil. Remove it from the paper towels and place on a plate. Repeat with other tacos in the pan.
As you continue frying the other tacos, have someone carefully place some grated cheese inside the tops of the tacos (gently pry them open just enough to place the cheese in). Then just let them sit until ready to serve---the cheese will melt as it sits in the warm taco.
To serve, garnish in this order: a smear of sour cream, dashes of hot sauce, shredded lettuce, diced tomato. You'll need to slightly open up the tops of the tacos to get all the garnishes in there.
Tacos will be hot for a minute or two after frying, so don't rush into eating! They'll stay nice and warm for a little while after frying.

Saturday, July 21, 2012

Chili-lime Oven Roasted Chicken

To watch this Video-Recipe please click HERE!!

Hi everyone: Today's recipe is another Oven Roasted Chicken, and I'm happy to say, this one is even better than the last one I made! I made this for my anniversary, and it was perfect, it took almost no time to prepare and after I placed it in the oven, I just forgot about it! so It was a very stress-free meal. Chicken is really cheap, so again, I was able to make a meal fit for a King on a very small budget! I hope you give this one a try, you wont regret it!

Ingredients:
  • 1 whole chicken (I'm using a 4½lbs chicken)
  • 4 tablespoons chili sauce
  • 4 tablespoons butter
  • Zest of 1 lime 
  • Juice of 1 lime
  • 1/2 tablespoon salt
  • 1/2 tablespoon black pepper
  • 1/2 tablespoon dry oregano
  • 1 tablespoon smoked paprika

Melt the butter. (takes 30 seconds on the microwave), Season it with 1/2 tablespoon of  each: Salt, black pepper and dry oregano. Also add in the Zest of 1 lime, plus the juice of half a lime. (reserve the rest of the juice for later). Add in 4 tablespoons of chili sauce and 1 tablespoon of smoked paprika. Mix well, until everything is well combined and set aside for a minute.

Rinse the chicken under cold water.  Pat it dry with paper towels.

With a small knife or your fingers, loosen the the skin from the chicken without tearing it apart. (watch the video for some tips).  With a small knife or a fork, poke the chicken a couple times, this will allow the marinade to fully impregnate the chicken. 

Grab some of the butter marinade, and rub it under the skin, on the chicken meat. Give the chicken a good massage with it. Make sure to rub this mixture all under the chicken skin. Grab the rest of the marinade, and massage it on the chicken skin. rub the whole chicken with it, and don't forget to also rub some of the marinade inside the chicken cavity.

Squeeze the rest of the lime juice over the chicken, and season with a little extra salt, black pepper and paprika. (½ teaspoon of each) on both sides of the chicken.  Marinate in the refrigerator for at least 2 hours. (the longer you marinate, the more flavorful it will become)

Preheat oven to 375ºF  (190ºC).

Cook for 1 hour in a 375ºF oven.  After 1 hour, turn the chicken around, so it can get nice and golden brown on the other side. Rise the oven temperature to 450ºF (230ºC) and continue to cook for 15 more minutes or until the chicken is completely cooked.  (The internal temperature of a cooked chicken is 170ºF ( 76ºC) )

After the chicken is cooked, let it rest for at least 10 minutes before serving it. This will allow all the juices to disperse all throughout  the chicken.


Enjoy!

Friday, July 20, 2012

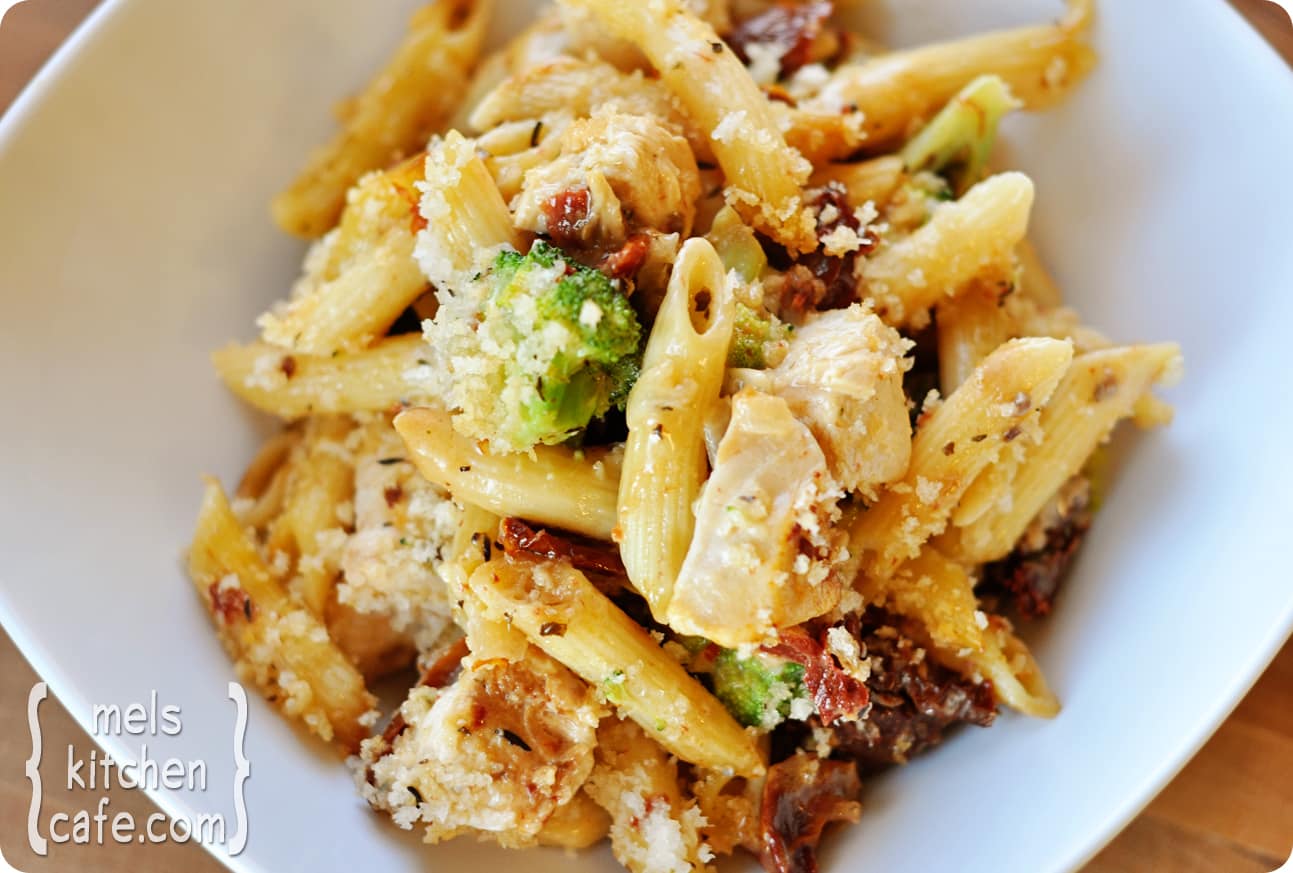
Baked Penne with Chicken, Broccoli and Smoked Mozzarella


We just ate this and here I am- already posting it. It's really, really good and a surprisingly fast meal to prepare. I halved the recipe for our family of 5 and it was perfect with one serving of leftovers. I made a few changes from the the original recipe on Mel's Kitchen Cafe .


Baked Penne with Chicken, Broccoli and Smoked Mozzarella
adapted from Mel's Kitchen Cafe 

*Note: See the asterisk below the recipe for make-ahead directions.
*Serves 6-8

INGREDIENTS:
Topping:
3/4 cup bread crumbs (store-bought or make your own)
2 tablespoons butter, melted
Filling:
1 bunch broccoli (about 1 ½ pounds), stalks cut off, florets trimmed into 1-inch pieces
12 ounces penne pasta
2 tablespoons olive oil
1 medium onion, minced
6 medium garlic cloves, finely minced or pressed through a garlic press
1 teaspoon dried thyme
¼ cup all-purpose flour
2 cups low-sodium chicken broth
1 cup heavy cream
1 teaspoon salt
½ teaspoon pepper
1 ½ pounds boneless skinless chicken breasts (about 3), trimmed and cut into bite-size pieces
3 ounces smoked mozzarella, shredded (I used regular mozzarella b/c smoked is pricey)
8 ounce jar roasted red peppers, chopped (Mel used sun-dried tomatoes but I don't really like them)
DIRECTIONS:
In a small bowl, combine the bread crumbs and butter and set aside. Lightly grease a 9X13-inch baking dish and set aside.
Preheat the oven to 400 degrees and make sure the oven rack is placed in the middle of the oven. In a large pot, bring the water for the pasta to a boil. Stir in one tablespoon salt and the broccoli. The broccoli cooks quickly so stay close! Cook the broccoli for 1 minute, until it is bright green. Quickly remove the broccoli with a slotted spoon to a plate. Return the water to a boil and add the pasta and cook until al dente, about 1-2 minutes less than how you would eat it normally (it will cook a bit more in the oven while baking). Drain the pasta in a colander and toss with 1 tablespoon olive oil. Leave it in the colander and set it aside.
Wipe the pot dry. Add the remaining 1 tablespoon oil and return to medium heat until shimmering. Add the onion and cook until softened and beginning to brown, about 5 minutes. Stir in the garlic and thyme; cook until fragrant, about 30 seconds, stirring constantly. Add the flour, salt and pepper, and cook, stirring constantly, until golden, about 1 minute. Slowly whisk in the broth and cream; bring to a simmer, whisking often. Add the chicken and cook, stirring occasionally, until cooked through, about 6-7 minutes. Stir in the roasted red peppers and (smoked) mozzarella.
Add the cooked pasta and broccoli to the sauce; stir to combine. Transfer the pasta mixture to the prepared baking dish and sprinkle with the bread crumb topping. Bake until the casserole is bubbling and the crumbs are lightly browned, about 15 minutes. Serve immediately.
*The casserole can be prepared in advance with the following steps: after the broccoli is removed from the boiling water, plunge it into a bowl of ice water and cool completely. Assemble the casserole following the directions in the recipe. After the casserole is spread in the prepared baking pan, let it cool for 5-10 minutes before covering with plastic wrap and refrigerating for up to 8 hours. To bake, preheat the oven to 375 and bake uncovered for 30 minutes.

Thursday, July 19, 2012

Vegetable Lasagna...in a crock pot!

This meal was so good that I wanted to stop mid-meal and post it.  But, I couldn't pull myself away from the plate.  And, who doesn't love a crock pot meal?  So easy.  We loved it.
courtesy google images
Vegetable Lasagna
Adapted from Eatingwell.com

1 large egg
1 15-oz. container cottage cheese (or ricotta, if you prefer)
1 5-oz. package baby spinach, coarsely chopped
1 pkg. sliced fresh mushrooms, chopped
1 zucchini, quartered lengthwise and thinly sliced
2 28-oz. diced tomatoes
3 cloves garlic, minced
Pinch of crushed red pepper
Salt, Pepper as desired
1 Tbs. dried basil
1/2 Tbs. dried oregano
Garlic Salt, as desired
3 cups mozzarella cheese, divided
Favorite Pkg. of Noodles (I used penne)

Combine egg, cottage cheese, spinach, mushrooms, zucchini, salt, garlic salt, and pepper in a large bowl.  Combine tomatoes, and all remaining spices and minced garlic in medium sized bowl.    Coat your crock pot with cooking spray.  Pour 1 1/2 cups of tomato mixture in bottom, followed by half of cottage cheese mixture, then another 1 1/2 cups of the tomato sauce, half of the package of noodles, and then 1 1/2 cups of the mozzarella.  Repeat all previous layers.  Cook on high for 4-5 hours, mixing entire meal together HALFWAY through to allow all noodles to cook evenly.  Enjoy!

    Quick Ham & Bean Soup

    I tell you, this is going to be an interesting few months... we just spent the last few weeks on vacation and had a lovely time in the middle of nowhere, Missouri. If you are ever in the Branson area and are looking for a nice place to stay, give a look to Dogwood Canyon's cabins. Of course, it was hotter than heck... and there was no Internet. Are we pathetic, or what? Perhaps it would have been easier if we'd just flat out had no service at all, but we had glimpses of it on our phones, which just taunted us for the entire week. Anyway. We had a good time despite the heat and lack of connectivity.

    Now that we're home, we are preparing for the packers to arrive next week. Unfortunately, our housing has not come through yet on the base where we're headed, so we'll be going into temporary housing for a while. I've all of a sudden realized that I will be without my kitchen for at least a month, possibly longer! It has started a panic in me, and I find myself wandering through my kitchen deciding which items I can't live without for that long... my butcher knife and favorite paring knife are definitely coming with me. Beyond that, I'm still trying to decide.

    This is also the first time I will be moving without taking my stocked freezer with me. In all my previous moves, we've gone door to door, so I simply locked a few pounds of dry ice in my upright freezer and moved it with everything in it. We can't do that this time. I foresee more weekly shopping and detailed meal planning on my horizon. Who knows? Maybe that will be a good thing. Hopefully, I will still be able to bake and experiment in my transient kitchen. I guess we'll find out soon!

    In the meantime, we're trying to clean out the pantry and fridge here, so I made a quick and simple ham and bean soup for dinner tonight. It turned out great and it was done in about 30 minutes. You just can't complain about that.

    Here are the basic ingredients. What you're not seeing here is the bacon strips, broth, and herbs.

    The general plan with this soup is to first render the fat out of the bacon, saute the vegetables, simmer the broth, puree, and then add final ingredients. Did I mention this soup is fast?

    Quick Ham & Bean Soup
    Yield: 4 servings

    2 slices bacon
    1 cup diced onion
    1/2 cup diced celery
    1-2 TBS minced garlic
    4 cups Knorr vegetable broth
    2 15-oz cans Navy beans, drained and rinsed
    2 bay leaves
    1/4 tsp ground thyme
    1 15-oz can black beans, drained and rinsed
    2 cups cubed ham
    salt & pepper to taste

    In a stock pot, cook the bacon until all the fat is rendered and the bacon is crispy. Set the bacon aside for garnish or eat as the cook's reward. Saute the onion, celery, and garlic in the bacon fat until translucent. Add the broth, bay leaves, thyme, and Navy beans. Bring to a boil, then reduce heat and simmer for about 10-15 minutes, until the celery is tender.

    Carefully puree the soup in a blender or with an immersion blender. Return to the pot and add the black beans and cubed ham. Heat through and serve! Garnish with crumbled bacon, if desired.