Showing posts with label Sides. Show all posts

Sunday, June 23, 2013

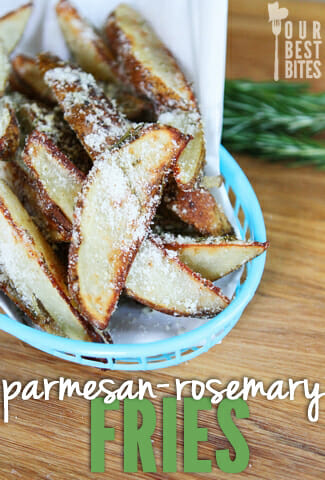
Oven-Bakes Parmesan Rosemary Fries


I don't know who else saw these on OBB but I decided to make them tonight for sunday dinner and they were mm mm good! The only ingredient I had to go get was some fresh rosemary but other then that they are relatively and easy make. And I would definitely recommend getting the fresh stuff. Also, put the pan on a rack closer to the top if you like them crispier.

Ingredients:
4 medium Russet potatoes
2 tablespoons extra-virgin olive oil
1 teaspoon kosher salt
1 teaspoon garlic powder
1/4 teaspoon freshly ground black pepper
1 tablespoon corn starch
1 1/2-2 tablespoons chopped fresh rosemary, plus more for garnish if desired
Canned Parmesan cheese
Instructions:
Preheat oven to 400 and line a baking sheet with aluminum foil (lightly crumple it if you want to; that will help ensure even browning) and spray with non-stick cooking spray. Set aside.
Cut each potato into 8 wedges and set aside ( you can also cut them like you do for this recipe). In a large, wide bowl, combine the olive oil, salt, garlic powder, black pepper, corn starch, and rosemary. Add the potato wedges and toss to coat them evenly with the olive oil mixture. Spread evenly over the prepared foil and bake in the preheated oven for  about 40 minutes or until the fries are golden brown. Remove from oven and sprinkle generously with Parmesan cheese and toss to combine. If desired, sprinkle with additional rosemary and salt. Serve immediately.


Thursday, May 16, 2013

Majadra


I know what you must be thinking... two posts in two days! Stop the presses! It is somewhat exciting. My little boy is starting to go to bed earlier and earlier. Tonight, he was in bed asleep by 7:30. To top it all off, my husband is out of town on business. My time is my own this evening. It doesn't happen that often these days, so I figured I'd make the most of it.

I celebrated by making another of those sandwiches I've been so fond of lately and then made a big old pot of this delicious dish. It may not be much to look at, but, boy, does it have some flavor! Majadra is of Lebanese origin and has rice, lentils, and caramelized onions. It also has a hint of spice and is absolutely delightful. You can serve it as a side dish or a main dish. I like to fill a bowl full to the brim and eat it with a spoon. It's very tasty. The best part is that it makes a decent amount and it tastes just as good reheated the rest of the week. It makes a perfect leftover lunch.

The other nice thing about it is that it's pretty simple to make. While it's not fast, it takes about an hour to complete it, the actual prep work is minimal and involves slicing an onion. That's it! Really! Okay, you also have to slice open a lemon for a little bit of juice, but, who's keeping track?

You start by putting the lentils on to simmer and caramelizing the onions. These two tasks take about the same amount of time, about half an hour. When the onions are starting to develop some really nice color, throw in a small stick of cinnamon. If you don't have a stick, you can also add just a dash of ground, but the stick adds more of an aromatic component to the dish rather than a flavor you taste with your tongue.


Once the lentils are tender and the onions are caramelized, you add the Batsmati rice to the onions to toast slightly. Then you add the drained lentils, boiling water, and cumin; cover it; and cook for twenty more minutes. After twenty minutes, you open the pot and fluff the rice. Spritz a couple teaspoons of fresh lemon juice over and add salt to taste (I think I added between 1/2 and 1 teaspoons).

Majadra
Yield: 6-8 servings

1 large onion, halved and sliced thinly
1/4 cup olive oil
1 cup green lentils
water to cover lentils by 1-2 inches
1  2" cinnamon stick
1 1/4 cup Batsmati rice
2 cups hot water
2 tsp cumin
2 tsp fresh lemon juice
salt to taste

Heat a large pot and the oil over medium to medium-high heat. Add the onions and saute, stirring occasionally, until the onions are very golden, about 30 minutes. Adjust the heat as needed to keep them from burning. At the same time, put the lentils in a sauce pan and cover with water so that it is one to two inches above the top of the lentils. Bring to a boil and then reduce to a simmer to cook for 25-30 minutes. The lentils should be tender about the time the onions are done. If the lentils are done before the onions, simply turn off the heat and let them sit. Drain the lentils once the onions are done.

When the onions are about 5 minutes away from being done, add the cinnamon stick and stir. Once the onions are nicely golden, add the rice and toast, stirring occasionally, for 3-5 minutes. Add the lentils, the cumin, and the water. Stir and bring to a boil. Reduce to a very gentle simmer. Cover and cook for 20 minutes. After twenty minutes, turn off the heat. Let sit 5 minutes. Remove the cover, add the lemon juice and salt and fluff gently with a fork.

Monday, January 7, 2013

Farro Love


Curiosity about new foods is a key aspect of how I operate in the kitchen. Sometimes it takes a bit longer to get around to trying something than I might like to admit, but I'll get there eventually. Sometimes I get a little prompt by being presented a food while eating out elsewhere, and that's usually never a bad thing. Take this grain, for instance. I first had it about three months ago at a catered event and immediately fell in love. What a wonderfully flavorful, easy to cook, chewy, tasty delight!

Farro is a grain within the wheat family, but is botanically different enough that some people who are allergic to the modern wheat variety found most commonly in the grocery can tolerate farro. Farro is also known as emmer wheat, and while it appears to have been cultivated in antiquity (i.e. thousands of years ago), its modern resurgence is fairly recent (as in the early 1900s). Most farro available for purchase today in the United States is grown in Italy.

While farro berries look very much like wheat berries, they cook very differently because most farro you'll find has been pearled (had the outer husk and much of the bran removed). Removing this bran casing allows the grain to cook much more quickly. You can visually judge how much of the bran has been removed by looking at the color of the grain; the more bran that has been removed, the lighter in color the grain will be.

So, how do you cook farro? Easily! I usually cook about one cup of the grain at a time. This will leave you with between 2 and 2 1/2 cups of cooked farro. You can round out the taste of the farro by dry toasting the grain in the pot first before adding the water. Simply turn the heat to medium, add the grain, and stir periodically until the grain gives off a nice toasty aroma. At that point, add water to cover, about 2 cups if you are cooking 1 cup of farro. Bring to a boil and then reduce to a simmer. I have had equal success with cooking my farro covered or uncovered. Simmer until the grain is tender, about 30 minutes. It will still be chewy, but pleasantly so. Drain off any excess water and let sit for a few minutes to absorb any remaining moisture after draining.

You can then use the farro in any number of ways. I like it very much as is and there are plenty of recipes for farro salads that are really excellent. My favorite way to serve it, however, is as a side dish with a slight flavor boost. After draining, I add salt and pepper to taste. I then drizzle a tiny bit of extra virgin olive oil and a tiny drizzle of fresh squeezed orange juice into the grain and stir. Be cautious not to overdo it with the oil and juice; you want to highlight the natural flavor of the grain, not mask it. Stir and serve! Farro is another great way to include more whole grains into your diet!

Wednesday, October 31, 2012

Spinach & Sage Dressing


This little side dish here is one of my favorites. The flavors go so well together. I love the savory flavor of the sage with the onions, mushrooms, and spinach. Dressing does not need to be a holiday exclusive dish! I like to prepare this dish year round. And, as you know, dressing from a box just isn't the same.

This recipe started as the filling for my stuffed mushrooms. Then, over the years, it's morphed into its own dish which I serve either alone as a side dish or use as a stuffing. You can roll it up in a pork tenderloin or stuff it in the center of a chicken breast. I'm telling you, this is some good stuff!

Spinach and Sage Dressing
Yield: 4 side servings or enough to stuff one pork tenderloin

3 TBS butter
1 cup diced onion
1 1/2 cup diced mushroom
2 cloves garlic, minced
6 oz fresh spinach, chopped
1 TBS ground sage
1/4 tsp salt
1/4 cup ground Parmesan
1/2 cup panko bread crumbs

Melt the butter in a saute pan. Saute the onions and mushrooms over medium-high heat until tender and lightly browned. Add the garlic and cook one minute. Reduce the heat to medium-low and add the spinach, stirring to wilt. Add the sage, salt, and Parmesan, stirring to mix. Lastly, add the bread crumbs, stirring to moisten. Serve immediately as a side dish or let cool before stuffing into pork loin or chicken breasts.


Tuesday, August 7, 2012

Barley Risotto

Well, we made it! We are now in D.C., trying to get settled without being able to get settled. What does that mean? It means we are still on the waiting list for base housing and are currently living in the temporary lodging facility (TLF) on base. Compared to some of the horror stories I've heard, our TLF is pretty darn nice... with one small caveat.

A TLF is fully furnished and, according to the website comes "equipped with a full kitchen." Based on my previous experiences with "full kitchens" in furnished apartments and extended stay hotels, I had certain expectations. I knew there would not be certain specialty items, so I brought some supplemental items, knowing I could be stuck in this temporary kitchen for as long as two months. So, I brought my good chef knife, a nice paring knife, my electric griddle, a cheese grater, etc. I brought my own knives, because in my experience, the knives found in these "equipped" kitchens are pretty poor indeed.

When we arrived in the TLF, after poking my head in each room, I started going through the kitchen cupboards. Oh la la!!! Good thing I brought my own knives! The only knives in this kitchen? Butter knives. The only items provided? A four place setting of dinnerware, silverware, and drink ware. One small sauce pan. One medium stock pot. One small skillet that really should have been thrown away two years ago. And one glass two cup Pyrex measuring cup. That's it! No mixing bowl. No spatula. No cutting board. No measuring cups or spoons. None of those normal, basic things you expect to find in an "equipped" kitchen. I wish I had known because I certainly could have brought all of these items. Now, I've had to go out and buy new, cheap ones.

Despite these challenges, I've managed to get a little cooking in. So far I've made spaghetti, tacos, and sauteed chicken breasts with caramelized onions. I even managed to make my favorite breakfast food, a batch of chocolate chip muffins. Of course, I had planned ahead on that one and brought everything I needed to make them (except the mixing bowl).

As you might imagine, I'm not sure how many new recipes I'll be able to develop while in this living situation, but I do have a few recipes stock-piled to share with you. This risotto is one of them. I love risotto and posted a more traditional version previously. I also love barley, usually in soups. Somewhere along the way, I started to wonder what a risotto made with barley might taste like, so I finally gave it a try. It turned out great! The texture is much more chewy than with arborio rice risotto, which I find to be a pleasant change of pace, and it is still creamy and flavorful.

Barley Risotto
Yield: 4 servings

1 1/2 TBS butter
8 oz mushrooms, chopped
1/2 cup onion, diced
1 cup pearled barley
1 cup chicken broth
1 bay leaf
up to 1 more cup of chicken broth
1 cup frozen peas
salt & pepper to taste


In a large sauce pan, melt the butter over medium high heat. Saute the mushrooms and onions until soft and lightly browned. Add the barley and saute for two minutes. Add the first cup of broth and bay leaf. Bring the mixture to a boil and reduce the heat to simmer. Cover and cook for twenty minutes. Remove the lid and stir. Over the next 20-30 minutes, slowly add broth as needed until the barley is tender and there is enough liquid left so that the risotto is creamy. Remove the bay leaf and add the frozen peas. Cook just long enough to heat the peas through and serve.

Friday, June 1, 2012

Baked Potato Wedges and Fry Sauce

photo from favfamilyrecipes.com

I really loved the flavoring of these wedges.  The parmesan cheese made all the difference.  And fry sauce....yum!  We used the bbq sauce instead of the ketchup!

Baked Potato Wedges

Recipe from favfamilyrecipes.com 

4 to 5 small potatoes
olive oil
Johnny's Seasoning Salt (or any kind of seasoning salt)
Parmesan cheese

Scrub potatoes well, slice into wedges and place in a large plastic bag.  Add a little olive oil and toss to coat then transfer to a foil-lined baking sheet with the skin side down. Sprinkle potatoes generously with seasoning salt and parmesan cheese. Bake at 450-degrees for 30-35 minutes (or until cooked through and golden brown). Do not stir while cooking.  Serve with ketchup, fry sauce, or ranch dressing.

Fry Sauce


1/3 c. ketchup (if you want to make it more like Red Robin you can substitute BBQ sauce)
2/3 c. mayonnaise
optional: 1 tsp mustard (just for a little added zip)
(If you want it like In-n-Out's special sauce: add some pickle relish)

Mix all ingredients until smooth. Eat with fries or chicken nuggets. Enjoy (I know you will)!

Tuesday, January 17, 2012

Tarta Pascualina

I tell you, that dinner club we've been participating has prompted some interesting stuff! Our theme last month was Argentine cuisine and I was tasked with coming up with a side dish. I looked and looked. I became a little frustrated because Argentine food appears to be an amalgamation of many different cultures: Italian, Spanish, and Arabic influences are prominent. I wanted to try something that seemed a little more authentic. I'm not sure how authentic this dish really is, but it sure is a stunning knock out! I originally served it as a side dish, but to be honest, it's filling enough to be a wonderful vegetarian main course. That's how I served it last night.

According to Rebecca of "From Argentina with Love," Tarta Pascualina, or Eastertime Tart, was brought to Argentina by the Italian in the 16th century. I figured 500 years in one culture was enough time to consider it "authentic." And I immediately loved the idea of a pie with whole eggs baked in it! When this thing is sliced, it is so gorgeous. The first time I made it, I made it exactly as Rebecca wrote the recipe. Last night I made some adjustments. While I liked it the first go around (I used all kale), I really liked it last night. I am not a huge fan of strong tasting greens, so I prefer to use all spinach, but you can use whatever mixture of greens appeals to you. I have posted my version of this recipe below.

The first step is to prepare the filling. Mix the cheeses, garlic, nutmeg, salt, pepper, cornstarch, and milk together in a bowl. Add your greens. If you use frozen greens, thaw them completely and then squeeze them to get the excess moisture out. If you use fresh greens, steam them until wilted through, cool, squeeze, and then chop into small pieces. After adding the greens, make sure to mix thoroughly. If you don't mix it really well, you can end up with large globs of cheese that mess with the great texture of the cooked filling.

This tart is made in a 9-inch spring form pan. Prepare a batch of pie crust (or use store bought) and line the bottom of the tart. Gently lay the crust into the pan so that it reaches all the way down into the "corners." Try not to stretch or press the dough down or it will become too thin or tear. Spoon the filling into the shell and even it out across the top. Then gently press open 6-7 holes in the filling. Last night, without thinking, I put an egg in the middle as well, which I think was a mistake, as I think it messes with the cut presentation of the slices.

Crack a raw egg into each hole you made. Note that this picture is from the first time I made it when I did not put an egg in the middle. Try to ensure that the hole is big enough to contain the whole egg. If it runs over, stick your finger into the hole and gently enlarge it until the egg white falls back into the hole.

Place the top crust on making sure that it lays flat across the filling. Seal the edges and flute however you prefer. Make an egg yolk wash (one yolk and 1 TBS water) and brush it on the crust to help with browning. Bake in a 375° F oven for approximately one hour. Now, this is important! Be sure to bake with your spring form pan sitting on a sheet pan. I forgot to do that the first time and there was leakage of grease from the crust onto the bottom of my oven... oh the smoke! You only make that mistake once! Bake until the tart is golden and a thermometer stuck in the middle reads 160° F. If you pull it out below this temperature, there's a good chance your eggs will not be hard baked yet.

Remove from the oven and let it cool in the spring form pan on a rack for 10 minutes. Run a knife around the edge of the fluting to ensure it isn't stuck to the pan before releasing the band. Remove the spring form band and let it cool another 10 minutes before slicing and serving. It serves well hot or at room temperature.

The trickiest part of this whole deal is trying to be sure you slice right down the middle of an egg for the best presentation! It seems like once you get your bearings with the first slice, it's fairly easy to get it right. Isn't that pretty? The combination of the cheesiness and the flaky crust along with the creamy spinach and that hard boiled egg surprise makes this one a true delight.

Tarta Pascualina
Yield: 6-8 servings
Adapted from the blog From Argentina with Love

One recipe for a double pie crust (or store bought)
18-20 ounces of greens, frozen or fresh (spinach, kale, chard, or a mixture)
1 cup ricotta cheese
1 cup shredded mozzarella cheese
1 cup grated Parmesan cheese
2 cloves garlic, grated
dash nutmeg
1/2 tsp salt
1/4 tsp ground black pepper
1 TBS cornstarch
2 TBS milk
6-7 eggs

Preheat the oven to 375° F. Prepare the greens: if using frozen, let them thaw completely and squeeze the excess water out. If using fresh, steam them until they are completely wilted. Cool and then squeeze the excess water out. Chop into small pieces.

Line a 9-inch spring form pan with the bottom crust, gently placing flat across the bottom and up the sides. Mix together the cheeses, garlic, nutmeg, salt, pepper, cornstarch, and milk. Add the greens and mix very thoroughly. Place the filling into the tart shell and gently pat it flat. Using a spoon or your fingers, make 6-7 holes in the filling about an inch from the edge of the tart. Make sure the wells are large enough to completely contain a raw egg. Crack a raw egg into each hole. If it spills over a little, simply stick your finger in and gently make the hole larger. Place the top crust over the filling and ensure that it sits flat on it. Seal the edges, crimp, brush with egg yolk wash, and make a couple of slits to let steam escape. Place the spring form pan on a baking sheet and bake for about an hour, until the pie is golden and the temperature in the center reads 160° F.

Let the tart cool in the spring form pan on a rack for 10 minutes. Run a knife around the edge of the crust to loosen it and then release the spring form mold. Let the tart cool another 10 minutes before slicing and serving. Serves well hot or at room temperature.

Tuesday, November 22, 2011

Green Bean Casserole from Scratch


I have always been a fan of the idea of green bean casserole. I mean who wouldn't be? Fresh green beans swimming in a savory mushroom sauce with crunchy onions on top? Sounds pretty good when it's put that way, huh? Unfortunately, being a scratch girl, not only do I never have canned cream of mushroom soup on hand, I am not a big fan of it's commercial taste. The use of frozen green beans over canned was an automatic; there was no debate there at all.

Last week I decided to make my own green bean casserole, from scratch. What that means is simply making a homemade sauce versus opening a can. It's pretty quick and easy, and boy was it good! I'm going to make it again later this week for the big day. Here's how it goes...

Green Bean Casserole from Scratch
Yield: 8-12 servings

3 TBS butter
1 medium onion, diced
8 oz baby bella mushrooms, diced
1/4 cup cream sherry
1/8 tsp garlic powder
1/2 cup flour
1 tsp salt (or to taste)
1/4 tsp pepper
4 cups whole milk, warmed
2 1/2 lbs frozen cut green beans, cooked and drained
1 1/2 cups french fried onions

Preheat the oven to 375° F. Melt butter in a deep skillet. I prefer using a stainless pan so I get better browning on the bottom, leading to a richer flavored sauce. Add the onions and cook over medium high heat until translucent and starting to caramelize. Add the mushrooms and cook until they are tender and browned. Add the sherry and stir vigorously to deglaze the pan and lift up all the browned bits on the bottom of the pan.

Mix the flour, salt, pepper, and garlic powder together. Add to the skillet and stir to mix. Slowly add the warmed milk, stirring as you go to minimize lumps. Once all the milk is added, cook, stirring continuously until it just comes to a boil and is thick. It will thicken more as it bakes and then cools. Add the green beans and stir to coat. Pour the mixture into a greased 9x12x1 inch baking dish (or similar). Sprinkle the top evenly with the french fried onions. Bake at 375° F until bubbly through and the onions are nicely browned, about thirty minutes. Cool slightly before serving.


Saturday, October 1, 2011

Parmesan Potatoes

Behold the most delicious potatoes ever! My mom made these for our family while we were growing up, and they have always been one of my favorite dishes. My only complaint is that she would stack the potatoes too much. As you might imagine, the best part of these potatoes is that golden, delicious crust on the outside of each slice. If you stack the potatoes too much, then only a small percentage of the potatoes have that crust. That state of being is an unfortunate and unnecessary occurrence. You may need to use a larger pan, or even two pans, so that the potatoes are spread as close to one layer thick as possible, but it is really, really worth it.

The other thing I want to throw out there is that potatoes have really gotten a bum rap lately... kind of like what eggs went through in years past. While, obviously, if you always eat your potatoes deep fried or mashed with a stick of butter, they are not a very good meal choice. By themselves, however, potatoes are a healthy and delicious addition to any meal. They're definitely a better choice than pasta. In fact, serving for serving, I would even argue that potatoes are a better choice than brown rice! I love this nutrition data site and suggest you go compare the nutrition data of potatoes with your other side dish options if you have been hesitant to eat potatoes lately.

This dish is nice because you get all the flavor and "pow!" of a sinful side dish while actually being quite restrained. You can use any kind of potato. In this case, I used little red potatoes, but you can use russets or Yukon Gold, or... whatever. I like to leave the skin on. I like the way it looks; I like the way it tastes. Plus the skin has a large percentage of the fiber and nutrients of the potato. Slice the potatoes thinly, about 1/8 of an inch. I use a mandolin, but you can slice them the old fashioned way or with a food processor.

Be sure you've started your oven to preheating to 425° F. Spray a baking sheet with cooking oil. Place your potato slices in a bowl and toss with a little bit of melted butter. You only need a tiny bit! The potatoes just need to have a little bit of a sheen from the butter (or oil, if you prefer).

Lay the potato slices out on the baking sheet as close to one layer thick as possible. In this case, I had plenty of room on my baking sheet. When things are a little tighter, I use a shingle pattern to maximize my use of space. Sprinkle the slices with a little salt (go easy, Parmesan is already pretty salty), some pepper, a little grated Parmesan cheese (I use the stuff in the green can for this application), and a little bit of paprika.

Bake until the potatoes are cooked through and golden. Depending on how many you are baking, it could be anywhere from 20-40 minutes. For best results, serve immediately!

Parmesan Potatoes
Yield: 4 side servings

3-4 cups of sliced (1/8 inch thick) potatoes
1 TBS melted butter
3 TBS grated Parmesan cheese
dash paprika
salt & pepper to taste

Toss the potatoes in the melted butter. Lay out on a greased baking sheet as close to one layer thick as possible. Sprinkle with cheese and paprika. Salt and pepper to taste. Bake in a 425° F oven until the potatoes are cooked through and golden. Baking time will depend on how thickly you stack your potatoes, but start checking after 20 minutes. Serve immediately.

Friday, June 10, 2011

Spinach Pasta

I'm not gonna lie to you. Making homemade pasta can be very time consuming. How time consuming depends on the shape. Today, I'm going to walk you through a basic spinach pasta dough recipe. Once the dough is made, you can process it into any shaped pasta you please. If you want something fast, you can go for fettuccini (or even taglioni - wide ribbons - if you don't have a pasta machine). I'm going to show you how to make farfalle pasta, aka bowties. This may be one of the most time consuming pasta shapes to make. Why do I still do it occasionally? Because they're so darn cute and they make a wonderful gift.

The first step in making spinach pasta is preparing the spinach puree. I often think about making this dough after I realise I bought a bag of spinach and then forgot to use it before it started getting a little funky around the edges. Not all of the spinach is bad, so I dump the bag into a sink full of water. This allows me to pick out the nasty pieces and rinse off any goo left behind from those nasty pieces. You can, of course, use fresh, beautiful spinach; I - unfortunately - am never that organized.

In my experience, you'll want to avoid using frozen spinach or spinach that is too mature because it is too fibrous and will not puree well enough and you could end up with fibers that don't cut easily, making it very hard to form the pasta. Not good.

Prepare a pan with a steamer insert and a little water. Steam the spinach until it is evenly wilted.
Then put the spinach into a food processor. You can add some water to help it puree. You'll have to let it drain regardless, so you might as well make your life easier. Once the spinach is nice and smooth, spoon it into a fine mesh sieve and let it sit and drain for a few hours. At this point, you can continue with the recipe or freeze the puree for later use. Since the recipe requires one half cup of puree, I freeze cups with that premeasured amount.

When you get ready to make the pasta dough itself, place the ingredients together in a stand mixer. You could, of course, mix this by hand, but that certainly sounds like a lot of effort to me! Especially with this dough. For some time, you're going to look at this mixture and wonder how it is ever going to come together, it looks so dry. You'll be sorely tempted to add some water. Don't!

Just give it a little more time and it will turn into a beautiful, green dough. This is a fairly soft dough to begin with, so if you add any extra water you will really be in a world of hurt. In fact, once it comes together, if it's still tacky, you may want to add a little extra flour. Knead for an additional 4-5 minutes after the dough comes together. Take the dough out and pat it into a ball. Spray a little oil on a sheet of plastic wrap and wrap the dough up to sit for a couple of hours before continuing.


Notice that after the dough rests, it will look a lot more workable. Divide the dough into six even pieces. At this point, you could roll it out with a rolling pin as thin as you can and cut it into strips with a pizza cutter. It will be delicious. If you want to go a little more gourmet, pull out the pasta roller. I have a KitchenAid stand mixer with the pasta roller attachment. It comes with a flat roller, a spaghetti roller, and a fettuchini roller. When making faralle, or bowties, I only use the flat roller. As I mentioned before, this dough is fairly soft and sticky, so have plenty of flour on hand. It will make a fine fettuchini, but I don't recommend trying to make spaghetti or any other "fine" pastas.

Take one of the pieces and dust it liberally with flour. Run it through the pasta roller until it is flat and fairly thin. Don't go too thin or you will have a mess. Bowties are usually a fairly thick pasta and that's a really good thing with this somewhat challenging to roll pasta dough (compared to plain old egg pasta dough, anyway). With my KitchenAid roller, I go up to setting six. Then lay the sheet down on a floured counter. I like to use semolina flour at this point because it keeps things from sticking without making my pasta all white. Also, if you have a lot of all purpose flour stuck to your pasta when it dries, it can get a little gummy when it cooks.

Lay the sheet out and use a pizza roller to cut long strips about 3/4 to 7/8 of an inch wide. Then use a ravioli cutter (with fluted edges) to cut the ribbons into individual pieces about 1 3/8 inch long. Have a large sheet tray with a parchment liner ready to accept your finished farfalle.

For each piece, squeeze the middle together until it sticks, forming that classic shape.

The pieces can then be transferred onto your sheet tray to dry. Let them sit at room temperature for at least 24 hours or until they are nice and brittle. Then place them in an airtight container for storage. They are best used within 2 to 3 months. When you go to prepare them, I find that homemade pasta tends to cook more quickly than store bought, so check for doneness early.


Spinach Pasta
Yield: about 1 pound of pasta

1/2 cup of drained spinach puree (from about 6 oz fresh spinach)
2 large eggs
1 large egg yolk
2 1/2 cups all purpose flour
1 tsp salt

Add all ingredients into the bowl of a stand mixer with a dough hook. Mix and knead on fairly low speed 3-4 minutes after the dough finally comes together. Spray a sheet of plastic wrap with a little cooking spray, place the dough inside and wrap up. Let dough sit and rest for 2 hours. After it has rested, divide dough into six pieces and shape as desired. Use semolina flour to prevent sticking. Finished pasta can be frozen or dried to prolong storage.

Here's a picture of what the finished farfalle looked like when I was packaging it to sell. This pasta makes a great gift that anyone would be happy to receive!

Tuesday, May 31, 2011

Spinach and Great Northern Beans

I am always looking for new and interesting, but fast, side dishes that are on the healthier side. In this case, I was looking for a side dish that packed a little more of a sustained punch than most vegetable side dishes without being a lot of empty carbohydrates. I love eating a big plate of broccoli and it fills me up, but I'm hungry again in less than an hour. I wanted a dish that would stick with me a bit longer. Fortunately, I have come to realize that I absolutely adore great northern beans. Their creaminess is so wonderful, but I find they need a little something-something to go with them. This dish surely lets them shine.

Spinach and Great Northern Beans
Yield: 2 generous side servings

1 15 oz can great northern beans, drained and rinsed
8 oz fresh spinach
1 clove garlic, minced
1 TBS olive oil
salt and pepper to taste

Heat a saute pan over medium high heat. Add the oil and the garlic, letting them sizzle together for a minute or two. Add the spinach and toss occasionally so that it cooks evenly. When the spinach is mostly wilted, add the beans and cook for just so that the beans are heated through. Remove from the heat, add salt and pepper to taste, and serve. Be careful not to saute the beans too long or they will dry out and be less appealing.

Monday, December 13, 2010

Spiced Cranberry Sauce

I feel like a failure for not getting this posted before Thanksgiving. Of course, I didn't actually make up the recipe until I was making cranberry sauce the day before we all sat down to eat. I suppose there are a lot of folks out there who do another round of traditional feasting for Christmas. Additionally, this version of cranberry sauce may just alter your thinking about it only being a once or twice a year dish.

I have always felt that store bought cranberry sauce was a little blasé. Well, that goes without saying... I am all about cooking from scratch, after all. Unfortunately, I always felt freshly made cranberry sauce had an astringent quality to it I didn't quite care for. I noticed early on that when I canned my own cranberry sauce, I really only started enjoying it after it had been sitting on the shelf for a few months.

With that in mind, I started playing with ways to balance the cranberry's natural tannins. Citrus became my go-to ingredient for many years. This year, I wanted to try something a little different, so I decided to add some apples and spice. What a wonderful decision! This is, hands down, the best cranberry sauce I've ever eaten. Apparently, my mom agrees, since we practically started duking it out over who would get to eat most of it. Even if you're not a big fan of traditional cranberry sauces, I urge you to give this one a try.

You can start with fresh or frozen berries. I found this bag in the deep, dark recesses of my freezer. To be honest, I'm not really sure what year I bought those berries. Fortunately, since we were going to cook them, it didn't really matter. There are four main flavors in this sauce: cranberry, orange, apple, and fall spices. You want to start with the cranberry and orange. In a sauce pan, mix the berries, orange juice, zest, sugar, and water and bring to a simmer.

Once the cranberries have started to pop, add the peeled, diced apple and orange segments. Simmer over medium low heat until the apples are tender and then add the spice mixture. Let simmer five minutes and then remove from the heat and cool slightly before decanting into a pretty bowl, covering with plastic wrap, and chilling in the refrigerator.


Spiced Cranberry Sauce
Yield: 2-3 cups

1 bag of fresh or frozen cranberries
1 orange, zested, sectioned, and juiced
2 granny smith apples, peeled, cored, and diced
2 cups granulated sugar
1/4 cup water
1/4 tsp spice mix (mix 1/4 tsp of ginger, nutmeg, cinnamon, and cloves)
1 TBS brandy (optional)

In a sauce pan, bring the cranberries, orange juice and zest, sugar, and water to a boil. Reduce heat and simmer until the berries start to pop, about 5-10 minutes. Add the apple and orange sections (cut out so that you do not end up with the membrane) and cook over medium low heat until the apple is tender. Stir periodically to ensure the mixture does not scorch on the bottom.

When the apple is tender, mix together 1/4 teaspoon of the following dried spices: ginger, nutmeg, cinnamon, and cloves. Then use 1/4 teaspoon of that mixture to spice to sauce. You can save the remaining mixture for later or discard it. Let the mixture simmer for five minutes before removing from the heat, cooling, and decanting into a bowl to refrigerate before serving.

NOTES: This sauce is quite delicious warm and you could very easily serve it right after removing it from the heat. Also, it would be wonderful with some currents or raisins. If you decide to add them, be sure to put them in when you put in the apples so that they can soften.

Tuesday, November 2, 2010

Fried Cornbread

I've made these things for a long time, ever since I first learned how to properly deep fry food when I first lived in the South back in the early nineties. I think it's kind of funny that after all these years, the other night was the first time it ever dawned on me to use a portion scoop to make them. Previously, I dropped the batter from a spoon and always ended up with a nice free-form look to them.

The portion scoop makes a really nice, beautiful globe of fried goodness. I suppose it makes them look like hush puppies... which I guess technically they are. I'm not sure any true Southerner would call these hush puppies, however. In my experience, hush puppies are much more dense than these balls of fried cornbread.

I made them two different sizes the other night. What you see in the above picture is the larger size. The 2 tablespoon portion scoop made large 2-bite balls that took a good while to cook all the way through and were a little more dense. The 2 teaspoon portion scoop made perfect single bite nuggets that weren't quite so perfectly shaped, but ended up much lighter and almost fluffy inside. The smaller ones also cooked much more quickly, which was good for me since I am very impatient.

Make them whatever size you want, just be sure that you don't have your oil heated too hot or the outside will get too dark before the inside is completely cooked. There's nothing worse than having a gooey-inside piece of fried cornbread. To be sure they're cooked all the way, stick an instant read thermometer inside and look for a temperature above 175 degrees F.

Mix together the wet ingredients. I used creamed corn I had put up in the freezer, but you can certainly use canned cream corn.

Then mix together the dry ingredients. Yellow cornmeal is a must here to get that gorgeous yellow hue in the finished product. Fry for 2-5 minutes (depending on their size) in oil that is between 330 and 360 degrees F. I like to start with the temperature on the high side so that after I add a few blobs of batter, the temperature is still high enough to get a good crust on the finished product.

Fried Cornbread
Yield: approximately 20-40 pieces, depending on size

1/2 cup all purpose flour
2 tsp baking powder
1/2 cup yellow cornmeal
1 tsp sugar
1/2 tsp salt
1 egg
1 cup creamed corn
2 TBS melted and cooled butter
1/4 cup milk
1/2 cup diced onion

Mix the dry and wet ingredients separately and then add the wet to the dry mixture. Stir thoroughly. Drop by the spoonful (2 tsp to 2 TBS) into hot oil (approx. 330 to 360 degrees F) and cook until golden brown and cooked through. To ensure they are completely cooked inside, use an instant read thermometer to check for a temperature over 175 degrees. Let cool slightly on a paper towel before serving.

NOTE: Smaller pieces will have a lighter, fluffier texture than large pieces, which is simply a matter of personal preference. If you want an even lighter, fluffier end product, add a little more milk so that the batter is a little looser; this allows for quicker expansion when the batter hits the hot oil, leading to a lighter cornbread.

Saturday, October 16, 2010

Sauteed Spinach

You have to try this dish! Even if you are not a big fan of cooked spinach or greens, you must give this one a try. I made this dish up the other day on the fly when I suddenly needed a vegetable dish for a luncheon I was hosting. It turned out so well that I made it again that evening for dinner. Here's the most amazing thing. My husband? He said he liked the spinach dish even better than the pasta we were having, which was his favorite pasta carbonara.

There is so much flavor in this dish you will be amazed it is so full of vitamins and nutrients. I actually would recommend caramelizing the shallots (or onions) more than is shown in this picture. I was in a little bit of a hurry when I made the dish for this picture (although it still tasted great). The more caramelized the onions, the more flavor the end result will have.

While this dish takes around twenty minutes total because of the caramelization, it is very low maintenance. Start the onions and go work on other dinner preparations before taking one minute to finish the spinach dish at the last second.


Sauteed Spinach
Yield: 4-6 servings

2 TBS olive oil
1 TBS minced garlic
½ cup sliced shallots
½ tsp salt
¼ tsp cracked pepper
8-10 ounces fresh spinach
2 tsp lemon juice

Saute the garlic and shallots in the olive oil over medium high heat until they just start to brown. Add the salt and pepper. Reduce the heat and let the shallots caramelize over medium-low heat for 10-20 minutes, until they are nicely browned and sweet. Increase the heat to medium and add the spinach and lemon, tossing until the spinach is just wilted. Add more salt to taste, as needed.

Tuesday, August 24, 2010

Greek Rice

Every now and again I try a recipe that I think looks intriguing but that ends up not being that great. I'd had my eye on a stuffed squid recipe for some time. It ended up looking pretty, just as nice as the picture in the recipe book:


However, there was something about the texture of the squid (fairly rubbery) that was an unappealing contrast to the texture of the rice filling. When cooking squid, the rule is typically cook it really fast or really long; anything in between is a recipe for dining on rubber bands. Unfortunately, to obtain a safe internal temperature on the eggs in the stuffing, I think it ended up crossing the "tender" boundary... if you can ever really call squid tender.

What was a pleasant surprise was how delicious the filling was. There was more filling than was needed to fill the squid I had, so I decided to saute it up with some added scrambled egg. What a delightful combination of flavors! The contrast of the sweet currents, the tangy lemon, and the nutty edge from the pine nuts was fabulous... and beautiful! While I can't recommend the squid application, I can whole-heartedly recommend this rice dish.

You need pre-cooked rice for this dish. Either use left over rice or cook some ahead of time. You need 1 1/2 cups of cooked rice. I advise toasting the pine nuts first. Nuts just have so much better flavor when they're toasted.


Greek Rice
Yield: 4 side servings

2 TBS olive oil
2 scallions, diced
1 1/2 cups cooked rice
1/4 cup toasted pine nuts
1/4 cup currents
2 TBS minced fresh parsley
2 tsp lemon zest
3 eggs, divided

Mix the scallions, rice, pine nuts, currents, parsley, and zest with one of the eggs that has been slightly beaten in a bowl and set aside. Heat the oil in a skillet over medium-high heat. Scramble the two remaining eggs in the skillet. When the eggs are almost cooked through, add the remaining ingredients and saute, stirring regularly, until the rice is heated through.

Thursday, June 3, 2010

Crumby Cauliflower

First of all, I want to make sure that you saw correctly that this is crum-BY cauliflower and not crum-MY cauliflower. Crummy cauliflower would - by definition - be no good, and that's not what I'm about here... at least I hope not! This cauliflower is good. It definitely does not fall into the crummy category. And it's a quick, easy side dish that can add some zing to your dinner.

Back when I was just out of high school, being a silly young girl, I went and fell in love with a guy who lived in another state far, far away. Of course, that meant that I had to follow him to said state and set up playing house. While I could bore you with the details of my poor decision making skills at the tender age of 18, that's really not important here. The reason I bring it up is that I suddenly started doing a lot of cooking. For the entire time I was with this guy, it was not unusual for me to cook three meals a day. At the time, I wasn't exactly a bad cook, I was just without experience, and side dishes is where I was lacking creativity the most.

When cooking back then, I would often spend most of my time on the main course and the sides were almost an after-thought, usually a boiled or steamed vegetable and a boxed side of pasta or rice. Looking back, I don't think I realized how easy it can be to make really fabulous side dishes that can rival the best main course. This recipe is a perfect example of a simple side dish that really carries its own weight in the meal.

And here's where the crumbs come in. See that golden nugget there in the middle? There's gold in them thar hills! That nugget there is pure bliss. It's salty and slightly crunchy, buttery and chewy. The nuggets go perfectly with a vegetable that is somewhat creamy inside. Ooooo! Pavlovian response. I swear, one of these days my computer's going to short out. Must. Stop. drooling while writing posts.

So, here's how easy it is: melt a little butter over medium heat in a saute pan that has a tight-fitting lid. Add the cut up cauliflower, cover, and shake across the burner periodically to toss and turn the pieces. Be careful not to toss it too often or you won't end up with the nice, tasty caramelization. Continue cooking, about 5-8 minutes, until the cauliflower is tender through and has a nice golden crust on it.

While the cauliflower is cooking, grate a small handful of cheese. I used Gruyere here, but Parmesan would work well, too. In a small bowl or on a paper towel, toss the cheese with a few tablespoons of bread crumbs. I've used both regular bread crumbs and panko. Both are delicious. Throw in a little dried parsley and toss to mix.

When the cauliflower is about done, remove the lid and throw in the cheese mixture. Stir and then continue to cook over medium heat until the cheese mixture is cooked through and nicely golden. Some of it will stick to the cauliflower, some will stick to itself and form nuggets. It's a win-win, I tell you. Add salt and pepper to taste and serve!

Sunday, March 14, 2010

Everyday Scalloped Potatoes

I'm not sure why I haven't made this dish more... it's super easy. Spend 5-10 minutes making a gravy, a few minutes more slicing up some potatoes, put it in the oven and go do something else! And who can turn down tender slices of potato immersed in a flavorful, creamy sauce? Not this girl, that's for sure!

Perhaps, because nice even slices of potatoes are pretty important for best results, I waited to make it regularly until I had a food processor or a mandolin. Either works great. I like the slices to be about an eighth of an inch thick... mainly because I'm impatient. It seems that making the gravy/sauce causes a ticking time bomb of salivary anticipation and the longer I have to wait, the worse it gets. Therefore: thinner is better in my book.

While you can make scalloped potatoes into sin city, this everyday version is pretty tame and you can eat a decent sized serving without feeling too guilty. If you're making it for company, you can always use cream, more cheese, or more bacon... or all of the above!!

As I mentioned, you first make the sauce. This simply involves cooking the bacon, sauteing the onions, adding a slurry of milk and flour, and then - off the heat - adding the cheese. All you have to do then is mix the sauce and potato slices together and place in a greased baking dish! The last step is the trickiest... occupy yourself long enough that it can bake completely and form a nice golden top!


Everyday Scalloped Potatoes
Yield: four side servings

2 strips bacon, diced
2 medium potatoes, peeled and sliced thinly (about 1/8 inch)
1 small onion, thinly sliced
2 cups milk
1 rounded TBS flour
1/2 cup Gruyere cheese
1/2 tsp salt (or to taste - depends on how salty your bacon and cheese is)
dash fresh ground pepper

Preheat the oven to 375 degrees F. Start the bacon cooking in a skillet over medium heat. Meanwhile, peel and slice the potatoes. If for some reason, your potatoes will be sitting more than 10 minutes between slicing and mixing with the sauce, let them hang out in some water to keep from browning.

When the bacon is nicely rendered but not too browned, add the onion. Do not remove the bacon grease unless your bacon was overly fatty. A tablespoon or two of grease is necessary to flavor the dish. Saute over medium heat until the onion is soft but - again - not browned. Mix the flour with a small amount of the milk while it is still cold. Add the remaining milk slowly to form a lump-free mixture. If you are concerned there are still lumps, simply run it through a sieve as you add it to the pan. Cook the sauce over medium to medium-low heat until it thickens and just starts to simmer. Remove from the heat and add the cheese, holding back a couple of tablespoons. Stir to mix. Add the salt, but be sure to taste as you go. The bacon and cheese may add more salt than you think. Add the pepper and stir one last time.

Add the potatoes to the sauce mixture and stir to completely coat the potatoes. Pour into a greased 10x6 inch pan (or similar). Sprinkle the rest of the cheese on the top. Bake at 375 for 40-45 minutes, or until the potatoes are nice and tender and the top is golden brown. Let cool slightly before serving.

Friday, February 5, 2010

Basil & Sun Dried Tomato Polenta Rounds

So, here we are. Eight hours of driving later, I am ready to see the space shuttle lift off tomorrow night... I mean morning. 4:39 am is a bit of a challenge, but sooooo worth it. We were able to come once before a few years ago and it was also a night launch. There is something about the night turning to day that really takes your breath away.

The reason we're here is because my husband served with one of the astronauts in the Air Force and they became friends. Actually, they were friends before that, having gone to college together, but that doesn't segue into this post very well. So, I am going to focus on the Air Force connection. Work with me, here, will you?

The reason is because the Air Force is ultimately the reason that this recipe exists. The different branches of the military have all sorts of camaraderie traditions. In the Air Force, the naming ceremony is a significant one. This is where a young man or woman receives their call sign. While I won't go into the gritty details, let it suffice to say that a naming ceremony often requires the eating of bizarre items by some of the participants.

When my husband went shopping in preparation for a recent naming ceremony, he tried to find things that he felt were weird, gross, or unusual. You know: dog biscuits, potted meat, raw eggs, and... pre-cooked polenta. I guess my husband wasn't the only one who didn't know what polenta was because while a few dog biscuits and raw eggs were consumed, the package of polenta was never opened. Ergo, it came home to be put into my pantry.

And there it sat for a while, until one night I couldn't stand that it kept rolling off the shelf, so I decided to do something with it. I liked the fact that it was already formed and that I could simply slice off pieces to saute in a skillet.

But, polenta, just being cooked cornmeal, needs a bit of flavor enhancement. I decided on sun dried tomatoes, basil, and Parmesan. Not only did they turn out beautifully, but they were pretty darn tasty, too... a darn sight better than dog biscuits, that's for sure!

Basil & Sun Dried Tomato Polenta Rounds
Yield: variable

1/2 thick slices of pre-cooked polenta from a roll
olive oil

Per polenta round:
1 tsp chopped fresh basil
2 tsp minced oil-packed sun dried tomatoes
1 tsp freshly grated Parmesan cheese
dash salt and pepper

Preheat a skillet over medium heat. Add a light skim of oil. When the oil is hot, add the polenta rounds. Cook for 2-4 minutes on each side, until they have gotten a nice, golden crust. Remove the heat and add the basil, sun dried tomatoes, salt, and pepper. Let the pan's residual heat gently cook the tomatoes and basil. Serve with a sprinkling of Parmesan cheese.