Friday, October 7, 2011

Spicy Burger with Jalapeno Mayonnaise

To watch this video recipe click HERE
Hey everyone!

Today's recipes is a super easy Spicy Burger with Jalapeno Mayonnaise! I hope you like it!


Ingredients for the patty:

20 oz ground meat (any kind you like)
1/4 cup red onions
1/4 cup fresh parsley
2 tablespoons Worcestershire sauce
1/2 tablespoon ground black pepper
1/2 tablespoon salt
1/2 tablespoon dry rosemary
2 tablespoon extra virgin olive oil
1 minced jalapeno pepper in Escabeche sauce (pickled can of jalapenos)
1 tablespoon of the escabeche sauce


Ingredients for the Jalapeno mayonnaise

1/4 cup mayonnaise
1 tablespoon Dijon mustard
1/2 tablespoon Worcestershire sauce
1 tablespoon escabeche sauce from the jalapenos
1-2 minced jalapenos

Ingredients to serve/garnish the patties.

Sandwich thins or any other kind of hamburger bun you like
bacon slices
cheese slices
red onion slices
tomato slices
more jalapenos in escabeche sauce (optional)


Preparation:

Jalapeno Mayonnaise:

Combine a 1/4 of a cup of mayo with a tablespoon of each: Dijon mustard and escabeche sauce
plus 1-2 minced jalapeno peppers. Season with a pinch of ground black pepper and 1/2 tablespoon of Worcestershire sauce. Mix well and refrigerate until ready to use.

Onion Slices:
Drizzle the onions with 2 tablespoons of escabeche juice and season with salt and ground black pepper, let the onions marinate in the sauce for about 10-15 minutes while you prepare the patties.

To make the parties:
Combine the ground meat with the red onion and fresh parsley, season with half a tablespoon of each: rosemary, ground black pepper and salt. Also mix in 2 tablespoons of Worcestershire sauce and 2 tablespoon of olive oil plus 1 tablespoon of the Jalapeno juice/sauce, also add 1 minced jalapeno pepper.

Using a fork or with your hands combine all the ingredients together. Do not over mix.
Divide the meat mixture into 4-6 equal size section to make the patties.

For easy cleaning line your baking sheet with foil and spray with cooking spray to prevent he patties from sticking to it.

Make the patties slightly bigger than the bread/bun you will be using. They will shrink slightly in the oven.

Drizzle about 1 teaspoon of Worcestershire sauce over each patty. Spread the sauce evenly. Bake at 400° for 15-20 minutes or until the patties are cooked. (1 inch to 1 1/2in patties. Bigger patties will take longer to cook 20-30 min.) (If you have time, refrigerate the patties before cooking for about 30 minutes. OPTIONAL)

Also bake the bacon and the onion slices at the same temperature with the patties for about 8-10 minutes or until the bacon is slightly brown and crisp.

If you prefer, these patties can be grilled, or pan fried, for about 6-7 minutes on each side.

Toast the bread very slightly just to add a nice crunch to it. Slice it in half and spread each half with the jalapeno mayonnaise. Start building your burger.

Mine has a layer of lettuce, followed by a patty, a cheese slice,topped by a second patty drizzled with more mayonnaise, followed by the onions, tomatoes and finally the bacon.


Add french fries to complete the dish and that's it enjoy!!

Marcy's Barbeque Chicken Salad

Marcy's BBQ Chicken Salad
(Family size)
1 pound skinless, boneless Chicken breast*, brush with barbecue sauce and BBQ on the grill or in oven. Cut into bite-size pieces (2 cups cooked chicken)
8 cups mixed greens (Romaine with some spring mix is good)
1 red apple, core, cut in bite size pieces, leaving on the red peel
(toss with a little lemon juice to keep white)
1/2 cup corn kernels (frozen or defrosted – doesn’t matter)
1/2 cup spicy peanuts
1/3 cup chopped red onion
2 Tbs. chopped cilantro
1 cup tortilla thin strips, or slightly crushed reg. tortillas chips, blue or plain
1 cup dressing , ¾ cup ranch dressing mixed with
¼ cup *barbecue sauce
1 cup blue cheese or *shredded cheese, mix cheddar and jack
*if it’s a non-blue cheese group

Toss ingredients together except for dressing and chips. Let people serve themselves the amount of dressing they prefer. Serve chips to the side so don’t get soggy.
Serves 6-8 generously

Wednesday, October 5, 2011

Cottage Cheese

I received an email last week asking about dry curd cottage cheese and whether my Super Easy Cheese would be similar. Unfortunately, they are not the same. The good news is that even though it is often hard to find dry curd cottage cheese at the market, it is fairly easy to make at home. The recipe I am about to show you will make regular cottage cheese or dry curd cottage cheese; the main difference is whether you add additional cream at the end.

I think the only hang up with this cheese is the length of time it must sit. It requires a packet of starter (available from cheese supply companies) but no rennet. As such, it must develop curds solely through bacterial action. That takes time... almost a full day. Fortunately, the actual work time in this cheese is fairly minimal. Here's how it goes:

First, pour a gallon of milk into a heavy duty, nonreactive pot. You can use any type of cow's milk from skim to whole. I used 1% for a nice low fat product. Heat the milk to 72° F. Because most of us have to use store bought, homogenized milk, it helps to add a little calcium chloride. Homogenization makes it a little harder for the milk to form firm curds and the calcium chloride helps to mitigate this issue. Add the calcium chloride mixed with a little water after the milk has reached this target temperature.

Add the starter packet, stir, and then cover. Set aside to let the milk set for about a day. Shoot for a room temperature around 70-74° F. After a day, the milk should have set and show a clean break. A clean break is where when you cut the milk, you can still see the cut when the knife is removed.

Cut the curd into roughly 1/4 inch pieces. Cut one way and then at an angle the other way. Don't forget that you need to cut the curds in pieces from the bottom of the pot up to the top as well. Let the cut curds sit for 15 minutes. See how you can clearly see the break in the curd in this picture? If your mixture does not do this, it probably needs to set a little longer.

Heat the curd gently, increasing the temperature slowly to 100° F and then hold at this temperature for 10 minutes. Stir periodically. If some of your curds seem a little too large, don't worry, they'll break down as you heat and stir them. Increase the temperature to 112° F slowly (about a degree per minute). Once at 112° F, hold this temperature as best you can, stirring regularly until the curds are firm. The whey will be completely separated from the curds long before they are firm. Go here if you need a picture of what the whey looks like when separated from the curds. This last firming step can vary in time, but be prepared for anywhere from 30-60 minutes.

You can test curd firmness by squishing one between your fingers. You want to have a little resistance, not pudding. When the curds are firm enough, drain them into a cheesecloth lined colander. Let drain. Meanwhile, prepare a bowl of cold water in which to wash the curds. Dip the curd filled cheesecloth into the cold water. This step has two purposes. First, it chills down the curds, firming them and it also rinses the curd to reduce their sour flavor. If you like more sour curds, only dip them the once. If you prefer a more mild cottage cheese, dip the curds a few times, changing the water between dips. Remove the curds from the water bath and let them drain for about five minutes.

Dump the drained curds into a bowl. Use a spoon to stir the salt into them, breaking up any clumps that may have formed. At this point, you have dry curd cottage cheese. If you prefer the more traditional style, simply mix in a little cream.

Curds may be stored in an airtight container in the refrigerator for up to one week. Eat plain or with fruit, or use in cooking. This is a versatile, flavorful cheese!

NOTE: You may find that you have a hard time keeping the milk at the exact temperatures specified. Don't fret. In my experience, you do the best you can and it works out fine. Just remember to check the temperature of the milk in the middle of the pot (versus the edge) and stir frequently to avoid hot spots.


Cottage Cheese
Yield: 1 1/2 pounds
Adapted from Ricki Carroll's Home Cheese Making

1 gallon milk (skim, 1%, 2%, or whole)
1/8 tsp calcium chloride in 1/4 cup distilled water (optional)
1 packet direct-set mesophilic starter
1 tsp kosher salt (or to taste)
cream (optional)

Heat the milk in a heavy pan to 72° F. Stir in the calcium chloride mixture, if using. Then add the starter and stir. Cover and let sit in a 70-74° F room for 18-24 hours.

At this point, the curds should have set and the milk should show a clean break. Cut the curd into 1/4 inch cubes. Let sit for 15 minutes and then begin heating gently up to 100° F. Hold at 100° F for ten minutes, stirring occasionally. Increase the heat slightly and heat slowly (aim for 1 degree per minute) until the curd reaches 112° F.

Hold the milk at 112° F, stirring regularly, until the whey separates from the curd completely and the curds become firm. The whey will separate long before the curds are firm. Times may vary widely depending on your milk; be prepared for 30-60 minutes. Test the curd's firmness by squeezing one between your fingers; it should have some resistance and not squish like pudding.

Once the curds are firm enough, drain them in a cheesecloth lined colander. Fill a bowl with cold water and rinse the curds. If you prefer a milder flavored cheese, rinse 2-3 times, changing water between each dip. Drain the curds for five minutes and then pour into a large bowl. Salt the curds, mixing to evenly distribute. At this point, you have dry curd cottage cheese. If you prefer and more traditional style, add cream to taste. Cheese will keep in a refrigerated air tight container for one week.

Tuesday, October 4, 2011

Spaghetti and Meatballs


To watch this video recipe click HERE!

Hi everyone, today's recipe is a super easy Spaghetti and Meatballs!
I hope you like it! This is they kind of food I like to eat when I'm feeling down! I am not Italian, but I love comfort food and there is nothing more comforting than a big plate of Spaghetti and meatballs! Enjoy!

Serves 4-6
Ingredients:

20 oz (1.25 lbs)  Ground meat(I used turkey, feel free to use any kind of ground meat you like)
3 bacon slices
1/2 cup dry breadcrumbs
2 tablespoons flour
2 teaspoons minced garlic
1 tablespoon fresh thyme
1/3 cup of fresh parsley plus a little more for garnish
1/4 cup chopped green onions
1 egg
1 package of spaghetti (1/2 the package is enough for 2-3 servings)
1 jar of your favorite pasta sauce.( I love Prego Chunky Combo)
2 tablespoons Italian seasoning
crushed red pepper
salt and ground black pepper to taste
2 garlic cloves
2 bay leaves
2/3 cup white wine
3 tablespoons extra virgin olive oil
1 tablespoon Worcestershire sauce

In a large pan, heat up 1 tablespoon of extra virgin olive oil and cook the bacon until brown. Remove from the pan, let it cool and chop into small pieces.

Combine the ground meat with the garlic, thyme, parsley and green onions. To the meat mixture, also also add in the flour and the breadcrumbs. Combine all the ingredients with a fork, and season with 2 tablespoons of Italian seasoning, 1/2 teaspoon of crushed red pepper
1 teaspoons of salt add in the egg, mix again with a fork and finally add 1 tablespoon of each olive oil and Worcestershire sauce, also add in the chopped bacon, stir all together to make sure all the ingredients are incorporated.

Make the meatballs. Grab some of the meat mixture with your hands and roll it into ball.
keep on reaping this step until you are done with the meat. (Make the balls as big or as small as you prefer.)

In the same pan where you cook the bacon, on medium heat, add 1 more tablespoon of oil, cook the meatballs for about 3-4 minutes on each side or until they become slightly brown.

Once the balls are brown on all sides, add in the white wine and cook until the wine reduces to half. Once the wine is reduced, add in the pasta sauce and 1 cup of water, (add more water if the sauce is too thick). Stir and taste the flavor, add more salt and ground black pepper if needed. (Add Italian seasoning if you prefer.) Reduce the heat to low, put on the lid on and cook until the sauce starts to boil. (for about 10 minutes)

Cook the spaghetti in salted boiling water, with 2 garlic cloves, 2 bay leaves and a little bit of olive oil. Cook until al dente. Drain and set aside...

To keep the pasta nice and warm, heat up your plate in the microwave for about 1-2 minutes.

Serve the Meatballs and sauce over the spaghetti. Garnish with fresh parsley and Parmesan cheese.

If you prefer, stir the pasta with the meatballs and sauce in the same pan.
Garnish with fresh parsley and Parmesan cheese and serve.

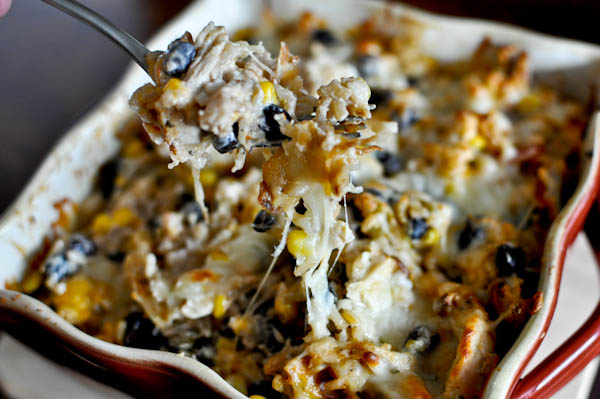
Microwave Chicken Tortilla Casserole

Photo from realmomkitchen.com


This sounds weird but it was really, really good and who doesn't love a really fast meal?  Definitely a keeper!


Microwave Chicken Tortilla Casserole
Recipe from realmomkitchen.com

  • 2 cooked chicken breasts, shredded or diced (this is about 2 cups)
  • 1 cup sour cream
  • 2 cup shredded cheddar cheese, divided
  • 1 cup french fried onion, divided
  • 1 (4 oz) can chopped green chilies
  • 1 pkg taco seasoning
  • 1 Tbsp dried cilantro or 3 Tbsp fresh
  • 2 (10 inch) flour tortillas (the big burrito sized ones)
  1. In a large bowl, combine the chicken, sour cream, 1 cup of the cheese, 1/2 cup of fried onions, chopped green chilies, taco seasoning, and chopped cilantro. Mix until well combined combine.
  2. Cut up one of the tortilla into 1 inch pieces using a pizza wheel.  Add to the chicken mixture and stir until blended in.
  3. Place the  remaining tortilla into a 9 inch pie plate, this will create  the crust for your pie.  Spoon the mixture into the tortilla/crust.
  4. Place in microwave and microwave on high for about five minutes. Sprinkle the pie with the remaining cheese followed by the fried onions. Microwave for one minute more, or until cheese is melted. Keep in mind that microwave varies, so cooking time may vary too.  Makes 6 servings.

Saturday, October 1, 2011

Parmesan Potatoes

Behold the most delicious potatoes ever! My mom made these for our family while we were growing up, and they have always been one of my favorite dishes. My only complaint is that she would stack the potatoes too much. As you might imagine, the best part of these potatoes is that golden, delicious crust on the outside of each slice. If you stack the potatoes too much, then only a small percentage of the potatoes have that crust. That state of being is an unfortunate and unnecessary occurrence. You may need to use a larger pan, or even two pans, so that the potatoes are spread as close to one layer thick as possible, but it is really, really worth it.

The other thing I want to throw out there is that potatoes have really gotten a bum rap lately... kind of like what eggs went through in years past. While, obviously, if you always eat your potatoes deep fried or mashed with a stick of butter, they are not a very good meal choice. By themselves, however, potatoes are a healthy and delicious addition to any meal. They're definitely a better choice than pasta. In fact, serving for serving, I would even argue that potatoes are a better choice than brown rice! I love this nutrition data site and suggest you go compare the nutrition data of potatoes with your other side dish options if you have been hesitant to eat potatoes lately.

This dish is nice because you get all the flavor and "pow!" of a sinful side dish while actually being quite restrained. You can use any kind of potato. In this case, I used little red potatoes, but you can use russets or Yukon Gold, or... whatever. I like to leave the skin on. I like the way it looks; I like the way it tastes. Plus the skin has a large percentage of the fiber and nutrients of the potato. Slice the potatoes thinly, about 1/8 of an inch. I use a mandolin, but you can slice them the old fashioned way or with a food processor.

Be sure you've started your oven to preheating to 425° F. Spray a baking sheet with cooking oil. Place your potato slices in a bowl and toss with a little bit of melted butter. You only need a tiny bit! The potatoes just need to have a little bit of a sheen from the butter (or oil, if you prefer).

Lay the potato slices out on the baking sheet as close to one layer thick as possible. In this case, I had plenty of room on my baking sheet. When things are a little tighter, I use a shingle pattern to maximize my use of space. Sprinkle the slices with a little salt (go easy, Parmesan is already pretty salty), some pepper, a little grated Parmesan cheese (I use the stuff in the green can for this application), and a little bit of paprika.

Bake until the potatoes are cooked through and golden. Depending on how many you are baking, it could be anywhere from 20-40 minutes. For best results, serve immediately!

Parmesan Potatoes
Yield: 4 side servings

3-4 cups of sliced (1/8 inch thick) potatoes
1 TBS melted butter
3 TBS grated Parmesan cheese
dash paprika
salt & pepper to taste

Toss the potatoes in the melted butter. Lay out on a greased baking sheet as close to one layer thick as possible. Sprinkle with cheese and paprika. Salt and pepper to taste. Bake in a 425° F oven until the potatoes are cooked through and golden. Baking time will depend on how thickly you stack your potatoes, but start checking after 20 minutes. Serve immediately.

Friday, September 30, 2011

Cheesy Chicken and Rice Bake

Photo from howsweeteats.com

This is the perfect meal to use up a bunch of leftovers, such as rice and chicken.  Wasn't my favorite meal ever but the practicality of it has it's worth!


Cheesy Chicken and Rice Bake
Recipe from howsweeteats.com


serves 4-6
2 boneless, skinless chicken breasts, grilled and shredded
4 cups cooked brown rice
3/4 cup frozen corn
1 15 ounce can black beans, drained and rinsed
1 cup plain greek yogurt (you can use sour cream)
1 4 ounce can green chilis
1/2 cup chunky salsa
1 cup grated cheddar & monterey jack cheese (low-fat cheese works too!) + more for topping if desired
cilantro for garnish

Preheat oven to 350. In a large bowl, combine all ingredients except for cilantro and mix thoroughly to combine. Make sure the yogurt and cheese is stirred in throughout the entire bowl. Season with salt and pepper if desired. Transfer to an oven-safe dish and top with extra cheese if you would like. Bake for 20-25 minutes, or until heated through. Garnish with chopped cilantro.

To make this process easier, I always have cooked chicken on hand, and use Uncle Ben’s Ready Rice. If you have those two things, this mean can be throw together in a matter of minutes! It can also easily be made ahead of time and reheated.