Cereal is the name given to those seeds used as food (wheat, rye, oats, barley, corn, rice, etc.), which are produced by plants belonging to the vast order known as the grass family. They are used for food both in the unground state and in various forms of mill products.
The grains are pre-eminently nutritious, and when well prepared, easily digested foods. In composition they are all similar, but variations in their constituent elements and the relative amounts of these various elements, give them different degrees of alimentary value. They each contain one or more of the nitrogenous elements, gluten, albumen, caseine, and fibrin, together with starch, dextrine, sugar, and fatty matter, and also mineral elements and woody matter, or cellulose. The combined nutritive value of the grain foods is nearly three times that of beef, mutton, or poultry. As regards the proportion of the food elements necessary to meet the various requirements of the system, grains approach more nearly the proper standard than most other foods; indeed, wheat contains exactly the correct proportion of the food elements.
Being thus in themselves so nearly perfect foods, and when properly prepared, exceedingly palatable and easy of digestion, it is a matter of surprise that they are not more generally used; yet scarcely one family in fifty makes any use of the grains, save in the form of flour, or an occasional dish of rice or oatmeal. This use of grains is far too meager to adequately represent their value as an article of diet. Variety in the use of grains is as necessary as in the use of other food material, and the numerous grain preparations now to be found in market render it quite possible to make this class of foods a staple article of diet, if so desired, without their becoming at all monotonous.
In olden times the grains were largely depended upon as a staple food, and it is a fact well authenticated by history that the highest condition of man has always been associated with wheat-consuming nations. The ancient Spartans, whose powers of endurance are proverbial, were fed on a grain diet, and the Roman soldiers who under Caesar conquered the world, carried each a bag of parched grain in his pocket as his daily ration.
Other nationalities at the present time make extensive use of the various grains. Rice used in connection with some of the leguminous seeds, forms the staple article of diet for a large proportion of the human race. Rice, unlike the other grain foods, is deficient in the nitrogenous elements, and for this reason its use needs to be supplemented by other articles containing an excess of the nitrogenous material. It is for this reason, doubtless, that the Chinese eat peas and beans in connection with rice.
We frequently meet people who say they cannot use the grains, that they do not agree with them. With all deference to the opinion of such people, it may be stated that the difficulty often lies in the fact that the grain was either not properly cooked, not properly eaten, or not properly accompanied. A grain, simply because it is a grain, is by no means warranted to faithfully fulfil its mission unless properly treated. Like many another good thing excellent in itself, if found in bad company, it is prone to create mischief, and in many cases the root of the whole difficulty may be found in the excessive amount of sugar used with the grain.
Sugar is not needed with grains to increase their alimentary value. The starch which constitutes a large proportion of their food elements must itself be converted into sugar by the digestive processes before assimilation, hence the addition of cane sugar only increases the burden of the digestive organs, for the pleasure of the palate. The Asiatics, who subsist largely upon rice, use no sugar upon it, and why should it be considered requisite for the enjoyment of wheat, rye, oatmeal, barley, and other grains, any more than it is for our enjoyment of bread or other articles made from these same grains? Undoubtedly the use of grains would become more universal if they were served with less or no sugar. The continued use of sugar upon grains has a tendency to cloy the appetite, just as the constant use of cake or sweetened bread in the place of ordinary bread would do. Plenty of nice, sweet cream or fruit juice, is a sufficient dressing, and there are few persons who after a short trial would not come to enjoy the grains without sugar, and would then as soon think of dispensing with a meal altogether as to dispense with the grains.
Even when served without sugar, the grains may not prove altogether healthful unless they are properly eaten. Because they are made soft by the process of cooking and on this account do not require masticating to break them up, the first process of digestion or insalivation is usually overlooked. But it must be remembered that grains are largely composed of starch, and that starch must be mixed with the saliva, or it will remain undigested in the stomach, since the gastric juice only digests the nitrogenous elements. For this reason it is desirable to eat the grains in connection with some hard food. Whole-wheat wafers, nicely toasted to make them crisp and tender, toasted rolls, and unfermented zwieback, are excellent for this purpose. Break two or three wafers into rather small pieces over each individual dish before pouring on the cream. In this way, a morsel of the hard food may be taken with each spoonful of the grains. The combination of foods thus secured, is most pleasing. This is a specially advantageous method of serving grains for children, who are so liable to swallow their food without proper mastication.
Showing posts with label Breakfast. Show all posts
Showing posts with label Breakfast. Show all posts
Thursday, July 4, 2013

Friday, April 19, 2013
Homemade Instant Oatmeal

I assumed going into this motherhood thing that, since I had a fair amount of childcare experience, I had it all figured out. What I hadn't realized, having always taken care of children six months and older, is that infants are quite a bit more time consuming than I had anticipated. I guess it's hard to entertain yourself when you can't sit up on your own, let alone reach out and hold something. On top of it all, my little boy is opposed to sleep. Oh, he sleeps great at night. In fact, last night, I got over six hours in a row and then a few more to boot! The problem is that my boy, who is almost ten weeks old now, doesn't like to nap much during the day. I looked up online how much infants should be napping at his age and it says around five hours a day. I'm lucky to get two out of him most days. The good news is that he isn't crabby with that little sleep. He's wide eyed and bushy tailed and ready to face the world... if only he could interact with it more!
As you might guess, between this sleep issue and keeping him fed, there isn't a huge amount of time for playing in the kitchen, but I've been making a concerted effort lately. I miss that tasty, creative outlet! So, in the last week, I've developed three new recipes. Of course, now the trick is to have the time to post them!
The first recipe I put together is for a homemade instant oatmeal. Once you've made the mix and put it in the pantry, you can prepare a serving in less than a minute and it is very, very tasty. It took me a few tries to get the flavor right, but I definitely think I've got it now. It's a brown sugar and maple flavored oatmeal with just a hint of cinnamon and vanilla. Very satisfying.
As I've mentioned before, muffins are usually my go to breakfast; it's my husband that's been consuming all the instant oatmeal up to this point (although that may change now!). As you might imagine, it galled me just a bit every time I put that box in the grocery cart. I just knew I could do better and cheaper. This recipe makes six servings for less than a buck. It looks very similar to what comes out of the box, doesn't it? But it doesn't have all those fillers in it! Just oats, salt, brown sugar, cinnamon, vanilla, and real maple syrup.

You start by mixing a portion of the oats with all the flavorings and then baking to dry it out and make it shelf stable. You then grind up that mix in a food processor (I suppose a blender might work too) until it is fairly finely ground. Finally, mix in the remaining oats and put it in a jar in the pantry. That's it!

Obviously, you can make the servings as large or as small as you want and add the water to your taste, but as a general guide, five tablespoons of dry mix makes a serving. That's approximately 40 grams. A Quaker Instant Oatmeal serving is 34 grams and has 120 calories. Based on the nutritional information and measurements for my recipe, it comes to about 170 calories a serving. If it was a similar serving size as the Quaker, it would be 145 calories. Why the difference? It's not that my version is sweeter. I think it has to do with the fillers they have in there. 34 grams of oats have 128 calories. Oats are less calorie dense than sugar, so to be able to have only 120 calories per serving, there must be a bunch of other, very low calorie stuff in there... perhaps the guar gum, sucralose, or calcium carbonate.
Homemade Instant Oatmeal
Yield: 6 servings
1/2 tsp table salt
5 TBS packed light brown sugar
1/8 tsp ground cinnamon
2 TBS real maple syrup
1/4 tsp vanilla
1 1/2 cup quick oats, divided
Preheat the oven to 250 degrees F. In a small bowl mix the salt, brown sugar, cinnamon, maple syrup, and vanilla. Add 1/2 cup of the oats. Stir to completely mix. Sprinkle out on a sheet pan lined with parchment. Bake for 30-40 minutes, stirring once, until the mixture is dry looking. Remove from the oven and let cool completely. Once cool, place the mixture in a food processor and process until the mix is fairly finely ground. Pour into a glass jar. Add the remaining cup of oats and shake to mix. Store tightly capped for maximum freshness. This recipe can be multiplied as many times as necessary to obtain the desired amount of mix.
To prepare the oatmeal, spoon 5 tablespoons of the instant oatmeal in a bowl. Add between 1/3 and 1/2 cup very hot water and stir. Let sit 30 seconds, stir again, and enjoy. The amount of water you use will be a matter of personal preference. Using 1/3 cup of water will lead to a thicker, more pasty oatmeal while 1/2 cup will be somewhat watery. Personally, I think halfway between is the perfect balance.
Saturday, April 6, 2013
Breakfast Enchiladas

I made these breakfast enchiladas for our blessing brunch. They are so, so good and very easy to make. The recipe is technically an overnight recipe (make it the night before and bake it the next day) but the first time I made it I just cooked it right away and the second time I put together the burrito the night before and then poured the egg mixture on the next morning and baked it right away. Super good and super tasty. You can just add whatever you want into the burrito!
Breakfast Enchiladas
Recipe from Inspired Taste BlogWhy we love this recipe. You can prepare these enchiladas the night before, refrigerate overnight then bake in the morning. These are perfect for brunch or entertaining in the morning.
What you need to know. We kept the recipe below quite simple with ham, cheese and peppers, but feel free to add your favorite ingredients. Cooked bacon or sausage would be great as well as other vegetables like mushrooms.
Equipment you’ll need. You will need a 13×9-inch (3-quart) glass baking dish, two large bowls and a whisk.
Created By: Joanne and Adam Gallagher
Serves: 6
Ingredients
- 2 cups (151 grams) diced cooked ham
- 1 bell pepper, diced
- 8 green onions, finely sliced
- 2 cups (227 grams or 8 ounces) shredded cheddar cheese
- 10 eight-inch flour tortillas
- 6 eggs
- 2 cups (473 ml) half-and-half
- 1 tablespoon all-purpose flour
- 1/2 teaspoon kosher salt
Method
Prepare Baking Dish
- Lightly spray 13×9-inch (3-quart) glass baking dish with cooking spray.
Roll Tortillas
- In large bowl, stir together ham, bell pepper, green onions and 1 cup of the cheese. Place 1/3 cup of the ham mixture down the center of each tortilla; roll up and place seam side down in baking dish.

Prepare Egg Mixture
- In large bowl, whisk eggs, half-and-half, flour and the salt. Pour over the tortillas. Cover then bake or refrigerate overnight to be baked in the morning.

Bake Enchiladas
- Heat oven to 350 degrees F (177 degrees C). Uncover baking dish then scatter the remaining cup of cheese over enchiladas. Cover baking dish with aluminum foil and bake for 35 minutes. Uncover, and then bake 10 to 15 minutes longer or until set and cheese melted.
Saturday, March 16, 2013
Cinnamon Rolls - Mastered!

My in-laws showed up yesterday to come meet their newest grandson. I feel fortunate to have such a great relationship with my in-laws such that I am excited for their visit. It helps that my mother-in-law is great with babies and this has allowed me to get a few things done around here. To celebrate the first morning of their visit, I decided to make a pan of cinnamon rolls.
Now, I posted my recipe for cinnamon rolls a long time ago. You can see that post here. However, while the basic recipe has remained the same, there have been a number of changes that have turned these rolls from good to super-freaking fantastic. I used to have a hard time passing by a Cinnabon when out and about, but now it's not a problem. I like these rolls better! It's amazing what a difference a few subtle changes can make. You may want to read through my last post first if you are not familiar with the general gist of how cinnamon rolls are made. In this posting, I will focus on the changes to the recipe and then will re-post the recipe in full at the end in case you want to print it out.
The first major change was in the filling. I'm not sure why it makes such a big difference, but changing from regular sugar to brown sugar completely changes the way the filling melts. If you mix the butter and sugar together first into a paste, along with the cinnamon, it melts even better and makes a nice gooey filling. Here you can see the dough rolled out with the filling spread out on it.

The nest major change was the way that I rolled the dough. If you look at my pictures in my original post, you'll notice just how thick the dough was when I rolled it up. That resulted in rolls that were very bread-y without a lot of that delicious filling. I now roll the dough almost as thin as I can manage. I shoot for no thicker than one quarter of an inch now. In my experience, it is imperative to have the dough cold to manage this. That's why I put the dough in the refrigerator for a second proofing. Roll the dough up and then use a serrated blade to cut perfect rolls.

Compare this photo with the similar one in the previous cinnamon roll post and you can see just how many more rolls you get in the dough when it is rolled thinly. It leads to a much better balance of dough and cinnamon/sugar filling.

You can see here how that filling melts so much better than in my previous recipe. The last change that I made to the recipe was in the icing. Adding a little cream cheese to the icing, with that little bit of tang it imparts, is absolutely divine and really puts these rolls over the top. My goodness, these things are delicious! Be sure to have a plan for all twelve rolls or you may find them all in your own tummy!

Cinnamon Rolls - Mastered!
Yield: 12 rolls
2 1/4 tsp instant yeast
1 1/4 cup warm milk
1/4 cup sugar
1/4 cup shortening
1 tsp table salt
3 whole eggs
4 to 4 1/2 cups flour
1/2 cup butter (one stick)
3/4 cup brown sugar
3 TBS cinnamon
4 ounces softened cream cheese
2 cups powdered sugar
1-2 TBS milk
Mix the first 6 ingredients together in the bowl of a stand mixer (through the eggs). Add two cups of the flour. Mix on medium with a paddle for 3 minutes. Add the remaining 2 to 2 1/2 cups flour. The amount of flour can vary depending on the humidity of your kitchen. You are looking for a dough that is still somewhat soft and sticky. It will become more workable after it rises and is chilled.
Place the dough in a grease bowl, covered with plastic wrap, until it is doubled. Knock down the dough and refrigerate for 2 hours (and up to 24 hours). Turn the cold dough out onto a floured counter. Roll out into a rectangle as thin as the dough will reasonably allow; shoot for less than 1/4 of an inch. The rectangle will be approximately 20 inches by 12 inches. Beat together the softened butter, brown sugar, and cinnamon. Heat gently in the microwave if it is not soft enough to spread on the dough. Spread the mixture evenly on the dough. Roll up tightly and slice, using a serrated blade, into twelve rolls. I trim off the ends before slicing so each roll has a nice look to it.
Place the rolls in a greased 9x13 inch pan. They also fit nicely four to a pan in 8" disposable aluminum pans if you want tot gift them. Cover the pan with plastic wrap and allow the rolls to rise for 30 minutes or until slightly puffy. Preheat the oven to 350 degrees F. Remove the plastic wrap and bake rolls for 25 minutes or until baked through and gently golden. Remove rolls from the oven and cool for 15 minutes before icing.
Beat the cream cheese, powdered sugar, and milk together until it forms a smooth icing. It will be too thick to pour. Spread the icing over the rolls. Serve immediately or store in an airtight container and reheat in the microwave before serving.
Friday, January 25, 2013
Classic Bran Muffins

photo courtesy of allrecipes
So, living in the "country" definitely has it's benefits, but also it's drawbacks. Last night we ran out of propane, and no propane = no heat or hot water. This morning our house was 53 degrees. Brrr! Outside it is 19 degrees and it is supposed to snow today. I was craving something warm for breakfast, so I was happy to find this bran muffin recipe. I made it vegan by substituting rice milk for the buttermilk, and it turned out delicious!
Classic Bran Muffins
adapted from Allrecipes.com
1 1/2 cups wheat bran (I used bran flakes)
1 cup buttermilk (substitute rice milk or any other milk)
1/3 cup vegetable oil
1 egg
2/3 cup brown sugar
1/2 tsp. vanilla
1 cup flour
1 tsp. baking powder
1 tsp. baking soda
1/2 tsp. salt
1/2 cup raisins
Preheat oven to 375 degrees. Line muffin cups or spray with cooking spray. Mix together wheat bran and milk. Let stand for 10 minutes.
Beat together oil, egg, sugar, and vanilla and add to milk/bran mixture. Sift together flour, baking soda, baking powder, and salt. Stir flour mixture into bran mixture, just until blended. Fold in raisins and spoon into muffin cups.
Bake 15-20 minutes. Enjoy!
Thursday, December 27, 2012
English Muffins

I hope you had a wonderful holiday. Since I'm in my last month before our new arrival arrives, I've been on restricted travel... I wasn't allowed to drive fourteen hours to spend Christmas with the family this year! It's the first time in the almost ten years that we've been married that my husband and I spent the day at home alone. It was relaxing, but I think I prefer the wonderful chaos of our normal routine better.
Being stuck at home, we decided we could celebrate our time together by splurging on our meals. I prepared some items I've never prepared before and enjoyed some other special meals that I only get to make rarely. Christmas eve we enjoyed a small prime rib. For Christmas day dinner, I made a roasted duck. This is the second time I've roasted a whole duck, and while it was darn tasty, it sure did make a mess of the oven! Last night was the finale of our gluttonous extravaganza. I made a roasted rabbit with mashed potatoes and gravy; boy was it tasty!
Surprisingly, probably the most challenging meal I made was breakfast on Christmas morning. I've been playing with an English muffin recipe and I know how much my hubby loves a good eggs Benedict, so I figured I'd give it a go. There were two components in this dish that I had never made before: poached eggs and Hollandaise sauce. I'll talk more about eggs Benedict in a future post, but let it suffice to say for now that these English muffins played a wonderful supporting roll.
Now, while we're on the subject of English muffins, lets talk about nooks and crannies. Those round holes you see in so many brands of commercial English muffins? Yeah, that's not traditionally an English muffin feature. You find those holes in crumpets, which also are also an English bread and are also cooked on a griddle, but are made from a looser batter and require rings to make. The traditional English muffin looks more like regular bread inside when split. It still holds the butter nicely when toasted though, so don't you worry!

The first step is to mix the dough. Mix the dough at least the night before you plan on making the muffins. For a more robust flavor, you can actually make the dough 2-4 days in advance. This extra fermentation time in the refrigerator helps to develop a very nice flavor, but they're still good when made after only twelve hours. The dough mixes together nicely and does not need to be kneaded for an exceptionally long time. When ready, dump the dough in a greased bowl, cover with plastic wrap and stash in the refrigerator. It will swell up nicely and do some lovely yeasty things.

When ready to make the muffins, lightly flour the counter and dump out the dough. Sprinkle the dough with a little flour too and roll it out until about one-quarter of an inch thick. Make sure you roll it thin enough. One time I didn't and I ended up with English muffins that looked like the Sears tower! They were crazy! Cut out using a 3 1/2 inch round cutter (or something similar). A nice sharp cutter is preferred because you don't want the dough on the edges to get sealed together as this can inhibit the muffins from puffing properly. If you only roll once, you should get about 8 muffins out of the dough; if you re-roll the scraps, you can get up to 14 muffins. Please note, however, that once you try to re-roll the dough, you'll be waging an uphill battle against gluten.

Place the muffins on a sheet tray sprinkled with cornmeal or farina (Malt-O-Meal or Cream of Wheat cereal). I prefer the look and taste of the farina, personally. In this picture, you're looking at cornmeal. Sprinkle the tops of the muffins as well and then loosely cover with plastic wrap. Let rise in a warm place until they have doubled in volume. Be sure to let them rise fully. If you try to cut this step short, most likely you will end up with dense, doughy English muffins.

When they are done rising, preheat your electric griddle to 325F. You can do this step on the stove, but I find being able to easily manage the temperature is a real plus here. Cook the muffins for two minutes on one side.

Give them a flip and let them cook another 5-7 minutes on the other side. If they do not have a nice golden color on them when you complete this first flip, you may want to hold off a bit longer and evaluate your griddle temperature.

This photo shows the second side once it has finished cooking as well. You see how it is not as flat as the first side? The first side cooking time is short for a reason. If you let the first side go too long, the top of the muffin gets too rounded and you end up with a smaller and smaller flat spot on the top of this second side, leading to a domed muffin instead of a nice flat muffin. In my experience, two minutes is a nice compromise between color development and maintaining as flat a second side as possible.

Let muffins cool slightly before slicing and toasting. While you can fork split these muffins, I almost prefer them cut open. Give it a try both ways and see which one appeals most to you. These muffins are great by themselves (as shown at the beginning of this post) or as part of a smashing eggs Benedict. Freeze the leftovers (I slice mine apart first), and you can enjoy homemade English muffins whenever the mood hits!

English Muffins
Yield: 8 - 14 3-1/2 inch muffins (depending on whether you re-roll the scraps)
3 cups bread flour
1 tsp table salt
1 1/4 cup milk
2 tsp sugar
2 tsp instant yeast
2 TBS vegetable oil
Mix all ingredients together and knead by hand or in a stand mixer for 5-7 minutes. Dough should come together but still be somewhat sticky. Place the dough in an oiled bowl and cover with plastic wrap. Place in the refrigerator at least overnight, but up to four days. The ideal time from a flavor/yeast development standpoint is probably on day three (let sit two nights in refrigerator).
When ready to make the muffins, pull the dough from the refrigerator and dump out onto a lightly floured counter. Sprinkle the dough with a little more flour and roll immediately until the dough is 1/4 inch thick. You should be able to cut eight 3 1/2 inch rounds without having to re-roll the dough. If you want to use all of the dough now, re-roll to obtain up to 14 rounds. The gluten will start to fight you as soon as you start re-rolling. Let the dough sit a few minutes to allow the gluten to relax a bit if it gets too frustrating.
Place rounds on a sheet pan generously sprinkled with farina (Malt-O-Meal or Cream of Wheat cereal) or cornmeal. Sprinkle the tops of the muffins as well. Loosely cover with plastic wrap and let rise in a warm place until double. Be sure to let them rise fully or you may end up with muffins that are dense and doughy.
When they have doubled, heat a dry electric griddle to 325F. Once preheated, place the rounds on the griddle and cook two minutes on the first side. Check to be sure the bottom is nicely golden and give the muffin a flip. If you wait too long to flip, the muffin will be dome shaped instead of flat. Cook another 5-7 minutes on the other side. Let cool briefly before splitting and toasting. Muffins can be frozen for up to six months.
Thursday, October 25, 2012
Cinnamon Belgian Waffles
Its no secret that I love breakfast food and I definitely have my favorite recipe for waffles. However, I'm always up for trying something new. In this case, I'm so glad I did. I might be adding cinnamon to waffles from here on out. We served this with maple syrup, fresh whipped cream and bananas. So delicious.

Cinnamon Belgian Waffles
Recipe from allrecipes.com
2 eggs, separated
1 tsp. vanilla extract
1 cup buttermilk
1/4 cup butter, melted
1 cup flour
1 1/2 tsp. baking powder
1/2 tsp. baking soda
1/2 Tbs. white sugar
1/4 tsp. salt
1 pinch ground cinnamon (add more if you prefer)
Preheat your waffle iron. In a medium bowl, whisk together the egg yolks, vanilla, buttermilk, and butter until well blended. Whisk in all dry ingredients- don't overmix. In a separate bowl, beat the egg whites with a mixer until stiff. Fold gently into the waffle batter. Cook batter in waffle maker until steam subsides. This makes about 3 large waffles- so if you are cooking for a crowd, I would definitely double the recipe.
Saturday, September 8, 2012
Healthy Banana Blueberry Muffins
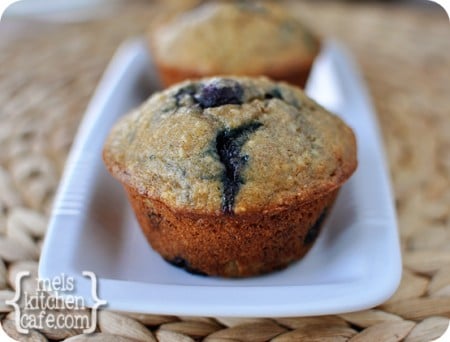
I pinned this as soon as I saw it on Mel's Kitchen Cafe (my fave cooking blog) because it looked so yummy and healthy too! I'm not a big muffin person- I'd rather have a cupcake! But, these looked justifiable. So, this morning, I had some bananas that were getting brown so I whipped up a quick batch. And, they were SO good! And, I felt okay about eating them for breakfast because they were 100% whole wheat!
Healthy Banana Blueberry Muffins
*Note: You can sub the equivalent amount of wheat germ for the oats, if you like. Also, I prefer white whole wheat to red whole wheat due to it’s lightness, but either kind of whole wheat flour can be used here.
*Makes 12 muffins
INGREDIENTS:
1/4 cup (4 tablespoons) butter, room temperature
1/4 cup plain yogurt
1/3 cup granulated sugar
1/3 cup packed light brown sugar
2 large eggs
1 3/4 cups whole wheat flour
1/4 cups quick or regular oats
1 teaspoon baking soda
1/2 teaspoon salt
2 ripe bananas, lightly mashed
1/3 cup milk
1 teaspoon vanilla extract
1 cup frozen blueberries
2 teaspoons flour
DIRECTIONS:
Preheat the oven to 375 degrees F. Lightly grease a 12-cup muffin tin with cooking spray. Set aside.
In a large bowl (or the bowl of an electric stand mixer), beat together the butter, yogurt and sugars until the mixture is light and fluffy. Add the eggs and beat well. In a blender or food processor, process the oats until they are finely ground. Add the wheat flour, baking soda and salt and pulse one or two times until the dry ingredients are lightly combined. Pour the dry mixture into the wet mixture and mix until just combined. Mix in the lightly mashed bananas. Stir in the milk and vanilla. Toss the blueberries with the 2 teaspoons flour and then gently fold them into the muffin batter. Divide the batter evenly among the 12 muffin cups. Bake for 20-22 minutes or until a toothpick inserted in the center comes out clean (watch the muffins carefully since each oven may vary slightly in temperature affecting exact baking time). Let the muffins rest in the pan for about 5 minutes and then turn out onto a wire rack to cool completely.
Tuesday, September 4, 2012
Bell Green Smoothie
I've had a few requests for our family's "green" smoothie. We have been eating this EVERY SINGLE morning for months and months and months and I can honestly say it's expanded my children's palates and also given me more energy during the day. Even Eloise loves it! By the way, it's not always green-colored. It's often a brownish-purplish-greenish hue. Oh, and this isn't an exact science- the measurements are very estimated! So, here it is:
Bell Green Smoothie
serves 5
2 c spinach leaves
3/4 c kale
1/2 to 3/4 c carrots
1 tomato
2 Tbl ground flaxseed
1/2 c water (or a little less)
Blend all ingredients on high until very blended. Then add:
1 1/2 bananas (not too ripe- it makes it very yucky)
1/2 peach
1 to 1 1/2 c frozen strawberries
1 to 1 1/2 c frozen tropical fruit OR frozen berries (we alternate every other day)
I usually pile all the frozen fruit on a plate and microwave it for about a minute and a half until only slightly thawed (this makes is easier/faster to drink b/c it's not as thick and cold). Add all the fruit to the veggie mixture and blend on high until well blended. Enjoy!!!
Bell Green Smoothie
serves 5
2 c spinach leaves
3/4 c kale
1/2 to 3/4 c carrots
1 tomato
2 Tbl ground flaxseed
1/2 c water (or a little less)
Blend all ingredients on high until very blended. Then add:
1 1/2 bananas (not too ripe- it makes it very yucky)
1/2 peach
1 to 1 1/2 c frozen strawberries
1 to 1 1/2 c frozen tropical fruit OR frozen berries (we alternate every other day)
I usually pile all the frozen fruit on a plate and microwave it for about a minute and a half until only slightly thawed (this makes is easier/faster to drink b/c it's not as thick and cold). Add all the fruit to the veggie mixture and blend on high until well blended. Enjoy!!!
Tuesday, July 31, 2012
Favorite Buttermilk Syrup
This is just a slightly different recipe from the other Buttermilk syrup on this blog, but I think I like it a little bit better. The other one sometimes doesn't work out for me. If you have that problem, too, give this one a try!

1 stick butter
1 stick butter
1 1/2 cups sugar
3/4 cup buttermilk
2 Tbs corn syrup
1 tsp vanilla
1 tsp baking soda
Melt butter in a 4 qt pot over stove, add other ingredients except baking soda. Turn on medium high and bring to a bubble of a boil, then add soda. Remove from heat.
Tuesday, May 29, 2012
Green Smoothie
 |
| photo from lindawagner.net |
Never thought I would be a morning smoothie girl but this is my new favorite go-to breakfast. I like to add about a teaspoon or orange juice concentrate...
Green Smoothie
From lindawagner.net
This recipe is super simple. All you need is a blender and the following ingredients:
§ 1-2 bananas
§ 1/2 cup frozen peaches
§ 1/2 cup frozen mango
§ a couple handfuls of spinach
§ water
§ ice (if desired)
Add enough water to blend and enjoy, that’s it! Forget the dehydrating morning latte and get the glow with a Green Smoothie instead.
Friday, May 4, 2012
Strawberry (or Raspberry) Cupcakes
 |
| photo from realmomkitchen.com |
Strawberry Cupcakes
Recipe from realmomkitchen.com
Cupcakes:
- 1 white cake mix
- 1 (3 oz) box of strawberry gelatin
- 2/3 cup canola oil
- 1/2 cup of frozen sliced strawberries in syrup, thawed
- 1/2 cup water
- 4 eggs
- 2/3 cup frozen sliced strawberries in syrup, thawed
- 1 1/2 cups butter, softened
- 6 cups powdered sugar
- Preheat oven to 350 degrees and line muffin tins with 24 cupcake liners.
- In the bowl of a stand mixer, beat together the cake mix, gelatin, oil, 1/2 cup of the strawberries, and water until combined. Then beat in the eggs 1 at a time until well incorporated.
- Fill cupcake liners 2/3 of the way full with batter, do not over fill. If you have extra batter then make a couple more cupcakes because if you over fill the liners the cupcakes will spill over the edges and you will have more of a flat top cupcake.
- Bake at 350 for about 16 minutes until a toothpick inserted into the center of a cupcake comes out clean. Allow to cool.
- Place the 2/3 cup of strawberries into a blender and puree. Place the butter in a bowl and using a mixer beat until smooth.
- Add half the powdered sugar to the butter and beat until all combined and fluffy. Then beat in the strawberry puree until well blended.
- Beat in the remaining powdered sugar until combined and fluffy. Pipe frosting onto cooled cupcakes.
Sunday, April 1, 2012
Impossible Quiche
 Pic courtesy Google Images
I made this for Eloise's blessing brunch and people loved it! I've been making this for years and it's actually from Mom's recipe collection. I love it and it's so easy.
Impossible Quiche
Rosalee Byers
1 1/2 c milk
6 Tbl butter, softened (or you could really get by with less)
3 eggs
1/2 tsp salt
1/2 heaping cup of Bisquick or other quick mix
pepper to taste
any veggies, meat, cheese you like
Preheat oven to 350. Combine milk, butter, eggs, salt, and Bisquick in blender. Pour in to greased 10" pie pan or 8x10 casserole dish. Put any meat, veggies on top and poke it in with a fork. Put a thin layer of cheese and season with pepper. Bake for 45 minutes or until edges are slightly brown and middle is firm. Let stand for 10 min. to set.
Monday, March 12, 2012
Homemade Vanilla Granola
 |
| photo from favfamilyrecipes.com |
I am going all granola-ey! Okay, that was lame. I love making granola lately. This makes such a huge batch, it's really moist, and super tasty!
Homemade Vanilla Granola
Recipe from favfamilyrecipes.com
8 c. oats
2 c. sliced almonds
1 c. wheat germ
1 c. brown sugar
1 tsp. salt
1 tsp cinnamon
craisins or raisins, to taste (optional)
3/4 c. canola oil
1 c. honey
3 Tbsp. vanilla (use the real stuff if you have it-- it tastes much better)
Preheat oven to 300-degrees. Combine first 8 ingredients (dry ingredients) in a large bowl. In a saucepan combine oil, honey, and vanilla and bring to a boil. Let boil for 1 minute then pour over oat mixture. Mix until all ingredients are moistened. Divide and spread mixture over 2 large cookie sheets and bake at 300-degrees for 20-30 minutes. Remove from oven and leave on pans until the granola hardens (it may be a little chewy and that's ok.. if you prefer it not to be chewy at all, allow to dry completely). Break up granola and store in large Ziploc bags or containers. Serve plain, with yogurt, or with milk.
Recipe from favfamilyrecipes.com
8 c. oats
2 c. sliced almonds
1 c. wheat germ
1 c. brown sugar
1 tsp. salt
1 tsp cinnamon
craisins or raisins, to taste (optional)
3/4 c. canola oil
1 c. honey
3 Tbsp. vanilla (use the real stuff if you have it-- it tastes much better)
Preheat oven to 300-degrees. Combine first 8 ingredients (dry ingredients) in a large bowl. In a saucepan combine oil, honey, and vanilla and bring to a boil. Let boil for 1 minute then pour over oat mixture. Mix until all ingredients are moistened. Divide and spread mixture over 2 large cookie sheets and bake at 300-degrees for 20-30 minutes. Remove from oven and leave on pans until the granola hardens (it may be a little chewy and that's ok.. if you prefer it not to be chewy at all, allow to dry completely). Break up granola and store in large Ziploc bags or containers. Serve plain, with yogurt, or with milk.
Friday, March 9, 2012
Breakfast Pockets
 |
| photo from budgetgourmetmom.com |
Breakfast Pockets
Recipe from budgetgourmetmom.com
Dough
§ 1 1/2 tblsp yeast
§ 1/2 c warm water (110 degrees)
§ 3/4 c evaporated milk (110 degrees)
§ 1/2 c vegetable oil
§ 1/4 c sugar
§ 1 egg
§ 1 tsp salt
§ 3 1/2 c flour
In a bowl, dissolve yeast in the water. Add milk, oil, sugar, egg, salt, and 2 cups flour; beat until smooth. Add enough flour until it makes a soft dough but do not knead. Cover and let rise in a warm place until doubled, about 1 hour.
Once the dough is done, punch down. Cut into 16 equal pieces. Roll each piece into 7 in circle on a floured surface. Top with 1/3 c filling, fold, and pinch shut. Bake in a 350 degree oven for 15-20 minutes.
Filling
§ 1 lb bulk sausage
§ 1/2 c onion, chopped
§ 1 1/2 c frozen hashbrown potatoes, thawed
§ 7 large eggs
§ 3 tblsp milk
§ 1/2 tsp salt
§ 1/2 tsp pepper
§ 1/2 tsp garlic salt
§ pinch of cayenne pepper
§ 2 c cheddar cheese, shredded
Cook the sausage and onion over medium heat until browned. Drain. Add the hashbrowns, eggs, milk, and spices. Cook and stir until set. Sprinkle with cheese and keep warm.
To Freeze:
Allow to cool on the baking sheet. Once cooled, place in the freezer until frozen. Store in a ziploc bag in the freezer for 3-6 months. To reheat, place on a paper towel and microwave for 1 1/2-2 minutes.
Allow to cool on the baking sheet. Once cooled, place in the freezer until frozen. Store in a ziploc bag in the freezer for 3-6 months. To reheat, place on a paper towel and microwave for 1 1/2-2 minutes.
Tuesday, March 6, 2012
Apple Fritter Muffins

 |
| photo from chasingsomebluesky.blogspot.com |
Apple Fritter Muffins
From chasingsomebluesky.blogspot.com
For the Apples:
2 large granny smith apples, 1/4 inch dice
3 tbsp butter
1/3 cup granulated sugar
2 large granny smith apples, 1/4 inch dice
3 tbsp butter
1/3 cup granulated sugar
2 tsp cinnamon
2 tbsp water
1/3 cup flour
For the Muffins:
2 large eggs
1/4 cup applesauce
1/4 cup canola oil
1 cup granulated sugar
1/3 cup brown sugar
1 tsp vanilla extract
2 1/3 cups all-purpose flour
2 large eggs
1/4 cup applesauce
1/4 cup canola oil
1 cup granulated sugar
1/3 cup brown sugar
1 tsp vanilla extract
2 1/3 cups all-purpose flour
1 1/2 tsp baking powder
1/2 tsp baking soda
3 tsp cinnamon
1/2 tsp salt
1 cup buttermilk
For the Glaze:
2 tbsp butter melted
1 cup confectioners sugar
1 tsp vanilla
1 tbsp hot water
Directions:
1/2 tsp baking soda
3 tsp cinnamon
1/2 tsp salt
1 cup buttermilk
For the Glaze:
2 tbsp butter melted
1 cup confectioners sugar
1 tsp vanilla
1 tbsp hot water
Directions:
1. Preheat oven to 400 degrees F.
2. Line 14 muffin cups with muffin liners
3. In a skillet add add apple ingredients except flour and cook over medium heat until apples are tender, about 10 minutes. Stir in flour to coat apples (this prevents apples from sinking to bottom of muffins)
4. In a medium bowl whisk together flour, baking powder, baking soda and salt.
5. In a large bowl beat together applesauce, oil, and sugars till smooth. Beat in eggs, one at a time. Add vanilla and mix thouroughly
6. Stir the flour into the butter mixture alternately with the buttermilk, beginning and ending with the flour and making sure everything is thoroughly combined.
7. Spoon batter into cups, filling the cups, and smooth tops. Divide batter equally among prepared muffin cups. Bake until muffin tops are a pale golden and springy to the touch, 15 to 17 minutes, rotating halfway through baking time.
8. Cool muffins in pan for 5 minutes, then transfer to wire rack and cool 10 minutes before glazing.
9. To make the glaze, In a medium bowl mix together the melted butter, confectioners sugar, vanilla and water. Whisk until smooth.
10. When muffins have cooled slightly, dip the muffin top into the glaze and allow the glaze to harden. Once hardened, dip a second time and allow to harden before serving.
Subscribe to:
Posts (Atom)